
1. Úvod
This manual provides detailed instructions for the installation, operation, and maintenance of your Titanium ED8432H5-D 32-Channel 5MP Digital Video Recorder (DVR). Please read this manual thoroughly before using the product to ensure proper setup and functionality. Keep this manual for future reference.
2. Konec produktuview
2.1 Klíčové vlastnosti
- 32-Channel Hybrid Input: Accepts 32 analog (TVI/AHD/CVI) signals and supports additional IP video integration.
- Four SATA Bays: Offers 4 × SATA slots (each up to 10 TB), allowing high-capacity on-board recording.
- H.265 High Profile Komprese: Reduces storage and bandwidth demands while maintaining video quality.
- Pentaplex Operation: Simultaneously supports preview, recording, playback, backup, and remote access without performance degradation.
- PTZ & Mobile Monitoring: Supports up to 255 PTZ presets and 8 auto-cruise routes; mobile apps (iOS/Android) allow remote monitoring and QR-code device linking.
2.2 Obsah balení
Po vybalení ověřte, zda jsou všechny položky přítomny a v dobrém stavu.
- Titanium ED8432H5-D DVR Unit
- Napájecí adaptér
- USB myš
- Kabely SATA (pro instalaci HDD)
- Montážní šrouby (pro instalaci pevného disku)
- Rychlý průvodce
2.3 Přední panel
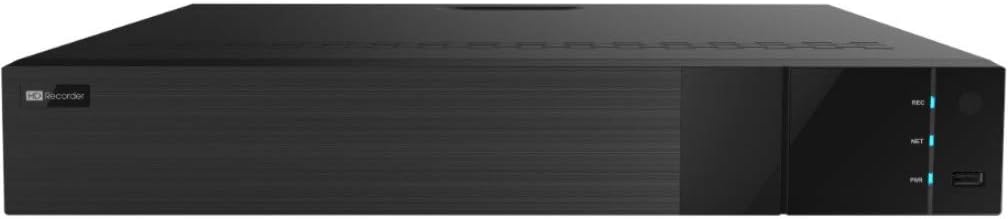
Obrázek 1: Přední view of the Titanium ED8432H5-D DVR. The front panel features LED indicators for power (PWR), network (NET), and hard drive activity (HDD), along with a USB port for mouse or backup devices.
2.4 Zadní panel

Obrázek 2: Zadní view of the Titanium ED8432H5-D DVR. This panel includes 32 BNC video input ports, RCA audio inputs/output, VGA and HDMI video outputs, Ethernet port, USB ports, RS485 terminal, and the power input with an on/off switch.
3. Nastavení
3.1 Instalace hardwaru
- Instalace pevného disku:
The DVR does not include a pre-installed hard drive. To install, open the DVR casing by removing the screws on the rear and sides. Connect the SATA data and power cables to the hard drive(s) and the corresponding ports on the DVR motherboard. Secure the hard drive(s) using the provided screws. Close the casing.
- Připojení kamer:
Connect your TVI/AHD/CVI cameras to the BNC video input ports on the rear panel. Ensure secure connections.
- Připojení monitoru:
Připojte monitor k DVR pomocí portu HDMI nebo VGA.
- Připojení myši:
Zapojte myš USB do jednoho z portů USB na předním nebo zadním panelu.
- Připojení k síti (volitelné):
For remote access and network features, connect an Ethernet cable from the DVR's LAN port to your router or network switch.
- Zapnutí:
Connect the power adapter to the DVR and a power outlet. Flip the power switch on the rear panel to the 'ON' position. The DVR will boot up.
3.2 Počáteční konfigurace
Upon the first boot, the DVR will guide you through an initial setup wizard. This typically includes:
- Vytvoření hesla: Set a strong password for the administrator account. This is crucial for security.
- Nastavení data a času: Configure the correct date, time, and time zone.
- Nastavení sítě: Configure IP address settings (DHCP recommended for most home networks).
- Hard Drive Formatting: The system will prompt you to format the newly installed hard drive(s). This step is necessary for recording.
4. Návod k obsluze
4.1 Živě View
Po přihlášení se na DVR zobrazí živý záznam. view of all connected cameras. You can switch between different display layouts (e.g., 1-channel, 4-channel, 9-channel, 16-channel, 32-channel) by right-clicking on the screen and selecting the desired layout or using the toolbar icons.
4.2 Nahrávání
- Ruční nahrávání: Klikněte na ikonu nahrávání v živém vysílání view interface to start/stop recording for a specific channel.
- Plánované nahrávání: Access the "Record" menu in the main settings to set up continuous, motion-detection, or alarm-triggered recording schedules for each camera.
- Detekce pohybu: Configure motion detection zones and sensitivity for each camera to trigger recording only when activity is detected.
4.3 Přehrávání
Na review zaznamenané footage:
- V hlavní nabídce vyberte možnost „Přehrávání“.
- Choose the desired date and camera channel(s).
- The timeline will display recorded segments. Drag the playback marker or use the control buttons (play, pause, fast forward, rewind) to navigate through the footage.
4.4 Remote Access and Mobile Monitoring
The Titanium ED8432H5-D supports remote viewing via dedicated mobile applications (available for iOS and Android devices) and web browsers. Download the official app from your device's app store. Use the QR code linking feature (usually found in the DVR's network settings) to quickly add your device to the mobile app.
4.5 Ovládání PTZ
If you have PTZ (Pan-Tilt-Zoom) cameras connected, you can control them directly from the DVR interface. In live view, select the PTZ camera and use the on-screen PTZ controls to adjust its direction and zoom. The DVR supports up to 255 PTZ presets and 8 auto-cruise routes for automated surveillance.
5. Údržba
5.1 Správa pevných disků
Regularly check the status of your hard drives in the DVR's storage settings. Ensure they are functioning correctly. The DVR is configured to overwrite the oldest footage when the hard drive is full, ensuring continuous recording. You can adjust this setting if needed.
5.2 aktualizací firmwaru
Pravidelně kontrolujte informace od výrobce website for firmware updates. Firmware updates can improve performance, add new features, and address security vulnerabilities. Follow the provided instructions carefully when performing a firmware update to avoid damaging the device.
5.3 Čištění
Keep the DVR unit clean and free from dust. Use a soft, dry cloth to wipe the exterior. Ensure ventilation openings are not blocked to prevent overheating. Do not use liquid cleaners directly on the unit.
6. Řešení problémů
| Problém | Možná příčina | Řešení |
|---|---|---|
| Na monitoru se nezobrazuje video. | Uvolněný video kabel, na monitoru vybrán nesprávný vstup, DVR není zapnutý. | Zkontrolujte připojení kabelů HDMI/VGA. Ujistěte se, že je monitor nastaven na správný vstupní zdroj. Zkontrolujte napájení DVR. |
| Žádný obraz z kamery. | Camera not powered, loose BNC connection, incompatible camera type. | Check camera power supply. Secure BNC cable. Ensure camera is TVI/AHD/CVI compatible and configured correctly in DVR settings. |
| Nelze vzdáleně přistupovat k DVR. | Network cable disconnected, incorrect network settings, firewall blocking. | Verify Ethernet cable connection. Check DVR network settings (IP address, gateway, DNS). Ensure router port forwarding is configured if not using P2P. |
| Zapomenuté heslo. | Ztracené nebo zapomenuté heslo. | Refer to the manufacturer's support for password reset procedures. This often involves a specific reset tool or contacting technical support with device details. |
| Žádný záznam. | Pevný disk není nainstalován/naformátován, plán nahrávání není nastaven, pevný disk je plný. | Install and format hard drive(s). Configure recording schedules. Check hard drive status and capacity. |
7. Specifikace
| Číslo modelu | ED8432H5-D |
| Kanály | 32 (TVI/AHD/CVI) + IP Camera Support |
| Komprese videa | H.265 |
| Video vstup | 32 BNC (TVI/AHD/CVI) |
| Audio vstup/výstup | 16 RCA vstup / 1 RCA výstup |
| Video výstup | hdmi, vga |
| USB porty | 2 |
| Síťové rozhraní | Ethernet (RJ45) |
| Skladování | 4 SATA bays, up to 10 TB each (Hard drives not included) |
| Operační systém | Vestavěný Linux |
| Rozměry (D x Š x V) | 17.32 cm x 15.35 cm x 2.76 cm |
| Dodržování | Vyhovuje NDAA |
8. Záruka a podpora
For warranty information, technical support, or service inquiries, please refer to the warranty card included with your product or visit the official Titanium webUschovejte si účtenku jako doklad o koupi pro případ reklamace.
Výrobce: Titan
Model: ED8432H5-D