
1. Úvod
This manual provides comprehensive instructions for the setup, operation, maintenance, and troubleshooting of your Easytry123 Universal Remote Control. This remote is designed as a replacement for various Optoma DLP 3D Projector models, ensuring seamless control over your device.
Compatible Optoma Projector Models include: TW635-3D, DW326, S311, W311, W501, WX31, X302, X303, X31, X501, W556-3D, DS339, DX339, DW339, TX635-3D.
2. Konec produktuview
2.1 Rozložení dálkového ovladače

Obrázek: Přední strana view of the remote control, displaying all buttons and their labels. Key buttons include Power, Source, Menu, Volume, Keystone, Zoom, and input selections like HDMI1, HDMI2, VGA1, VGA2, Video, 3D.
2.2 Funkce tlačítek
- Moc: Slouží k zapnutí nebo vypnutí projektoru.
- Zdroj: Cycles through available input sources (e.g., HDMI, VGA, Video).
- Menu: Opens the projector's on-screen display (OSD) menu.
- Navigation (Up, Down, Left, Right, Enter): Používá se k navigaci v menu a potvrzování výběrů.
- Hlasitost (+/-): Nastavuje výstupní úroveň zvuku.
- Page (+/-): Used for presentation control or specific menu navigation.
- Základní kameny: Adjusts the image's vertical keystone correction.
- Zoom (+/-): Adjusts the digital zoom level of the projected image.
- Input Selectors (HDMI1, HDMI2, VGA1, VGA2, Video, 3D): Directly selects the corresponding input source or activates 3D mode.
- Zmrazit: Pauses the current image display.
- AV Mute: Temporarily mutes audio and blanks the screen.
- Re-Sync: Resynchronizes the input signal.
- Přepínač: Toggles between different display modes or functions.
- Brightness (+/-): Upravuje jas obrazu.
3. Nastavení
3.1 Instalace baterie
Dálkový ovladač vyžaduje k provozu dvě baterie AAA (nejsou součástí balení). Pro instalaci baterií postupujte takto:
- Najděte přihrádku na baterie na zadní straně dálkového ovladače.
- Stiskněte západku a posuňte kryt přihrádky na baterie dolů, abyste jej sejměli.
- Vložte dvě baterie typu AAA a ujistěte se, že kladný (+) a záporný (-) pól správně shodují s označením uvnitř přihrádky.
- Zasuňte kryt přihrádky na baterie zpět na místo, dokud bezpečně nezacvakne.

Obrázek: Zadní view of the remote control, highlighting the battery compartment cover at the bottom.
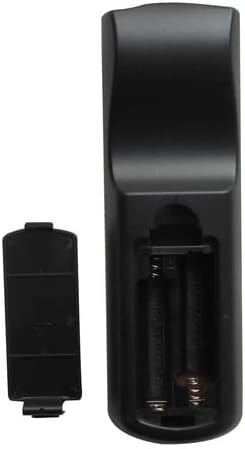
Image: The remote control's battery compartment with the cover removed, revealing two empty slots for AAA batteries and the positive/negative terminals.

Obrázek: Úhlové view of the remote control with the battery cover detached, illustrating the correct orientation for inserting AAA batteries into the compartment.
4. Návod k obsluze
Point the remote control directly at the projector's IR receiver for optimal performance.
4.1 Zapnutí/vypnutí
Stiskněte tlačítko Moc button once to turn the projector on. Press it again to turn the projector off. Confirm any power-off prompts on the projector screen if applicable.
4.2 Výběr vstupního zdroje
Stiskněte tlačítko Zdroj button repeatedly to cycle through available input sources (e.g., HDMI1, HDMI2, VGA1, VGA2, Video). Alternatively, use the dedicated input buttons (e.g., HDMI1, VGA1) for direct selection.
4.3 Nastavení hlasitosti
Použijte Hlasitost + button to increase the audio volume and the Hlasitost - tlačítko pro jeho snížení.
4.4 Navigace v nabídkách
Stiskněte tlačítko Menu button to open the projector's on-screen display (OSD). Use the Nahoru dolu vlevo vpravo arrow buttons to navigate through menu options. Press Vstupte to confirm a selection or access a sub-menu. Press Menu znovu pro ukončení OSD.
4.5 Korekce lichoběžníkového zkreslení
Použijte Keystone buttons to correct trapezoidal distortion in the projected image, ensuring a rectangular display.
4.6 Funkce zoom
Stiskněte tlačítko Zoom + button to digitally enlarge the image or Lupa - to reduce it.
4.7 3D Mode Activation
If your projector and content support 3D, press the 3D button to activate or deactivate 3D display mode.
5. Údržba
5.1 Čištění dálkového ovladače
Pro čištění dálkového ovladače jemně otřete jeho povrch měkkým, suchým hadříkem. V případě odolných nečistot lehceamphadřík vodou. Nepoužívejte agresivní chemikálie ani abrazivní čisticí prostředky, protože by mohly poškodit povrchovou úpravu dálkového ovladače nebo vnitřní součásti.
5.2 Výměna baterie
Replace batteries when the remote's response becomes sluggish or stops functioning. Always replace both batteries simultaneously with new AAA batteries. Do not mix old and new batteries, or different types of batteries. Dispose of used batteries responsibly according to local regulations.
6. Řešení problémů
- Dálkové ovládání nereaguje:
- Ujistěte se, že jsou správně vloženy nové baterie AAA.
- Zkontrolujte, zda se mezi dálkovým ovladačem a infračerveným přijímačem projektoru nenacházejí nějaké překážky.
- Ověřte, zda se nacházíte v dosahu infračerveného přijímače projektoru.
- Omezená funkčnost:
- While this remote is compatible with listed Optoma models, some advanced or specific functions of your original projector remote may not be replicated. Refer to your projector's original manual for specific features.
- Ensure the projector is powered on and not in a standby mode that restricts remote commands.
7. Specifikace
- Zdroj napájení: 2 x AAA baterie (nejsou součástí balení)
- Technologie připojení: Infračervený (IR)
- Kompatibilní zařízení: Optoma DLP 3D Projectors (specific models listed in Introduction)
- Maximální počet podporovaných zařízení: 1 (dedicated to the paired projector)
8. Záruka a podpora
For any issues not covered in this manual or for further assistance, please contact the manufacturer, Easytry123, through your purchase platform. Keep your purchase receipt as proof of purchase for any warranty claims.