1. Úvod
This manual provides essential information for the safe and effective operation of your Metravi XB-30 Fully-protected Digital Multimeter. The XB-30 is a versatile tool designed for measuring DC/AC voltage, DC current, resistance, and performing diode and continuity tests. It features a 1999-count backlit LCD display and overload protection up to 500V DC/AC RMS.
Please read this manual thoroughly before using the device to ensure proper handling and to prevent potential hazards.
2. Bezpečnostní informace
Always adhere to the following safety precautions when using the Metravi XB-30 Digital Multimeter:
- Ochrana proti přetížení: The device features overload protection of 500V DC/AC RMS. Do not exceed this rating.
- Hodnocení kategorie: This multimeter conforms to CE, CAT-III 600V, and IEC 1010-1 standards. CAT-III is for measurements performed in the building installation at the distribution level.
- Před použitím zkontrolujte: Before each use, inspect the meter and test leads for any damage. Do not use if damaged.
- Proper Terminal Connection: Ensure test leads are connected to the correct input terminals for the desired measurement.
- svtage Povědomí: Při práci s objemem buďte velmi opatrní.tagnad 30 V AC RMS, 42 V peak nebo 60 V DC. Tyto objemytages představují nebezpečí úrazu elektrickým proudem.
- Do Not Operate in Explosive Environments: Do not use the meter in the presence of explosive gas, vapor, or dust.
- Výměna baterie: Pro zajištění přesných údajů vyměňte baterie ihned po zobrazení indikátoru slabé baterie.
3. Konec produktuview
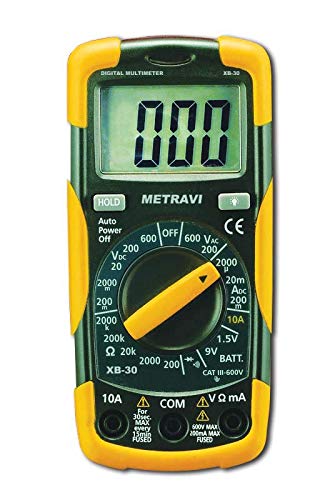
The Metravi XB-30 Digital Multimeter is designed for ease of use and durability. Key components include the LCD display, rotary function switch, and input terminals.

Obrázek 3.1: Přední view of the Metravi XB-30 Digital Multimeter with test leads connected. The display shows '000', and the rotary switch is set to the OFF position. The input terminals for COM, VΩmA, and 10A are visible at the bottom.
3.1. Displej
The 1999 (3 ½) count, 15mm backlit LCD provides clear digital readings. Indicators for units (V, A, Ω), polarity, low battery, and data hold will appear on the display.
3.2. Otočný přepínač funkcí
This switch is used to select the desired measurement function and range. Ensure it clicks firmly into position for accurate operation.
3.3. Vstupní svorky
- COM: Společná svorka pro všechna měření (černý měřicí kabel).
- VΩmA: Vstupní svorka pro objtage, resistance, and current up to 200mA (red test lead).
- 10A: Input terminal for high current measurements up to 10A (red test lead).
4. Nastavení
4.1. Instalace baterie
The Metravi XB-30 requires one 9V battery (included). Follow these steps to install or replace the battery:
- Ensure the multimeter is turned OFF and disconnect all test leads from any circuits.
- Vyhledejte kryt přihrádky na baterie na zadní straně jednotky.
- Odšroubujte upevňovací šroub(y) a opatrně sejměte kryt.
- Připojte 9V baterii k bateriové svorkě a dbejte na správnou polaritu.
- Vložte baterii do přihrádky a nasaďte kryt, který zajistíte šroubem (šrouby).

Obrázek 4.1: Zadní view of the Metravi XB-30 Digital Multimeter with the battery compartment open, showing the 9V battery slot and a GP Supercell 9V battery.
The multimeter features an Auto Power Off function to conserve battery life. It will automatically power off after a period of inactivity.
5. Návod k obsluze
Before making any measurement, ensure the test leads are correctly inserted into the appropriate input terminals and the rotary switch is set to the desired function and range.
5.1. DC svtage Measurement (0-200mV/2V/20V/200V/600V)
- Insert the red test lead into the VΩmA terminal and the black test lead into the COM terminal.
- Nastavte otočný přepínač na požadovanou hlasitost DCtage (V=) range (e.g., 20V for measuring up to 20V). If the voltage is unknown, start with the highest range (600V) and decrease as needed.
- Připojte měřicí sondy k měřené součástce nebo obvodu.
- Přečtěte si svtage value on the display. Observe polarity if indicated.
5.2. AC svtage Measurement (0-200V/600V)
- Insert the red test lead into the VΩmA terminal and the black test lead into the COM terminal.
- Nastavte otočný přepínač na požadovanou hlasitost střídavého proudutage (V~) range (e.g., 200V or 600V).
- Připojte měřicí sondy k vodiči AC volt.tage zdroj.
- Přečtěte si svtage hodnota na displeji.
5.3. DC Current Measurement (0-2000µA/20mA/200mA/10A)
Pozor: Nikdy nezapojujte multimetr paralelně s napětím.tagPři měření proudu se ujistěte, že je zdroj e. Vždy zapojujte sériově se zátěží.
- For currents up to 200mA, insert the red test lead into the VΩmA terminal. For currents up to 10A, insert the red test lead into the 10A terminal. The black test lead always goes into the COM terminal.
- Set the rotary switch to the appropriate DC Current (A=) range (e.g., 20mA, 200mA, or 10A).
- Otevřete obvod, kde má být měřen proud, a zapojte multimetr sériově.
- Odečtěte aktuální hodnotu na displeji.
5.4. Resistance Measurement (0-200Ω/2KΩ/20KΩ/200KΩ/2MΩ)
Pozor: Před měřením odporu se ujistěte, že je obvod bez napětí a všechny kondenzátory jsou vybité.
- Insert the red test lead into the VΩmA terminal and the black test lead into the COM terminal.
- Set the rotary switch to the desired Resistance (Ω) range.
- Připojte měřicí sondy k rezistoru nebo součástce.
- Odečtěte hodnotu odporu na displeji.
5.5. Test diod
- Insert the red test lead into the VΩmA terminal and the black test lead into the COM terminal.
- Set the rotary switch to the Diode Test symbol (→|).
- Připojte červenou sondu k anodě a černou sondu ke katodě diody. Přímý proudtagZobrazí se pokles (obvykle 0.5 V až 0.8 V pro křemíkové diody).
- Prohoďte sondy. Na displeji by se mělo zobrazit „OL“ (otevřená smyčka), pokud je dioda v pořádku.
5.6. Test kontinuity
- Insert the red test lead into the VΩmA terminal and the black test lead into the COM terminal.
- Set the rotary switch to the Continuity Test symbol ()))).
- Připojte měřicí sondy k obvodu nebo součástce.
- If continuity exists (resistance below a certain threshold), the buzzer will sound, and the display will show a low resistance value. "OL" indicates an open circuit.
5.7. Test baterie (9V/1.5V)
This function allows for quick testing of 9V and 1.5V batteries under a light load.
- Insert the red test lead into the VΩmA terminal and the black test lead into the COM terminal.
- Set the rotary switch to the "9V BATT." or "1.5V BATT." position.
- Připojte červenou sondu ke kladnému pólu a černou sondu k zápornému pólu baterie.
- Přečtěte si svtage value on the display. A reading significantly below the nominal voltage indicates a weak or discharged battery.
Obrázek 5.1: The Metravi XB-30 Digital Multimeter with test leads connected to a 9V battery, demonstrating the battery test function. The display shows a voltage čtení.
5.8. Funkce uchování dat
Stiskněte tlačítko „HOLD“ pro zmrazení aktuální hodnoty na displeji. Dalším stisknutím zrušíte pozastavení a obnovíte živé hodnoty.
6. Údržba
6.1. Čištění
Otřete měřič casing s reklamouamp hadříkem a jemným čisticím prostředkem. Nepoužívejte abrazivní prostředky ani rozpouštědla. Před použitím se ujistěte, že je měřič zcela suchý.
6.2. Výměna baterie
Refer to Section 4.1 for detailed instructions on battery installation and replacement. Always use a fresh 9V battery when the low battery indicator appears on the display.
7. Řešení problémů
Pokud multimetr nefunguje správně, zvažte následující běžné problémy:
- Žádný displej/slabý displej: Zkontrolujte baterii. V případě potřeby ji vyměňte.
- „OL“ na displeji: This typically indicates an over-range condition (measurement exceeds the selected range) or an open circuit (e.g., during continuity or resistance tests). Select a higher range or check the circuit connection.
- Nesprávné čtení:
- Ensure test leads are securely connected to the correct input terminals.
- Ověřte, zda je otočný přepínač nastaven na správnou funkci a rozsah.
- Check the battery level. Low battery can affect accuracy.
- Žádný pípnutí kontinuity: Ensure the rotary switch is set to the continuity function and the circuit is not open.
If problems persist, contact customer support as detailed in Section 9.
8. Specifikace
| Funkce | Specifikace |
|---|---|
| Zobrazit | 1999 (3 ½) Count, 15mm Backlit LCD |
| Ochrana proti přetížení | 500V DC/AC RMS |
| DC svtage Rozsahy | 0-200mV, 2V, 20V, 200V, 600V |
| AC svtage Rozsahy | 0-200V, 600V |
| Rozsahy stejnosměrného proudu | 0-2000µA, 20mA, 200mA, 10A |
| Rozsahy odporu | 0-200Ω, 2KΩ, 20KΩ, 200KΩ, 2MΩ |
| Test baterie | 9V, 1.5V |
| Test diod | Ano |
| Test kontinuity | Ano (s bzučákem) |
| Data Hold | Ano |
| Automatické vypnutí | Ano |
| Shoda s bezpečností | CE, CAT-III 600V, IEC 1010-1 |
| Zdroj napájení | 1 x 9V baterie (součástí balení) |
| Rozměry (D x Š x V) | 15 x 7 x 4.8 centimetrů |
| Hmotnost položky | 500 g |
9. Záruka a podpora
Metravi Instruments provides a 1-year warranty against manufacturing defects for the XB-30 Digital Multimeter.

Obrázek 9.1: Metravi warranty and contact information, indicating a 1-year warranty against manufacturing defects and contact details for support.
9.1. Zákaznická podpora
For usage issues, product issues, replacements, or warranty claims, please contact Metravi customer support:
- E-mail: online_sales@metravi.com
- SMS / WhatsApp: 9073384641
Please have your product model number (XB-30) and purchase details ready when contacting support.