
LUX P111
Návod k obsluze neprogramovatelného termostatu Lux Pro model P111
Your guide to simple and efficient home climate control.
Konec produktuview
The Lux Pro Model P111 is a non-programmable thermostat designed for straightforward and reliable temperature control in your home. It offers essential features for managing your heating and cooling systems with ease.

Figure 1: Lux Pro P111 Non-Programmable Thermostat. This image displays the front view of the thermostat, showing its LCD screen, fan and system mode switches, and temperature adjustment buttons.
- Snadná instalace: Designed for simple setup with clear instructions.
- Neprogramovatelný provoz: Provides direct temperature control without complex scheduling.
- Duální napájení: Operates on 2 AA alkaline batteries (included) or 24-volt system power.
- Podsvícený displej: Nabízí snadnoview backlight for clear temperature readings.
- Ochrana zařízení: Includes a selectable 5- or 2-minute time delay to safeguard your HVAC equipment.
- Adjustable Limits: Allows setting of heating and cooling temperature limits.
- Možnosti zobrazení teploty: Switch between Fahrenheit (℉) or Celsius (℃) display.

Figure 2: Key Features of Lux Pro P111 Thermostat. This graphic highlights features such as Keyboard Lockout, Adjustable Heating and Cooling Limits, Back-Lit Display, Dual Power, and a 5-Year Limited Warranty.
Kompatibilita systému
The Lux Pro P111 thermostat is designed for compatibility with various HVAC systems. Please review the following compatibility chart to ensure it meets your system requirements.

Figure 3: System Compatibility Chart. This chart details which heating and cooling systems are compatible (e.g., Gas/Oil/Electric Furnace, Heat Pump without Auxiliary Heat, 2-wire Hydronic, 750 Millivolt, Gas Fireplaces, Single Stage Cooling) and which are not (e.g., Heat Pump Multistage, Radiant Ceiling Heat, Electric Baseboards, 3-wire Hydronic, Multistage systems, Portable space heaters, Plug-in air conditioners).
Nastavení a instalace
Správná instalace je zásadní pro optimální výkon vašeho termostatu. Pokud si nejste jisti některými kroky, doporučujeme se poradit s kvalifikovaným technikem HVAC.
1. Požadavky na napájení
The P111 thermostat can be powered by two (2) AA alkaline batteries or by a 24-volt system. Batteries are included for convenience and reliable operation.
2. Schémata zapojení
Refer to the following diagrams for common wiring configurations. Ensure power to your HVAC system is turned off at the circuit breaker before beginning any wiring.
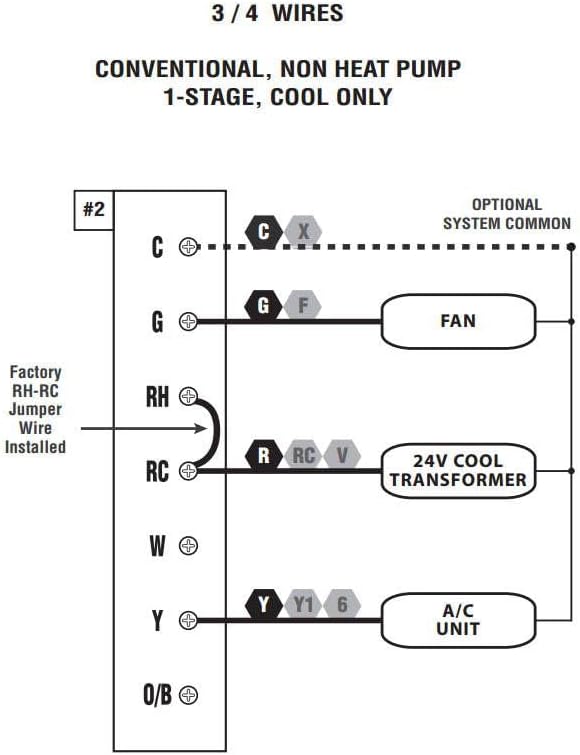
Figure 4: Wiring Diagram for 3/4 Wires. This diagram illustrates the wiring for a conventional, non-heat pump, 1-stage, cool-only system, showing connections for C (optional system common), G (FAN), RH (24V COOL TRANSFORMER), RC (24V COOL TRANSFORMER), and Y (A/C UNIT). A factory RH-RC jumper wire is installed.

Figure 5: Wiring Diagram for 4/5 Wires. This diagram shows the wiring for a conventional, non-heat pump, 1-stage tepla a 1-stage cool system, with connections for C (optional system common), G (FAN), RH (24V TRANSFORMER), RC (24V TRANSFORMER), W (HEATER), and Y (A/C UNIT). A factory RH-RC jumper wire is installed.

Figure 6: Wiring Diagram for 5/6 Wires. This diagram illustrates the wiring for a conventional, non-heat pump, 1-heat / 1-cool system with two transformers, showing connections for C (optional system common), G (FAN), RH (24V HEAT TRANSFORMER), RC (24V COOL TRANSFORMER), W (HEATER), and Y (A/C UNIT). The factory RH-RC jumper wire must be removed for this configuration.
3. Montáž
The thermostat is designed for wall mounting. Use the provided screws and wall anchors for secure installation. Ensure the thermostat is level for accurate temperature readings.
Návod k obsluze
The Lux Pro P111 thermostat features an intuitive control panel for easy operation.

Figure 7: Control Panel Diagram. This diagram labels the key components of the thermostat's front panel: Fan Mode Switch (Fan Auto/On), System Mode Switch (Heat/Off/Cool), LCD Display Screen, SET Button, and UP and DOWN Buttons.
1. Přepínač systémového režimu
- TEPLO: Aktivuje systém vytápění.
- OFF: Vypíná systémy vytápění i chlazení.
- CHLADNÝ: Aktivuje chladicí systém.
2. Fan Mode Switch
- AUTO: Ventilátor běží pouze tehdy, když je aktivně zapnuto topení nebo chlazení.
- NA: Ventilátor běží nepřetržitě, bez ohledu na to, zda je aktivní systém topení nebo chlazení.
3. Nastavení teploty
Použijte UP (▲) a DOLŮ (▼) buttons to set your desired temperature. The current temperature will be displayed prominently on the LCD screen.
4. Backlight Activation
Press any button to activate the backlight for improved visibility in low-light conditions. The backlight will automatically turn off after a short period of inactivity.
5. Temperature Display (Fahrenheit/Celsius)
The thermostat allows you to switch between Fahrenheit (℉) and Celsius (℃) temperature displays. Refer to the full instruction manual for specific steps on how to change this setting, typically found in the advanced settings menu.
6. Equipment Protection Time Delay
The thermostat features a selectable 5- or 2-minute time delay for equipment protection. This delay prevents short cycling of your heating and cooling system, which can extend the lifespan of your equipment. This setting is usually configured during initial setup or in advanced settings.
7. Blokování klávesnice
To prevent unauthorized adjustments, the thermostat includes a keypad lockout feature. Consult the detailed manual for instructions on how to activate and deactivate this function.
Údržba
1. Výměna baterie
When the battery indicator appears on the display, replace the two (2) AA alkaline batteries. Ensure proper polarity when inserting new batteries. The thermostat retains settings during battery replacement.
2. Čištění
Očistěte vnější povrch termostatu měkkým hadříkemamp hadříkem. Nepoužívejte abrazivní čisticí prostředky ani rozpouštědla, protože by mohly poškodit povrchovou úpravu nebo vnitřní součásti.
Odstraňování problémů
If you encounter issues with your Lux Pro P111 thermostat, consider the following common solutions:
- Žádný displej nebo indikátor slabé baterie: Replace the batteries with fresh AA alkaline batteries.
- Systém nereaguje (vytápění/chlazení):
- Check that the system mode switch is set to HEAT or COOL.
- Ensure the fan mode switch is set to AUTO or ON.
- Verify that the circuit breaker for your HVAC system is not tripped.
- Confirm that the wiring connections are secure and correct according to the installation diagrams.
- Allow for the equipment protection time delay (5 or 2 minutes) to elapse before the system activates.
- Nesprávný údaj teploty: Zajistěte, aby termostat nebyl vystaven přímému slunečnímu záření, průvanu nebo zdrojům tepla, které by mohly ovlivnit jeho senzor.
- Klávesnice nereaguje: Check if the keypad lockout feature is active. Refer to the manual for deactivation steps.
V případě přetrvávajících problémů si přečtěte kompletní uživatelskou příručku nebo kontaktujte zákaznickou podporu.
Specifikace
| Funkce | Detail |
|---|---|
| Značka | LUX |
| Název modelu | P111 |
| Rozměry produktu | 4"H x 7"Š x 7"V |
| Typ ovladače | Stiskněte tlačítko |
| Speciální funkce | Podsvícený displej, displej teploty |
| Barva | P111-white |
| Specifická použití | Klimatizace, tepelné čerpadlo |
| Typ řízení teploty | Manuál |
| Zahrnuté komponenty | Pro P111 Non-Programmable Thermostat; 1 Heat, 1 Cool |
| Zdroj napájení | Battery Powered (2 AA batteries required), 24V System Powered |
| Hmotnost položky | 1.6 unce |
| svtage | 24 voltů |
| Materiál | Plast |
| Typ montáže | Držák na zeď |
| Styl | Neprogramovatelné |
| Podsvícení | Ano |
| UPC | 021079141111 |
Záruka a podpora
Informace o záruce
The Lux Pro P111 thermostat comes with a 5letá omezená zárukaTato záruka se vztahuje na vady materiálu a zpracování při běžném používání. Uschovejte si prosím doklad o koupi pro případ uplatnění záruky.
Zákaznická podpora
For technical assistance, troubleshooting not covered in this manual, or warranty inquiries, please contact Lux customer support. Refer to the product packaging or the official Lux webstránky s nejaktuálnějšími kontaktními informacemi.
You can visit the official LUX Store for more information: Obchod LUX na Amazonu
Ask a question about this manual
Ask about setup, troubleshooting, compatibility, parts, safety, or missing instructions. Manuals+ will review the question and use this page’s manual context to help answer it.