Walfront REX-C100 (Walfrontgir981co7e)
Walfront REX-C100 Digital PID Temperature Controller User Manual
Model: REX-C100 (Item Model Number: Walfrontgir981co7e)
1. Úvod
This manual provides comprehensive instructions for the installation, operation, and maintenance of the Walfront REX-C100 Digital PID Temperature Controller. The REX-C100 is designed for precise temperature control in various industrial and scientific applications, offering high accuracy and stable performance.
Mezi klíčové vlastnosti patří:
- High precision PID control for fast response and minimal overshoot.
- Relay output for versatile control applications.
- Široký provozní objemtage range: 100-240V AC.
- Suitable for temperature measurement, thermostatic control, and alarm functions.
2. Bezpečnostní informace
Please read and understand all safety precautions before installing or operating this device. Failure to follow these instructions may result in electric shock, fire, or damage to the product.
- Elektrické nebezpečí: Ensure power is disconnected before wiring or performing any maintenance.
- Kvalifikovaný personál: Installation and wiring should only be performed by qualified electricians.
- Provozní prostředí: Do not operate the device in environments with corrosive gases or excessive humidity (30-85% RH, non-condensing).
- svtage Kompatibilita: Ověřte, že zásoba objtage matches the device's specifications (100-240V AC).
- Správné uzemnění: Ensure the device is properly grounded to prevent electrical shock.
3. Technické specifikace
| Parametr | Hodnota |
|---|---|
| Model | REX-C100 |
| Typ ovládání | Teplota |
| Režim ovládání | Relay and SSR |
| Provozní svtage | 100-240V AC |
| Přesnost měření | ± 0.5 % FS |
| Rezoluce | 14 bitů |
| Izolační síla | 1500V AC / 1 minuta |
| Hmotnost položky | 5.3 ounces (150g approx.) |
| Rozměry produktu | 3.94 x 1.57 x 3.94 palce (10 x 4 x 10 cm) |
| Barva | Černý |
| Materiál | Plast |
| Typ zobrazení | LED |
| Provozní prostředí | 0-50°C, 30-85% RH (non-corrosive gas) |
4. Konec produktuview
The REX-C100 temperature controller features a compact design with a clear LED display for process value (PV) and set value (SV). It includes control buttons for easy parameter adjustment and terminal blocks for electrical connections.

Obrázek 4.1: Úhlové view of the REX-C100 Digital PID Temperature Controller, highlighting its compact form factor and terminal block connections on the side.

Figure 4.2: Close-up of the REX-C100 front panel, showing the red LED display for Process Value (PV), green LED display for Set Value (SV), and control buttons (SET, left arrow, down arrow, up arrow).
4.1 Rozložení předního panelu
- PV Display (Red LED): Shows the current measured temperature (Process Value).
- SV Display (Green LED): Shows the desired set temperature (Set Value).
- Tlačítko SET: Používá se pro vstup do režimu nastavení parametrů a potvrzení výběru.
- Arrow Buttons (Left, Down, Up): Používá se k navigaci mezi parametry a úpravě hodnot.
- ALM1/ALM2 Indicators: Alarm status indicators.
- Indikátor OUT: Output status indicator.
- Indikátor AT: Auto-tuning status indicator.
4.2 Rear Terminal Connections
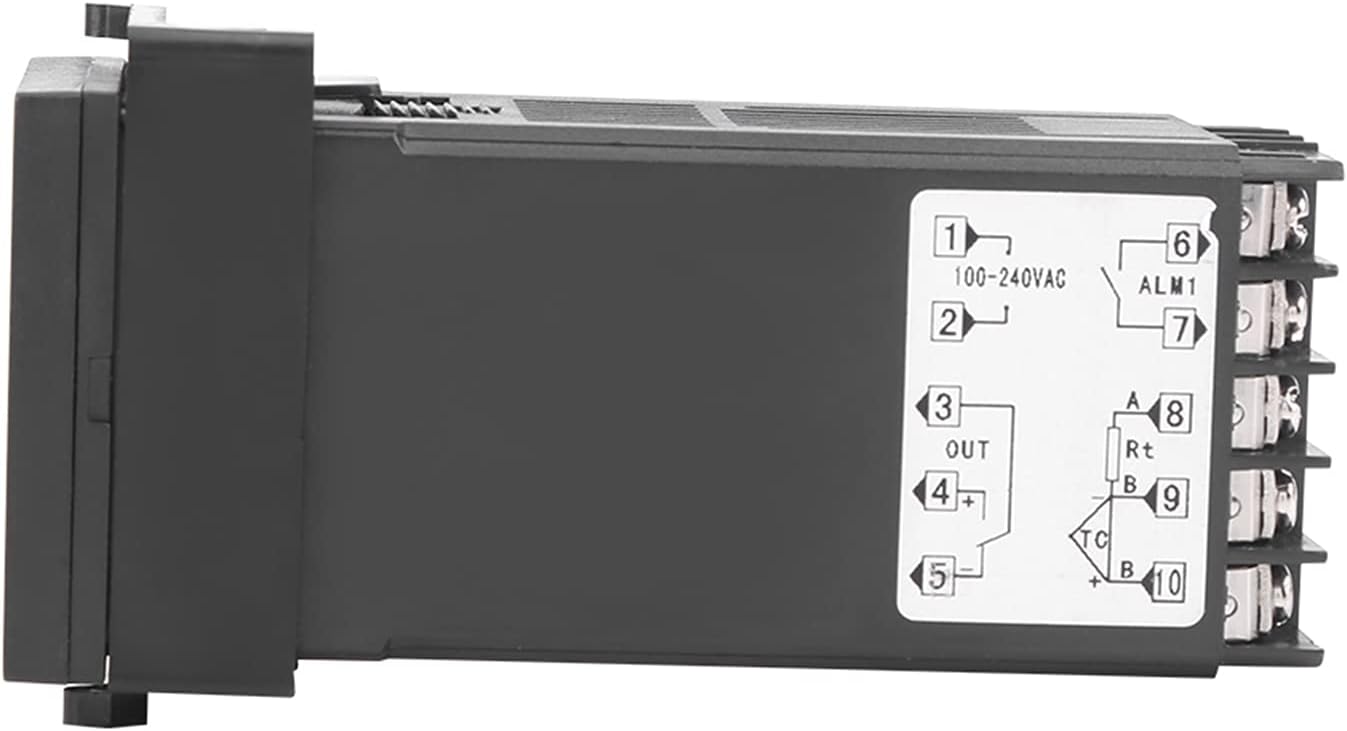
Obrázek 4.3: Strana view of the REX-C100 controller, illustrating the numbered terminal blocks for electrical connections. Terminals 1 and 2 are for power input (100-240VAC), 3, 4, 5 for output, and 6-10 for sensor and alarm connections.
The rear of the unit provides screw terminals for power input, control output, and sensor input. Refer to the wiring diagram in the Setup section for detailed connections.
5. Nastavení a zapojení
Before proceeding with wiring, ensure that the main power supply is disconnected to prevent electrical shock.
5.1 Montáž regulátoru
The REX-C100 is designed for panel mounting. Cut an appropriate opening in your control panel according to the dimensions provided in Figure 5.1. Secure the controller using the provided mounting brackets.

Figure 5.1: Dimensions of the REX-C100 controller. The front panel measures approximately 4.6cm (1.81in) by 4.6cm (1.81in), and the depth is approximately 10.5cm (4.13in).
5.2 Elektrické zapojení
Refer to the wiring diagram below for correct connections. Incorrect wiring can damage the device or connected equipment.

Figure 5.2: Detailed wiring diagram for the REX-C100. It illustrates connections for working voltage (100-240V), alarm light/buzzer output, heating tube, solid state relay, K-type thermocouple (two wires), and RTD (3-wire) sensor. Note the short connection for the solid state relay control.
- Napájení (svorky 1 a 2): Connect 100-240V AC power to terminals 1 and 2.
- Control Output (Terminals 3, 4, 5):
- For relay output, connect your load (e.g., heating element via a Solid State Relay) to these terminals as per the diagram.
- If using an SSR, connect the SSR control input to the appropriate output terminals (e.g., 4(+) and 5(-)).
- Sensor Input (Terminals 8, 9, 10):
- For K-type thermocouple (two wires), connect to terminals 9 and 10.
- For RTD (3-wire) sensor, connect A to terminal 8, B/B to terminals 9 and 10.
- Alarm Output (Terminals 6 & 7): Connect an alarm device (e.g., alarm light or buzzer) to terminals 6 and 7 if alarm functionality is desired.
Důležité: Před připojením napájení vždy dvakrát zkontrolujte všechna připojení.
6. Návod k obsluze
Once the controller is wired and powered on, the PV display will show the current temperature, and the SV display will show the set temperature.
6.1 Setting the Target Temperature (SV)
- Stiskněte tlačítko SOUBOR button once. The SV display will start flashing.
- Použijte Up (▲) a Dolů (▼) tlačítky se šipkami nastavte požadovanou teplotu.
- Použijte Vlevo (◀) arrow button to shift the cursor for faster adjustment of digits.
- Stiskněte tlačítko SOUBOR button again to confirm the new SV and exit the setting mode.
6.2 Parameter Settings (Advanced)
To access advanced parameters (e.g., PID parameters, alarm settings, input type), press and hold the SOUBOR button for approximately 3-5 seconds until the first parameter code appears on the PV display.
- Použijte SOUBOR button to cycle through parameters.
- Použijte Up a Dolů arrow buttons to change the value of the selected parameter.
- To exit parameter setting mode, press and hold the SOUBOR button again, or wait for the controller to automatically exit after a period of inactivity.
Poznámka: Refer to the detailed parameter list in the full technical manual for specific parameter codes and their functions. Incorrect parameter settings can lead to unstable control or damage.
6.3 Auto-Tuning Function
The auto-tuning (AT) function automatically calculates optimal PID parameters for your specific heating system. This helps achieve stable and accurate temperature control.
- Set your desired target temperature (SV).
- Access the parameter settings (hold SOUBOR).
- Locate the auto-tuning parameter (often labeled "AT" or similar).
- Set the auto-tuning parameter to "ON" or "1". The AT indicator will light up.
- The controller will cycle the output to analyze the system's response. This process may take some time.
- Once auto-tuning is complete, the AT indicator will turn off, and the calculated PID parameters will be saved.
Pozor: During auto-tuning, the temperature may overshoot or undershoot the set value. Ensure this will not damage your process or materials.
7. Údržba
The REX-C100 is designed for reliable operation with minimal maintenance. However, periodic checks can help ensure its longevity and accuracy.
- Čištění: Jemně otřete přední panel měkkým, suchým hadříkem. Nepoužívejte abrazivní čisticí prostředky ani rozpouštědla.
- Připojení terminálu: Periodically check all wiring connections for tightness, especially in environments with vibration.
- Integrita senzoru: Inspect the temperature sensor and its wiring for any signs of damage or corrosion. Replace if necessary.
- Větrání: Ensure that the ventilation slots on the controller are not obstructed to allow for proper heat dissipation.
8. Řešení problémů
This section provides solutions to common issues encountered with the REX-C100 controller.
| Problém | Možná příčina | Řešení |
|---|---|---|
| Žádný displej/Vypnuto | Žádné napájení; Nesprávné zapojení; Spálená pojistka. | Check power connections (Terminals 1 & 2). Verify supply voltage. Check for internal fuse (if accessible and user-serviceable). |
| Displej PV zobrazuje „HHHH“ nebo „LLLL“ | Sensor open circuit (HHHH); Sensor short circuit or reverse connection (LLLL); Incorrect sensor type setting. | Check sensor wiring and connections. Ensure sensor type in parameters matches the connected sensor. Replace faulty sensor. |
| Temperature control is unstable/overshoots | PID parameters not optimized; Incorrect sensor placement; Load too large/small. | Perform auto-tuning. Ensure sensor is placed correctly to measure actual process temperature. Verify load compatibility. |
| Výstup se neaktivuje | Wiring error; Output parameter setting incorrect; Faulty SSR/relay. | Check output wiring (Terminals 3, 4, 5). Verify output type setting in parameters. Test external SSR/relay. |
Pokud problém přetrvává i po vyzkoušení těchto řešení, kontaktujte zákaznickou podporu.
9. Záruka a podpora
Walfront products are manufactured to high-quality standards. For warranty information, please refer to the documentation provided with your purchase or contact your retailer. For technical support, please visit the Walfront store on Amazon or contact their customer service directly.
Walfront Store: https://www.amazon.com/stores/Walfront/page/FECAC109-E5D3-4C74-B6F1-3FA643B2EA7D
Ask a question about this manual
Ask about setup, troubleshooting, compatibility, parts, safety, or missing instructions. Manuals+ will review the question and use this page’s manual context to help answer it.