
Zavedení
This manual provides detailed instructions for the setup, operation, and maintenance of your Digoo DG-C3 Wireless Weather Station. This device integrates a hygrometer, thermometer, weather forecast station, and alarm clock functions, offering comprehensive environmental monitoring and timekeeping capabilities. Please read this manual thoroughly before using the product to ensure correct operation and to maximize its features.
Obsah balení
- Digoo DG-C3 Wireless Weather Station Unit
- Napájecí kabel USB
- Uživatelská příručka (tento dokument)
Poznámka: Baterie (3x AAA) nejsou součástí balení a je nutné je zakoupit samostatně.
Konec produktuview
Familiarize yourself with the various components of your Digoo DG-C3 weather station.
Přední displej
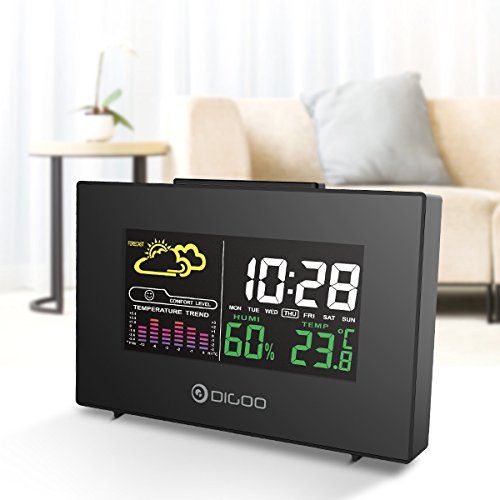
The front display features a color backlit screen showing the current time, day of the week, indoor humidity, indoor temperature, and a weather forecast icon. It also includes a comfort level indicator and a temperature trend graph.
- Čas a datum: Digital display of current time and day.
- Předpověď počasí: Ikony označující předpovězené povětrnostní podmínky (např. slunečno, oblačno, deštivo).
- Úroveň pohodlí: Udává vnitřní komfort na základě teploty a vlhkosti.
- Teplotní trend: Bar graph showing recent temperature changes.
- Vlhkost: Procenttage display of indoor humidity.
- Teplota: Digital display of indoor temperature (Celsius or Fahrenheit).
zadní panel
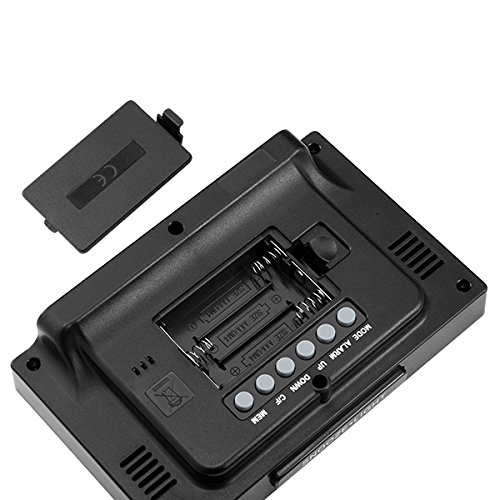
The back of the unit houses the battery compartment and various control buttons for setting the device.
- Přihrádka na baterie: Holds 3x AAA batteries for power backup.
- Tlačítko MODE: Used to switch between display modes and enter setting mode.
- Tlačítko ALARM: Používá se k nastavení a aktivaci/deaktivaci budíku.
- Tlačítko NAHORU: Used to increase values during settings or view maximum records.
- Tlačítko DOLŮ: Used to decrease values during settings or view minimum records.
- Tlačítko °C/°F: Přepíná mezi jednotkami teploty Celsia a Fahrenheita.
- Tlačítko MEM: Zvyklý view memory records for temperature and humidity.
Horní panel
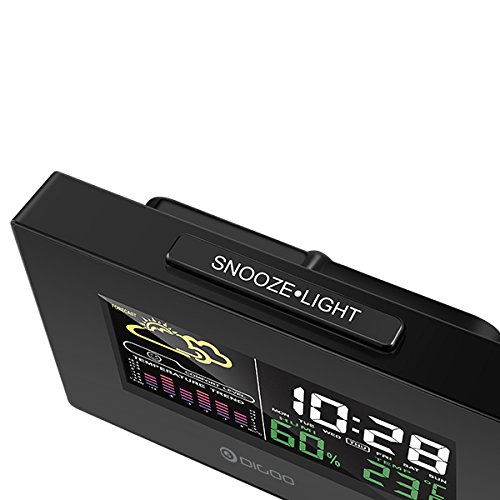
The top of the unit features a single button for snooze and backlight functions.
- SNOOZE·LIGHT Button: Press to activate the backlight or snooze the alarm.
Nastavení
1. Zapnutí
- Instalace baterie: Open the battery compartment cover on the back of the unit. Insert 3x AAA batteries, ensuring correct polarity (+/-). Close the cover. Batteries provide backup power and allow for portability.
- Připojení napájení USB: For continuous power and backlight, connect the provided USB cable to the USB port on the unit and to a compatible USB power adapter (not included) or a computer USB port.
- The display will light up and show default settings.
2. Initial Settings (Time, Date, Unit)
- Nastavení času:
- Stiskněte a podržte MODE button for approximately 3 seconds to enter time setting mode. The hour digit will flash.
- Použijte UP or DOLŮ tlačítka pro nastavení hodiny.
- Stiskněte MODE again to confirm the hour and move to minute setting. The minute digit will flash.
- Použijte UP or DOLŮ tlačítka pro nastavení minut.
- Stiskněte MODE again to confirm and move to 12/24 hour format selection.
- Použijte UP or DOLŮ buttons to select 12-hour or 24-hour format.
- Stiskněte MODE pro potvrzení a ukončení nastavení času.
- Nastavení data:
- Po nastavení času stiskněte MODE again to enter date setting mode. The year will flash.
- Použijte UP or DOLŮ tlačítka pro úpravu roku.
- Stiskněte MODE to confirm and move to month setting.
- Použijte UP or DOLŮ tlačítka pro nastavení měsíce.
- Stiskněte MODE to confirm and move to day setting.
- Použijte UP or DOLŮ tlačítka pro nastavení dne.
- Stiskněte MODE pro potvrzení a ukončení nastavení data.
- Výběr jednotky teploty:
- Stiskněte tlačítko ° C / ° F button on the back of the unit to switch between Celsius (°C) and Fahrenheit (°F) temperature display.
Návod k obsluze
1. Funkce budíku
- Nastavení budíku:
- Stiskněte tlačítko POPLACH jednou stiskněte tlačítko pro zobrazení aktuálního času budíku.
- Stiskněte a podržte POPLACH button for approximately 3 seconds. The hour digit will flash.
- Použijte UP or DOLŮ tlačítka pro nastavení hodiny budíku.
- Stiskněte POPLACH again to confirm the hour and move to minute setting. The minute digit will flash.
- Použijte UP or DOLŮ tlačítka pro nastavení minuty budíku.
- Stiskněte POPLACH pro potvrzení a ukončení nastavení budíku.
- Aktivace/deaktivace alarmu:
- V normálním režimu zobrazení času stiskněte POPLACH button repeatedly to toggle the alarm ON or OFF. An alarm icon will appear on the display when the alarm is active.
- Funkce odložení:
- Když zazní alarm, stiskněte SNOOZE·LIGHT button on the top of the unit to activate the snooze function. The alarm will temporarily stop and sound again after a few minutes (typically 5-10 minutes).
- To stop the alarm completely, press any other button on the back panel.
2. Předpověď počasí
The weather station provides a weather forecast based on internal atmospheric pressure changes. The forecast icons (e.g., sunny, cloudy, rainy) are predictions for the next 12-24 hours and may not always match local weather services, which use more comprehensive data.
- The forecast icon is displayed on the upper left of the screen.
- The device requires a period of stable operation (typically 24 hours) to calibrate and provide accurate forecasts.
3. Zobrazení teploty a vlhkosti
- The current indoor temperature and humidity are continuously displayed on the screen.
- Viewing Min/Max Records:
- Stiskněte tlačítko MEM button once to display the maximum recorded temperature and humidity.
- Stiskněte MEM again to display the minimum recorded temperature and humidity.
- Stiskněte MEM a third time to return to current readings.
- To clear the min/max records, press and hold the MEM tlačítko na 3 sekundy viewzáznamů.
4. Ovládání podsvícení
- When powered by USB, the backlight will remain on.
- Při napájení pouze bateriemi stiskněte SNOOZE·LIGHT button to temporarily activate the backlight for a few seconds.
Údržba
- Čištění: Wipe the unit with a soft, dry cloth. Do not use abrasive cleaners or solvents. Avoid getting moisture into the unit.
- Výměna baterie: When the display becomes dim or functions irregularly, replace the 3x AAA batteries in the back compartment. Ensure correct polarity.
- Skladování: If not using the device for an extended period, remove the batteries to prevent leakage. Store in a cool, dry place.
Odstraňování problémů
| Problém | Možná příčina | Řešení |
|---|---|---|
| Displej je prázdný nebo tmavý. | Low batteries or no power connection. | Replace batteries or connect the USB power cable. |
| Nesprávný čas/datum. | Time/date not set correctly after power loss or initial setup. | Follow the "Initial Settings" section to reset time and date. |
| Předpověď počasí se zdá být nepřesná. | Device needs calibration time; local conditions may differ from pressure-based forecast. | Allow 24 hours for calibration. Understand that the forecast is based on internal pressure changes. |
| Alarm se nespustí. | Alarm is not activated or volume is too low (if adjustable). | Ujistěte se, že je zobrazena ikona budíku. Zkontrolujte nastavení budíku. |
Specifikace
| Model: | DG-C3 |
| Konektivita: | USB (pro napájení) |
| Zdroj napájení: | 3x AAA Batteries (not included) or USB Power |
| Speciální vlastnosti: | Hygrometer, Thermometer, Weather Forecast, Alarm Clock, Color Backlight, Portable |
| Zobrazit: | Color Backlit LCD |
| Jednotka teploty: | Volitelné °C / °F |
Záruka a podpora
Informace o záruce nebo technickou podporu naleznete v dokumentaci dodané při nákupu nebo se obraťte na prodejce. Uschovejte si účtenku jako doklad o koupi.