
1. Úvod
This manual provides essential instructions for the safe and efficient operation of your BLACK+DECKER BCD6W 6 Place Setting Portable Countertop Dishwasher. Please read all instructions carefully before use and retain this manual for future reference. This appliance is designed for residential use to clean dishes, offering convenience for small kitchens, RVs, or areas with limited space.

Obrázek 1.1: Přední strana view of the BLACK+DECKER BCD6W Portable Countertop Dishwasher. The unit is white with a black door and an LED display panel above the door. An Energy Star logo is visible on the bottom right.

Image 1.2: The BLACK+DECKER BCD6W dishwasher shown with an arrow pointing to the Energy Star certification logo, indicating energy efficiency.
2. Bezpečnostní informace
Při používání elektrických spotřebičů vždy dodržujte základní bezpečnostní opatření, abyste snížili riziko požáru, úrazu elektrickým proudem a zranění osob.
2.1 Všeobecné bezpečnostní pokyny
- Před použitím myčky si přečtěte všechny pokyny.
- Nedotýkejte se topného tělesa během nebo bezprostředně po použití.
- Neprovozujte myčku, pokud je poškozen napájecí kabel nebo zástrčka.
- Zajistěte správné uzemnění pro elektrickou bezpečnost.
- Keep children away from the dishwasher, especially when it is operating. This model includes a child lock feature for added safety.
- Používejte pouze mycí prostředky a leštidla speciálně určené pro automatické myčky nádobí.
- V blízkosti myčky neskladujte ani nepoužívejte hořlavé materiály.
- Před čištěním nebo údržbou vždy odpojte spotřebič od elektrické sítě.
- Ne tamps ovládáním.
2.2 Varování k návrhu 65
Tento produkt obsahuje chemikálie, o kterých je ve státě Kalifornie známo, že způsobují rakovinu a vrozené vady nebo jiná poškození reprodukce. Pro více informací navštivte www.P65Warnings.ca.gov.
3. Konec produktuview
Familiarize yourself with the components of your BLACK+DECKER BCD6W dishwasher.
3.1 Hlavní součásti
- Ovládací panel: Features an LED display and electronic touch controls for cycle selection and time management.
- Stojan na nádobí: Designed to hold up to 6 place settings, including plates, bowls, saucers, mugs, cups, wine glasses, and utensils.
- Koš na příbory: Pro organizaci vidliček, lžic a nožů.
- Dávkovač pracího prostředku: Located inside the door for adding dishwasher detergent.
- Dávkovač leštidla: For adding rinse aid to improve drying performance.
- Filtrační systém: Removable filter at the base of the dishwasher to trap food particles.
- Quick Connect Assembly: Hoses and adapter for connecting to a standard faucet.
- Interiér z nerezové oceli: Durable and designed for effective cleaning.

Image 3.1: The interior of the dishwasher, highlighting the stainless steel construction which resists stains and retains heat for effective cleaning.
4. Nastavení
Proper setup ensures optimal performance and safety of your dishwasher.
4.1 Vybalení a umístění
- Opatrně odstraňte veškerý obalový materiál.
- Place the dishwasher on a flat, stable surface, such as a countertop. Ensure there is adequate space around the unit for ventilation and hose connections.
- The dishwasher dimensions are approximately 21.5" (W) x 21.7" (D) x 17.2" (H). Verify your space accommodates these measurements.
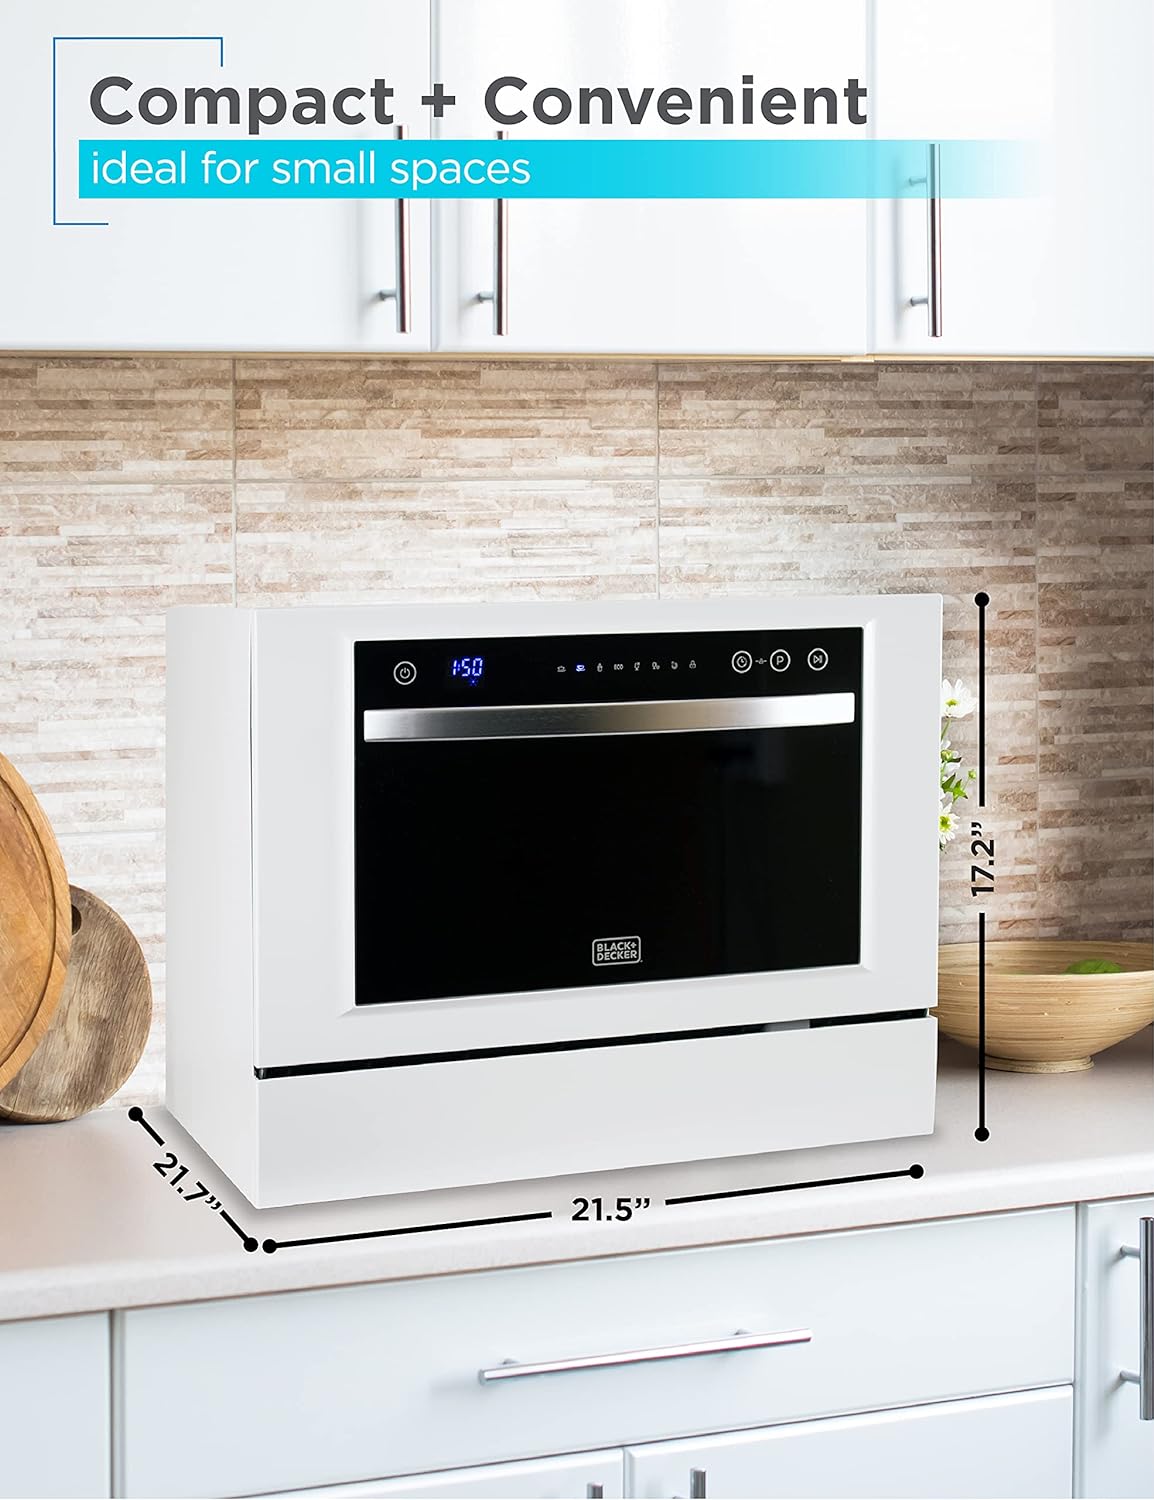
Image 4.1: The compact dishwasher placed on a kitchen countertop, illustrating its dimensions (21.5" width, 21.7" depth, 17.2" height) for easy placement in small spaces.
4.2 Quick Connect Installation
This dishwasher uses a quick-connect system for easy attachment to your kitchen faucet, eliminating the need for permanent plumbing.
- Locate the quick-connect adapter and hoses (typically 59 inches long).
- Attach the quick-connect adapter to your kitchen faucet. Ensure a tight seal to prevent leaks. If your sink faucet requires screwing into the adapter, you may need to remove one of the black rings from inside the adapter for a proper fit.
- Connect the water inlet hose from the dishwasher to the quick-connect adapter on the faucet.
- Place the drain hose into the sink. Ensure it is securely positioned to prevent it from falling out during operation.
- Once connected, turn on the hot water faucet to allow water to flow to the dishwasher.
- After each wash cycle, disconnect the hoses and drain any residual water by angling them over a sink or bucket. Regularly check the connection points for tightness to prevent leaks.

Image 4.2: Visual guide for the quick-connect setup, showing the dishwasher connected to a kitchen sink faucet via a 59-inch connector hose.
5. Návod k obsluze
Follow these steps for effective and safe operation of your dishwasher.
5.1 Vkládání nádobí do myčky
- Scrape off large food particles from dishes before loading. Minimal rinsing is generally sufficient.
- Load dishes into the rack, ensuring they do not block the spray arms or detergent dispenser.
- Place larger items and heavily soiled dishes towards the back or sides to ensure proper water circulation.
- The dishwasher can accommodate up to 6 place settings. Plates up to 10 inches in height can typically fit.
- Place cutlery in the cutlery basket with handles down for forks and spoons, and handles up for knives for safety.

Image 5.1: The dishwasher interior showing a typical load of dishes, including plates, bowls, cups, and cutlery, demonstrating its 6-place setting capacity.

Image 5.2: An illustration of the dishwasher's 6-place setting capacity, showing various dishes arranged within the unit.
5.2 Přidání mycího prostředku a leštidla
- Open the detergent dispenser located on the inside of the door.
- Add the recommended amount of dishwasher detergent. For optimal results, use dishwasher tablets or powder. Avoid using excessive detergent, as this can leave residue.
- If desired, fill the rinse aid dispenser to improve drying and prevent water spots.
- Pevně zavřete kryt dávkovače.

Image 5.3: A hand demonstrating how to add detergent to the dispenser, located on the inside of the dishwasher door.
5.3 Výběr pracího cyklu
The BLACK+DECKER BCD6W offers 7 wash cycles to suit various cleaning needs. Use the electronic touch controls and LED display to select your desired cycle.
- Normální: Standardní cyklus pro každodenní mytí nádobí.
- Intenzivní: Pro silně znečištěné nádobí a hrnce.
- Echo: Energy-efficient cycle for normally soiled dishes.
- Sklo: Gentle cycle for delicate glassware.
- 90 minut: For lightly soiled dishes that need a quick wash.
- Rychlý: A very quick wash for lightly soiled items without drying.
- Namočit: Pre-wash cycle to loosen stubborn food residues.

Image 5.4: The LED display panel showing various wash cycle icons and a hand selecting a cycle, illustrating the 7 available wash settings.

Image 5.5: A graphic illustrating the different wash cycles: Heavy, Eco, Normal, Glass, Speed, and Rinse, with the dishwasher at the center.
5.4 Starting a Cycle and Delay Start
- After selecting a cycle, press the Start button. The LED display will show the remaining cycle time.
- To use the Delay Start feature, press the Delay button repeatedly to set the desired delay time before the cycle begins.
5.5 Funkce dětského zámku
The dishwasher is equipped with a child lock to prevent accidental operation. Refer to the control panel instructions for activating and deactivating this feature.

Image 5.6: The dishwasher with a graphic overlay of a shield and padlock icon, indicating the child lock feature for safety.
6. Údržba
Pravidelná údržba zajistí dlouhou životnost a účinnost vaší myčky nádobí.
6.1 Čištění filtračního systému
- The removable filter at the base of the dishwasher should be cleaned regularly (e.g., monthly) to prevent clogging and ensure effective cleaning.
- Twist and lift the filter assembly to remove it.
- Rinse the filter under running water to remove any trapped food particles. Use a brush if necessary.
- Reinsert the filter and twist to secure it in place.
Image 6.1: A hand demonstrating the removal of the removable filter from the base of the dishwasher for cleaning.
6.2 Čištění interiéru a exteriéru
- Vnější povrchy otřete měkkým, damp tkanina. Vyhněte se abrazivním čisticím prostředkům.
- Vnitřek myčky pravidelně čistěte spuštěním prázdného cyklu s čističem myčky.
- Wipe down the door gasket and edges to remove any food debris or residue.
6.3 Hose Maintenance
- After each use, ensure the hoses are fully drained to prevent stagbez vody a zápachu.
- Periodically check hose connections for tightness and signs of wear or damage.
7. Řešení problémů
V této části naleznete řešení běžných problémů, se kterými se můžete setkat.
| Problém | Možná příčina | Řešení |
|---|---|---|
| Myčka se nespustí | Napájecí kabel není zapojen do zásuvky; dvířka nejsou správně zavřená; jistič se vypnul. | Ensure the power cord is securely plugged in. Close the door firmly until it latches. Check and reset the circuit breaker. |
| Nádobí není čisté | Improper loading; clogged spray arms; insufficient detergent; dirty filter. | Reload dishes to ensure spray arms are not blocked. Clean spray arm nozzles. Add appropriate amount of detergent. Clean the filter system. |
| Voda nevytéká | Drain hose kinked or clogged; dirty filter; sink drain clogged. | Check the drain hose for kinks or blockages. Clean the filter. Ensure your sink drain is clear. |
| Leaks from the unit | Loose hose connections; damaged gasket; improper installation. | Check and tighten all quick-connect hose fittings. Inspect the door gasket for damage. Ensure the unit is level. |
| Dishes not drying well | No rinse aid; cycle without drying option; improper loading. | Add rinse aid to the dispenser. Select a wash cycle that includes a drying phase. Ensure dishes are loaded to allow proper air circulation. Opening the door slightly after a cycle can aid drying. |
If you experience issues not covered in this section, please contact customer support.
8. Specifikace
| Funkce | Detail |
|---|---|
| Název modelu | BCD6W |
| Značka | ČERNÁ+DECKER |
| Typ instalace | Pracovní deska |
| Umístěte nastavení | 6 |
| Rozměry výrobku (Š x H x V) | 21.5 x 21.7 x 17.2 palce (přibližně) |
| Hmotnost položky | 46.2 libry |
| svtage | 110 voltů |
| Mycí cykly | 7 (Normal, Intensive, Eco, Glass, 90 Minutes, Rapid, Soak) |
| Typ zobrazení | LED |
| Vnitřní materiál | Nerez |
| Délka výstupní hadice | 59 palce |
| Speciální funkce | Childproof Lock, Compact, Delay Start |
| Energetická účinnost | ENERGY STAR Certified, 155 Kilowatt Hours Per Year |
| UPC | 819813014551 |
9. Záruka a zákaznická podpora
For warranty information, technical assistance, or to purchase replacement parts, please contact BLACK+DECKER customer support. Refer to the product packaging or the official BLACK+DECKER webstránky s nejaktuálnějšími kontaktními údaji.
Online resources, including FAQs and additional user guides, may also be available on the manufacturer's webmísto.
Můžete také navštívit Obchod BLACK+DECKER na Amazonu pro více informací o produktu a podporu.