
1. Úvod
This manual provides detailed instructions for the setup, operation, and maintenance of your DIGOO DG-TH8888 Wireless Weather Station. Please read this manual thoroughly before using the device to ensure proper functionality and longevity. This weather station offers comprehensive environmental monitoring, including indoor and outdoor temperature and humidity, weather forecasts, and time-keeping functions.
2. Konec produktuview
The DIGOO DG-TH8888 is a wireless weather station designed to provide accurate local weather information. It features a large, easy-to-read color LCD display and a remote outdoor sensor.
2.1 Klíčové vlastnosti
- Large Color LCD Display for clear data visualization.
- Monitorování vnitřní a venkovní teploty a vlhkosti.
- Weather Forecast with graphical icons (Sunny, Partly Cloudy, Cloudy, Rainy, Stormy, Snowy).
- Zobrazení barometrického tlaku.
- Zobrazení fází Měsíce.
- Budík s funkcí odložení buzení.
- Min/Max Temperature and Humidity Records.
- Multi-language Weekday Display (English, German, French, Spanish, Italian).
2.2 Komponenty
- Hlavní zobrazovací jednotka
- Bezdrátový venkovní snímač
- Napájecí kabel USB

Figure 1: DIGOO DG-TH8888 Weather Station main unit displaying various functions.

Figure 2: The DIGOO DG-TH8888 Weather Station main unit in a home setting.
3. Nastavení
3.1 Napájení hlavní jednotky
- Otevřete kryt baterie na zadní straně hlavní jednotky.
- Insert 3x AAA batteries (not included), observing the correct polarity (+/-).
- Alternatively, connect the provided USB power cable to the main unit and a USB power adapter (not included) or a USB port. Using the USB cable enables continuous backlight.
3.2 Napájení bezdrátového venkovního senzoru
- Otevřete kryt baterie na zadní straně venkovního senzoru.
- Insert batteries (type not specified, typically 2x AAA or AA, please check sensor for markings), observing the correct polarity (+/-).
- Bezpečně uzavřete přihrádku na baterie.
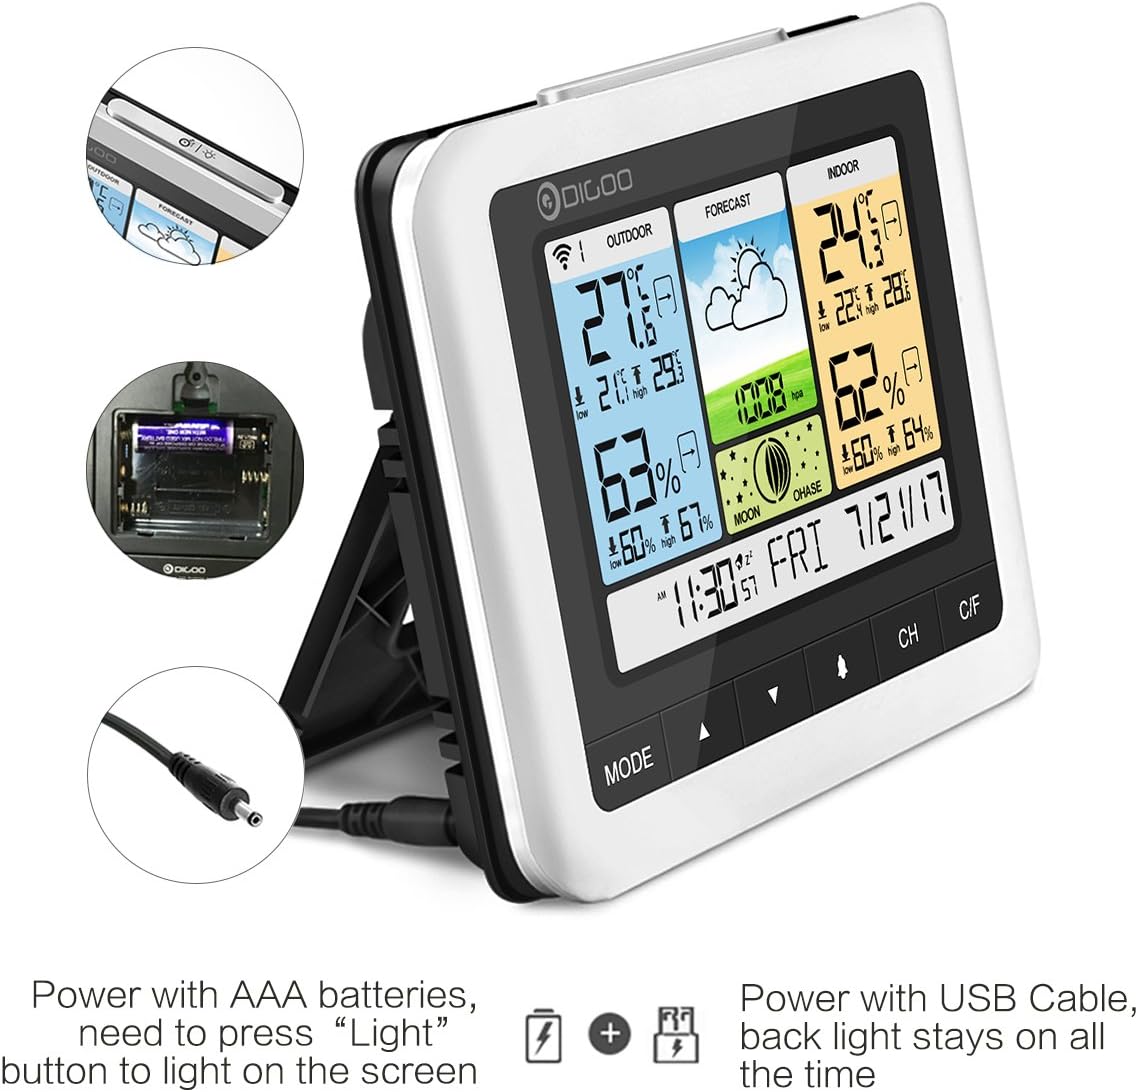
Figure 3: Power options for the main unit: AAA batteries or USB cable.
3.3 Sensor Placement and Synchronization
- Place the outdoor sensor in a shaded, dry location, protected from direct sunlight and heavy rain, to ensure accurate temperature and humidity readings.
- Ensure the sensor is within the wireless transmission range of the main unit (up to 50 meters in open space, up to 25 meters with obstacles).
- Upon powering both units, the main unit should automatically search for and connect to the outdoor sensor. The outdoor temperature and humidity will appear on the display.
- If the connection is not established, press the 'CH' button on the main unit to initiate a manual search. You may also need to press the 'RESET' button on the outdoor sensor.

Figure 4: Wireless outdoor sensor and recommended placement.
4. Návod k obsluze
The main unit features several buttons for navigation and settings: 'MODE', '▲' (Up), '▼' (Down), 'CH', and 'C/F'.

Figure 5: Detailed display elements and button functions.
4.1 Nastavení času a data
- Press and hold the 'MODE' button to enter time setting mode.
- Use the '▲' (Up) and '▼' (Down) buttons to adjust the flashing value (e.g., hour, minute, year, month, day).
- Stiskněte znovu tlačítko „MODE“ pro potvrzení nastavení a přechod k dalšímu parametru.
- Once all settings are complete, press 'MODE' to exit.
4.2 Funkce alarmu
- From the normal time display, press 'MODE' once to view čas budíku.
- Press and hold 'MODE' to enter alarm setting mode. Adjust the hour and minute using '▲' and '▼'.
- Stiskněte tlačítko „MODE“ pro potvrzení.
- To activate/deactivate the alarm, press the '▲' button while viewnastavení času budíku. Ikona budíku se zobrazí/zmizí.
- When the alarm sounds, press the 'SNOOZE/LIGHT' button (located on top) to activate snooze. The alarm will sound again after approximately 5 minutes.
4.3 Výběr jednotky teploty
Press the 'C/F' button to switch between Celsius (°C) and Fahrenheit (°F) temperature display.
4.4 Záznamy o minimálních/maximálních hodnotách
The weather station automatically records the minimum and maximum indoor/outdoor temperature and humidity for a 24-hour period. Press the '▼' (Down) button to cycle through current, maximum, and minimum readings. These records typically reset automatically each day.
4.5 Barometric Pressure Unit
Press and hold the '▼' (Down) button to switch the barometric pressure unit between hPa/MB and inHg.
4.6 ovládání podsvícení
When powered by batteries, the backlight will illuminate briefly when the 'SNOOZE/LIGHT' button is pressed. When powered by the USB cable, the backlight remains continuously on.
5. Údržba
5.1 Výměna baterie
Vyměňte baterie v hlavní jednotce i venkovním senzoru, když se na displeji zobrazí indikátor slabé baterie. Při vkládání nových baterií dbejte na správnou polaritu.
5.2 Čištění
Wipe the main unit and outdoor sensor with a soft, dry cloth. Do not use abrasive cleaners, solvents, or harsh chemicals, as these may damage the display or casing.
5.3 Sensor Protection
While the outdoor sensor is designed for outdoor use, prolonged exposure to heavy rain or direct water spray can affect its performance and lifespan. Position the sensor under an overhang or in a sheltered spot to protect it from extreme weather conditions.
6. Řešení problémů
- Bez zobrazení venkovní teploty/vlhkosti:
Check if the outdoor sensor batteries are correctly installed and charged. Ensure the sensor is within the effective transmission range of the main unit. Try re-synchronizing by power cycling both units and pressing the 'CH' button on the main unit. - Nepřesná čtení:
Ensure the outdoor sensor is not in direct sunlight or exposed to heat sources, which can cause artificially high temperature readings. Allow some time for the readings to stabilize after initial setup. For humidity, ensure the sensor is not in an area with extreme moisture or dryness that doesn't reflect the general environment. - Display Not Clear/Hard to Read:
The display's readability can vary with viewing angle. Adjust the angle of the main unit for optimal visibility. If using batteries, the backlight is temporary; connect the USB power cable for continuous illumination. - Button Press Beep Sound:
Some users have noted that button presses produce an audible beep that cannot be disabled. This is a design characteristic of the device. - Outdoor Sensor Malfunction After Rain:
The outdoor sensor, while weather-resistant, may be vulnerable to heavy water ingress. Ensure it is placed in a sheltered location to prevent direct exposure to heavy rain or standing water.
7. Specifikace
| Značka | DIGOO |
| Model | DG-TH8888 |
| Rozsah vnitřní teploty | 0 °C ~ 50 °C (32 °F ~ 122 °F) |
| Rozsah venkovních teplot | -40 °C ~ +70 °C (-40 °F ~ 158 °F) |
| Rozsah vlhkosti (vnitřní a venkovní) | 20% RH ~ 99% RH |
| Rozsah barometru | 800hPa ~ 1100hPa |
| Dosah bezdrátového přenosu | Up to 50 meters (open space), up to 25 meters (with obstacles) |
| Napájení hlavní jednotky | 3x AAA batteries or USB power cable |
| Napájení venkovního senzoru | Batteries (type not specified, typically AAA or AA) |
| Typ zobrazení | Barevný LCD |
8. Záruka a podpora
For warranty information or technical support, please refer to the product packaging or contact DIGOO customer service directly. Keep your purchase receipt for any warranty claims. Do not attempt to repair the device yourself, as this may void the warranty.