
1. Úvod
This manual provides detailed instructions for the installation, operation, and maintenance of your ASRock AB350M-HDV MicroATX Motherboard. The ASRock AB350M-HDV is designed to support AMD Socket AM4 A-Series APUs (Bristol Ridge) and Ryzen Series CPUs (Summit Ridge), featuring a Digi Power design and 7 Power Phase design for stable performance. It supports DDR4 memory and offers various connectivity options including SATA3, USB 3.0, and an Ultra M.2 slot.
2. Konec produktuview
The ASRock AB350M-HDV motherboard is a MicroATX form factor board, ideal for compact PC builds. It features essential components for a modern computing system.

Obrázek 2.1: Úhlové view of the ASRock AB350M-HDV Motherboard, showcasing its compact MicroATX design and various components.
Klíčové vlastnosti:
- Supports AMD Socket AM4 A-Series APUs (Bristol Ridge) and Ryzen Series CPUs (Summit Ridge).
- DDR4 memory support up to 3200+ (OC) for Ryzen CPUs and 2400 for A-series APUs.
- 1 PCIe 3.0 x16 slot and 1 PCIe 2.0 x1 slot for expansion cards.
- 4 SATA3 ports and 1 Ultra M.2 (PCIe Gen3 x4 & SATA3) slot for storage.
- 6 USB 3.0 ports (2 front, 4 rear) and 2 USB 2.0 ports for peripheral connectivity.
- Integrated Gigabit Ethernet for network connectivity.
- Video outputs: VGA, DVI, HDMI.

Obrázek 2.2: Shora dolů view of the ASRock AB350M-HDV Motherboard, highlighting the CPU socket, RAM slots, M.2 slot, and PCIe slots.
3. Nastavení a instalace
Follow these steps carefully to install your ASRock AB350M-HDV motherboard and its components.
3.1 Instalace CPU
- Najděte patici procesoru AM4 na základní desce.
- Zvedněte páku zatížení na boku zásuvky.
- Zarovnejte trojúhelníkovou značku na procesoru s odpovídající značkou na patici. Opatrně vložte procesor do patice, aniž byste jej museli silou zasunout.
- Spusťte páku zatížení, abyste zajistili procesor na místě.
- Nainstalujte chladič CPU podle pokynů výrobce.
3.2 Instalace paměti RAM
- Locate the DDR4 DIMM slots. This motherboard has 4 slots.
- Otevřete klipy na obou koncích slotu DIMM.
- Zarovnejte zářez na modulu RAM s výstupkem ve slotu DIMM.
- Pevně zasuňte modul RAM do slotu, dokud nezacvaknou klipsy. Ujistěte se, že jsou oba klipsy zavřené.
3.3 Instalace úložného zařízení (SATA a M.2)
SATA disky:
- Připojte jeden konec datového kabelu SATA k portu SATA3 na základní desce.
- Připojte druhý konec datového kabelu SATA k pevnému disku nebo SSD disku.
- Připojte napájecí kabel SATA z napájecího zdroje (PSU) k úložnému zařízení.
M.2 SSD:
- Vyhledejte slot Ultra M.2 na základní desce.
- Odstraňte šroub M.2 a distanční sloupek ze slotu.
- Vložte disk M.2 SSD do slotu pod úhlem 30 stupňů.
- Push the M.2 SSD down and secure it with the screw and standoff.
3.4 Připojení napájení
- Připojte 24pinový napájecí konektor ATX ze zdroje do 24pinové napájecí zásuvky na základní desce.
- Connect the 8-pin (or 4-pin) ATX 12V power connector from your PSU to the corresponding socket near the CPU.
3.5 Připojení předního panelu
Connect the cables from your PC case (Power Button, Reset Button, HDD LED, Power LED, USB, Audio) to the corresponding headers on the motherboard. Refer to the motherboard layout diagram in your physical manual for exact header locations.
3.6 Instalace grafické karty
- Vyhledejte slot PCIe 3.0 x16.
- Sejměte příslušný kryt rozšiřujícího slotu z pouzdra počítače.
- Align the graphics card with the PCIe slot and press it down firmly until it clicks into place.
- Připevněte grafickou kartu k pouzdru šroubem.
- Connect any required PCIe power cables from your PSU to the graphics card.
4. Návod k obsluze
4.1 První spuštění a nastavení BIOSu/UEFI
- Po sestavení všech komponent připojte monitor, klávesnici a myš.
- Zapněte systém.
- Během spouštění opakovaně stiskněte tlačítko DEL or F2 klávesu pro vstup do nástroje pro nastavení systému BIOS/UEFI.
- In the BIOS, you can configure boot order, system time, and other advanced settings. Save changes and exit to boot into your operating system installation media.
4.2 Instalace ovladače
After installing your operating system, install the necessary drivers for the motherboard components. These typically include chipset drivers, audio drivers, LAN drivers, and any specific utility drivers. Drivers can be found on the ASRock official webstránky pro váš konkrétní model základní desky.
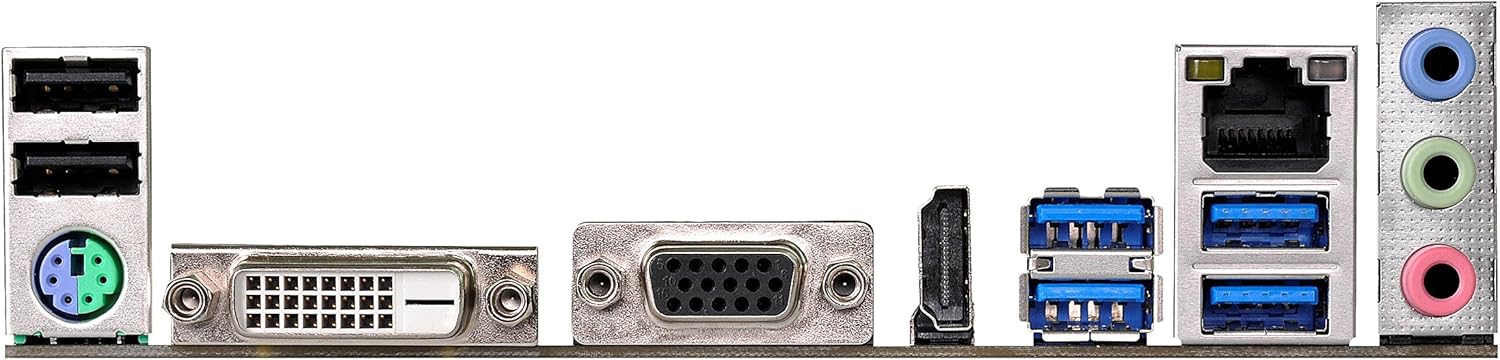
Figure 4.1: Rear I/O panel of the ASRock AB350M-HDV Motherboard, showing USB ports, video outputs (VGA, DVI, HDMI), LAN port, and audio jacks.
5. Údržba
Správná údržba zajistí dlouhou životnost a optimální výkon vaší základní desky.
5.1 Čištění
- Pravidelně čistěte prach ze základní desky a komponent pomocí stlačeného vzduchu.
- Před čištěním se ujistěte, že je systém vypnutý a odpojený od sítě.
- Nepoužívejte tekuté čisticí prostředky přímo na součástky.
5.2 Aktualizace BIOSu/UEFI
Pravidelně kontrolujte ASRock website for BIOS/UEFI updates. Updates can improve compatibility, stability, and performance. Follow the instructions provided by ASRock carefully when performing a BIOS update to avoid system damage.
6. Řešení problémů
Tato část obsahuje řešení běžných problémů, se kterými se můžete setkat.
6.1 Žádné napájení / Žádný POST (automatický test při zapnutí)
- Zkontrolujte připojení napájení: Ensure the 24-pin and 8-pin (or 4-pin) CPU power connectors are securely seated.
- Ověření zdroje napájení: Test your power supply unit (PSU) to ensure it is functional and providing adequate power.
- Znovu usaďte komponenty: Remove and re-install the CPU, RAM, and graphics card to ensure they are properly seated.
- Vymazat CMOS: Refer to your physical manual for instructions on how to clear the CMOS (Complementary Metal-Oxide-Semiconductor) settings, which can resolve boot issues.
6.2 Žádný výstup na displej
- Připojení monitoru: Ensure your monitor is correctly connected to the graphics card or motherboard (if using an APU with integrated graphics).
- Grafická karta: If using a dedicated graphics card, ensure it is properly installed and has sufficient power. Test with another graphics card if possible.
- APU Compatibility: If using an AMD A-Series APU, ensure your monitor is connected to the motherboard's video outputs (VGA, DVI, HDMI). Ryzen CPUs without integrated graphics require a dedicated graphics card.
6.3 Operační systém se nespustí
- Pořadí spouštění: Check the BIOS/UEFI settings to ensure the correct boot device (e.g., SSD/HDD with OS) is prioritized.
- Úložné zařízení: Verify that your storage device is detected in the BIOS.
- Instalace operačního systému: If the OS is newly installed, ensure the installation process completed successfully.
7. Specifikace
| Značka | ASRock |
| Název modelu | AB350M-HDV |
| Zásuvka CPU | Zásuvka AM4 |
| Typ čipové sady | AMD Promontory B350 |
| Kompatibilní procesory | AMD A-Series APUs (Bristol Ridge), Ryzen Series CPUs (Summit Ridge) |
| Technologie paměti RAM | DDR4 |
| Rychlost paměti | 2133 MHz (Base), up to 3200+ (OC) for Ryzen CPU |
| K dispozici paměťové sloty | 4 |
| Rozhraní grafické karty | PCI Express (1x PCIe 3.0 x16, 1x PCIe 2.0 x1) |
| Total SATA Ports | 4 (SATA3) |
| Slot M.2 | 1 (Ultra M.2, PCIe Gen3 x4 & SATA3) |
| Celkový počet portů USB | 8 (6x USB 3.0, 2x USB 2.0) |
| Video výstupy | VGA, DVI, HDMI |
| Typ hlavního napájecího konektoru | 24pinový ATX |
| Form Factor | MicroATX |
| Hmotnost položky | 1.3 libry |
8. Informace o záruce
The ASRock AB350M-HDV Motherboard comes with a 1 rok záruka. For specific terms and conditions, please refer to the warranty card included with your product or visit the official ASRock webmísto.
9. Podpora
For further assistance, technical support, or driver downloads, please visit the official ASRock webmísto:
You can also find contact information for customer service and support resources on their webmísto.