
1. Úvod
This manual provides comprehensive instructions for the safe and efficient operation of your VERITAS Sarah Sewing Machine, Model 1301. Designed for ease of use, this machine is suitable for beginners and experienced sewers alike, offering essential functions for various sewing projects. Please read this manual thoroughly before using the machine to ensure proper setup, operation, and maintenance.

Obrázek 1.1: The VERITAS Sarah Sewing Machine. This image displays the compact white sewing machine with red accents, featuring two rotary dials on the front for stitch selection and length adjustment.

Obrázek 1.2: Key benefits for users. This image highlights the machine's suitability for all who want to start sewing, requiring no prior experience, offering particularly simple operation, and being excellent for all common fabrics, including fine materials like chiffon, silk, and satin.
2. Bezpečnostní upozornění
Pro zajištění bezpečného provozu a prevenci zranění nebo poškození dodržujte prosím následující bezpečnostní pokyny:
- Children and individuals with limited physical, sensory, or mental capabilities should only use the machine after receiving thorough instruction and under constant supervision.
- Never leave the machine unattended, especially in areas accessible to children.
- Always disconnect the machine from the power supply before cleaning, performing maintenance, or when not in use.
- Během provozu držte prsty v dostatečné vzdálenosti od všech pohyblivých částí, zejména od jehly.
- Používejte pouze příslušenství a nástavce doporučené výrobcem.
- Nepoužívejte stroj, pokud má poškozený kabel nebo zástrčku, nebo pokud nefunguje správně.
- Ensure the machine is placed on a stable, level surface during use.
3. Obsah krabice
Upon unpacking your VERITAS Sarah Sewing Machine, please verify that all the following items are included:
- VERITAS Sarah Sewing Machine
- 5 Quality Needles
- All-round Sewing Foot
- Patka na zip
- Patka na knoflíkovou dírku
- Štětec
- Rozparovač švů
- 3 cívky
- Embroidery and Darning Plate
- Šroubovák
- Edge Ruler
- 2 Felt Pads
- Návod k použití

Obrázek 3.1: Extensive accessories included with the VERITAS Sarah. This image shows various accessories such as quality needles, a zipper foot, and highlights the machine's suitability for multi-layer fabrics.
4. Klíčové vlastnosti
The VERITAS Sarah Sewing Machine is equipped with features designed for efficient and versatile sewing:
- 13 Stitch Programs: Offers a variety of essential stitches for different sewing needs.
- 4-Step Buttonhole Function: Zjednodušuje vytváření konzistentních knoflíkových dírek.
- Nastavitelná délka stehu: Easily set stitch length between 0 and 4 mm using a rotary wheel.
- Motor s vysokým točivým momentem: Capable of handling thicker fabrics such as denim and canvas.
- Integrated Wire Cutter: For convenient thread trimming.
- Free Arm Function: Ideal for sewing cylindrical items like sleeves, cuffs, and pant hems.
- Glare-Free LED Light: Osvětluje šicí oblast pro lepší viditelnost.
- Automatic Thread Tensioner: Helps maintain optimal thread tension for balanced stitches.
- Snap-On Presser Foot System: Allows for quick and easy changing of presser feet, includes 6 different feet.
- Rychlost šití: Up to 750 stitches per minute.
- Removable Accessory Compartment: Provides convenient storage for tools and accessories.
- Robustní konstrukce: Features a stable, durable aluminum die-cast frame.

Obrázek 4.1: Performance features of the VERITAS Sarah. This image highlights a sewing speed of 750 stitches per minute, the Snap-On presser foot system including 6 presser feet, and the integrated LED sewing light.

Obrázek 4.2: Stitch capabilities of the VERITAS Sarah. This image illustrates the maximum stitch length of 4 mm, maximum stitch width of 5 mm, 13 different stitches, a 4-step automatic buttonhole function, and adjustable stitch length.
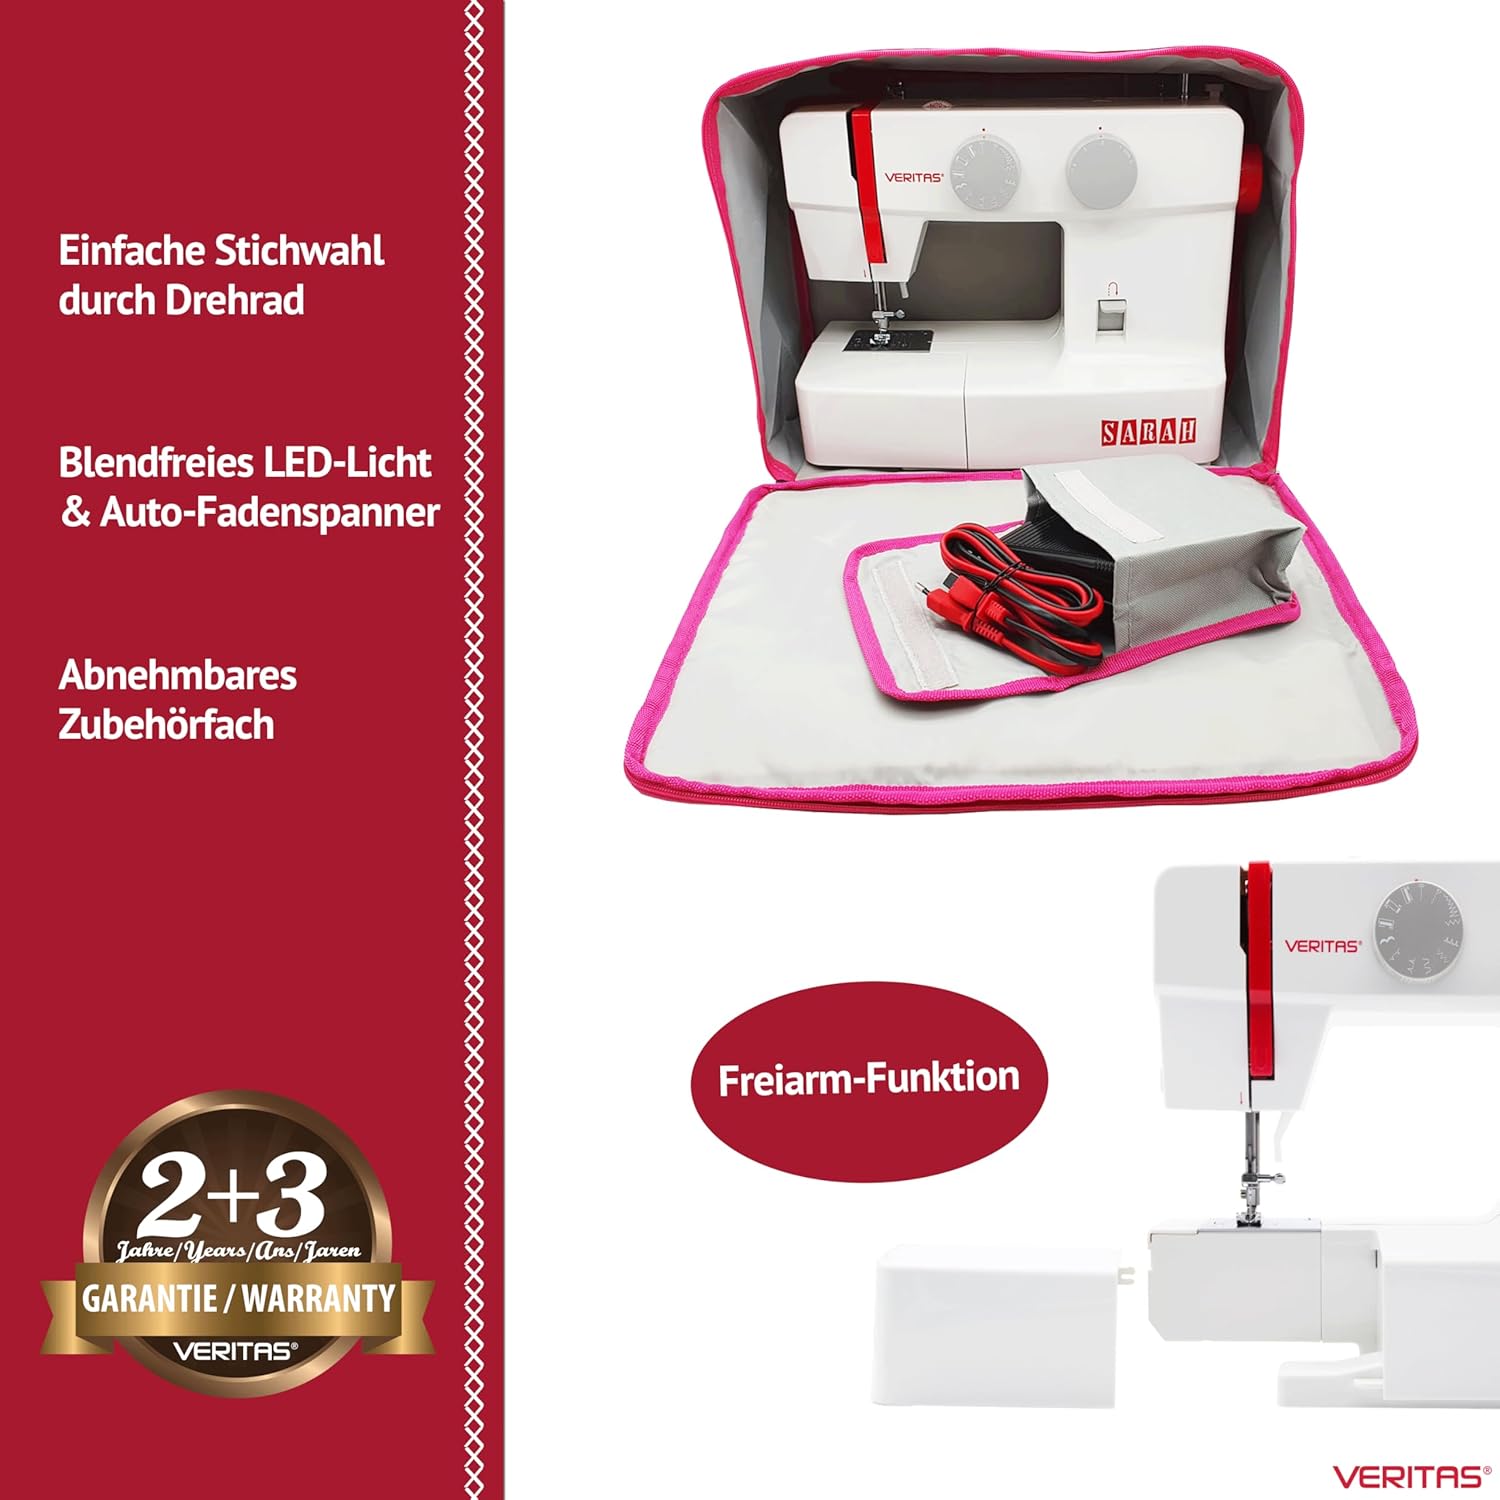
Obrázek 4.3: Convenience features of the VERITAS Sarah. This image shows easy stitch selection via a rotary dial, glare-free LED light, auto-thread tensioner, a removable accessory compartment, and the free-arm function.
5. Nastavení
5.1 Vybalení a umístění
- Opatrně vyjměte šicí stroj z obalu.
- Umístěte stroj na stabilní, rovný povrch s dostatečným osvětlením.
- Ujistěte se, že kolem stroje je dostatek prostoru pro pohodlnou obsluhu a manipulaci s látkou.
5.2 Připojení napájení
- Zapojte zástrčku nožního ovladače do zásuvky stroje.
- Zapojte napájecí kabel do vhodné elektrické zásuvky.
- Zapněte stroj pomocí vypínače, který se obvykle nachází na boku nebo vzadu.
5.3 Navíjení cívky
- Umístěte špulku nitě na špulku.
- Veďte nit horním vodítkem nitě a kolem napínacího kotouče navíjení cívky.
- Provlékněte nit otvorem v cívce a nasaďte cívku na vřeteno navíječe cívky.
- Zatlačte vřeteno navíječe cívek doprava.
- Jemným stisknutím nožního ovladače spusťte navíjení. Zastavte, když je cívka plná.
- Odstřihněte nit a zatlačte vřeteno navíječe cívky zpět doleva.
5.4 Vložení cívky
- Otevřete kryt cívky.
- Vložte navinutou cívku do pouzdra cívky a ujistěte se, že se nit odvíjí ve správném směru (obvykle proti směru hodinových ručiček).
- Protáhněte nit napínací pružinou a do štěrbiny vodítka nitě.
- Zavřete kryt cívky.
5.5 Navlékání horní nitě
- Zvedněte páčku přítlačné patky.
- Umístěte špulku nitě na špulku.
- Postupujte podle očíslované dráhy navlékání vyznačené na stroji a veďte nit skrz všechna vodítka a napínací kotouče.
- Bring the thread down and through the needle eye from front to back.
- Pull about 15 cm (6 inches) of thread through the needle eye and under the presser foot.
5.6 Vytažení spodní nitě
- Levou rukou lehce přidržte horní nit.
- Otočte ruční kolo směrem k sobě, abyste jehlu spustili do stehové desky, a poté ji znovu zvedněte.
- The upper thread will catch the bobbin thread, forming a loop. Pull the loop to bring the bobbin thread up through the needle plate hole.
- Protáhněte obě nitě (horní i cívkovou) pod přítlačnou patku a směrem k zadní části stroje.
6. Návod k obsluze
6.1 Výběr stehu
The VERITAS Sarah offers 13 different stitch patterns. To select a stitch, turn the stitch selection dial (left rotary wheel) until the desired stitch pattern aligns with the indicator mark.
6.2 Nastavení délky stehu
Adjust the stitch length using the stitch length dial (right rotary wheel). You can set the length between 0 and 4 mm. For most general sewing, a length of 2.5 mm is suitable.
6.3 Začínáme šít
- Umístěte látku pod přítlačnou patku.
- Sklopte páčku přítlačné patky.
- Jemně sešlápněte nožní ovladač pro zahájení šití. Čím silněji sešlápnete, tím rychleji bude stroj šít.
- Guide the fabric gently with both hands, but do not push or pull it forcefully.
6.4 Šití v opačném směru
To reinforce stitches at the beginning and end of a seam, press and hold the reverse lever/button. The machine will sew backward. Release the lever/button to resume forward sewing.
6.5 Finishing a Seam
- Sew a few reverse stitches to secure the seam.
- Zvedněte jehlu do nejvyšší polohy otáčením ručního kola směrem k sobě.
- Zvedněte páčku přítlačné patky.
- Pull the fabric towards the back of the machine.
- Use the integrated thread cutter or scissors to cut the threads, leaving about 10-15 cm (4-6 inches) of thread.
6.6 Buttonhole Sewing (4-Step)
- Připojte patku pro knoflíkové dírky.
- Označte si na látce polohu knoflíkové dírky.
- Select the first step of the buttonhole program on the stitch selection dial.
- Sešijte první stranu knoflíkové dírky.
- Change to the next step on the dial and sew the bar tack.
- Continue through all four steps, following the machine's instructions for each segment of the buttonhole.
- Use the seam ripper to carefully open the buttonhole.
6.7 Šití s volným ramenem
To use the free arm, simply slide off the accessory compartment. This exposes the narrow free arm, making it easier to sew small, circular items.
7. Údržba
Regular maintenance ensures the longevity and optimal performance of your sewing machine. Always disconnect the machine from the power supply before performing any maintenance.
7.1 Čištění oblasti cívky
- Vyjměte jehlu, přítlačnou patku a stehovou desku.
- Remove the bobbin case.
- Use the small brush provided to remove any lint and dust accumulated in the bobbin area and feed dog teeth.
- Znovu smontujte díly.
7.2 Oiling (If Applicable)
Refer to the detailed instruction manual for specific oiling points and frequency. Generally, a few drops of sewing machine oil in designated areas can keep moving parts running smoothly. Avoid over-oiling.
7.3 Výměna jehly
Replace the needle regularly (after 8-10 hours of sewing) or if it becomes bent, dull, or broken. Use the screwdriver to loosen the needle clamp screw, remove the old needle, insert a new one with the flat side facing the back, and tighten the screw. Ensure the needle is fully inserted.
8. Řešení problémů
This section addresses common issues you might encounter. For more detailed troubleshooting, consult the full instruction manual.
8.1 Vynechané stehy
- Příčina: Nesprávná jehla, ohnutá jehla, nesprávné navlékání nitě, nesprávná velikost jehly pro danou látku.
- Řešení: Replace the needle with a new, correct type and size for your fabric. Re-thread the machine completely, ensuring all guides are followed.
8.2 Thread Breakage (Upper Thread)
- Příčina: Incorrect upper thread tension, improperly threaded, burr on needle eye or thread path, poor quality thread, needle inserted incorrectly.
- Řešení: Check and adjust upper thread tension. Re-thread the machine. Inspect the needle and thread path for rough spots. Use good quality thread. Ensure needle is correctly inserted.
8.3 Thread Breakage (Bobbin Thread)
- Příčina: Improperly wound bobbin, incorrect bobbin insertion, lint in bobbin case, incorrect bobbin tension.
- Řešení: Re-wind the bobbin evenly. Re-insert the bobbin correctly. Clean the bobbin case area.
8.4 Uneven Stitches / Looping
- Příčina: Incorrect thread tension (upper or bobbin), improper threading, wrong needle size, pulling fabric.
- Řešení: Adjust thread tensions. Re-thread both upper and bobbin threads. Use the correct needle. Allow the feed dogs to move the fabric naturally.
8.5 Stroj se nespouští
- Příčina: Power cord not plugged in, power switch off, bobbin winder spindle engaged, machine jammed.
- Řešení: Check power connections. Ensure power switch is on. Disengage bobbin winder spindle. Check for thread jams in the bobbin area or needle plate.
9. Specifikace
| Značka | VERITAS |
| Číslo modelu | 1301 |
| Rozměry produktu (D x Š x V) | 37 x 16 x 29.5 cm |
| Hmotnost položky | 5 kg |
| Materiál | Metal (Aluminum Die-Cast Frame), Plastic |
| Stehové programy | 13 |
| Typ knoflíkové dírky | 4stupňová automatická převodovka |
| Max. délka stehu | 4 mm |
| Max. šířka stehu | 5 mm |
| Rychlost šití | 750 stehů/minutu |
| Osvětlení | LED |
| Zdroj napájení | Elektrický kabel |

Obrázek 9.1: Dimensions of the VERITAS Sarah Sewing Machine. This image provides a visual representation of the machine's length (37 cm), width (16 cm), and height (29.5 cm).
10. Záruka a podpora
10.1 Informace o záruce
The VERITAS Sarah Sewing Machine comes with a 5letá záruka výrobce. This typically includes a standard 2-year warranty, which can be extended by an additional 3 years upon product registration. Please refer to the warranty card included in your packaging or the manufacturer's official website for detailed terms and conditions regarding warranty claims and registration procedures.

Obrázek 10.1: Comparison highlighting VERITAS quality and warranty. This image emphasizes the stable aluminum die-cast frame, high piercing power for all fabrics, modern manufacturing, and the 5-year extended manufacturer's warranty upon registration.
Obrázek 10.2: Visual representation of the 2+3 year warranty for the VERITAS Sarah. This image clearly shows "2+3 Jahre/Years/Ans/Jaren GARANTIE/WARRANTY VERITAS".
10.2 Zákaznická podpora
For technical assistance, spare parts, or further inquiries, please contact VERITAS customer support. Contact details can typically be found on the manufacturer's webwebu nebo v dokumentaci dodané s vaším produktem.