
1. Úvod
Thank you for choosing the OSD Audio PRE-1 High Definition Preamplifier. This unit is designed to enhance your audio experience by providing versatile source selection and precise audio control. The PRE-1 acts as a central hub for various audio components, including turntables, CD/DVD players, and tape decks, delivering a clean and powerful signal to your main ampživější.
This manual provides detailed instructions for the proper setup, operation, and maintenance of your PRE-1 preamplifier. Please read this manual thoroughly before operating the unit to ensure optimal performance and longevity.
2. Důležité bezpečnostní informace
- Zdroj napájení: Připojujte jednotku pouze k typu zdroje napájení uvedenému na štítku s označením.
- Větrání: Ensure adequate ventilation. Do not block any ventilation openings. Install in accordance with the manufacturer’s instructions.
- Voda a vlhkost: Nepoužívejte tento přístroj v blízkosti vody a nevystavujte jej kapající nebo stříkající vodě.
- Teplo: Neinstalujte v blízkosti zdrojů tepla, jako jsou radiátory, tepelné regulátory, kamna nebo jiná zařízení (včetně amplifikátory), které produkují teplo.
- Čištění: Čistěte pouze suchým hadříkem.
- Servis: Nepokoušejte se tento výrobek opravit sami. Veškerý servis svěřte kvalifikovanému servisnímu personálu.
- Základy: Tato jednotka musí být řádně uzemněna.
3. Obsah balení
Zkontrolujte prosím, zda jsou v balení obsaženy následující položky:
- OSD Audio PRE-1 High Definition Preampdoživotní
- Napájecí kabel
- Uživatelská příručka (tento dokument)
4. Konec produktuview
4.1. Přední panel
The front panel provides access to all primary controls and a microphone input for convenient use.

This image displays the front panel of the OSD Audio PRE-1 Preamplifier, including its physical dimensions for installation planning.

Detailní view of the left side of the PRE-1's front panel, highlighting the Microphone Level, Bass, Midrange, and Treble adjustment knobs.

Detailní view of the right side of the PRE-1's front panel, showing the Loudness, Balance, and Volume controls, along with input selection and function buttons.
- Vypínač: Zapíná nebo vypíná jednotku.
- Vstup mikrofonu: 1/4palcový konektor jack pro připojení mikrofonu.
- Úroveň mikrofonu: Upravuje hlasitost mikrofonního vstupu.
- Ovládání basů: Upravuje nízkofrekvenční výstup.
- Mid Control: Adjusts the mid-range frequency output.
- Ovládání výšek: Upravuje vysokofrekvenční výstup.
- Hlasitost: Engages or disengages a loudness contour for enhanced bass and treble at low volumes.
- Váhy: Upravuje vyvážení levého/pravého kanálu.
- Objem: Master volume control for all outputs.
- Výběr vstupu: Rotary knob to choose between Phono, AUX1, AUX2, and CD/DVD inputs.
- Tape Button: Activates the Tape Monitor loop.
- Mono tlačítko: Combines stereo signals into a monaural output.
- Nízký filtr: Engages a low-frequency cut-off filter.
- Ztlumit: Silences all audio output.
4.2. Zadní panel
The rear panel houses all the necessary input and output connections for your audio system.
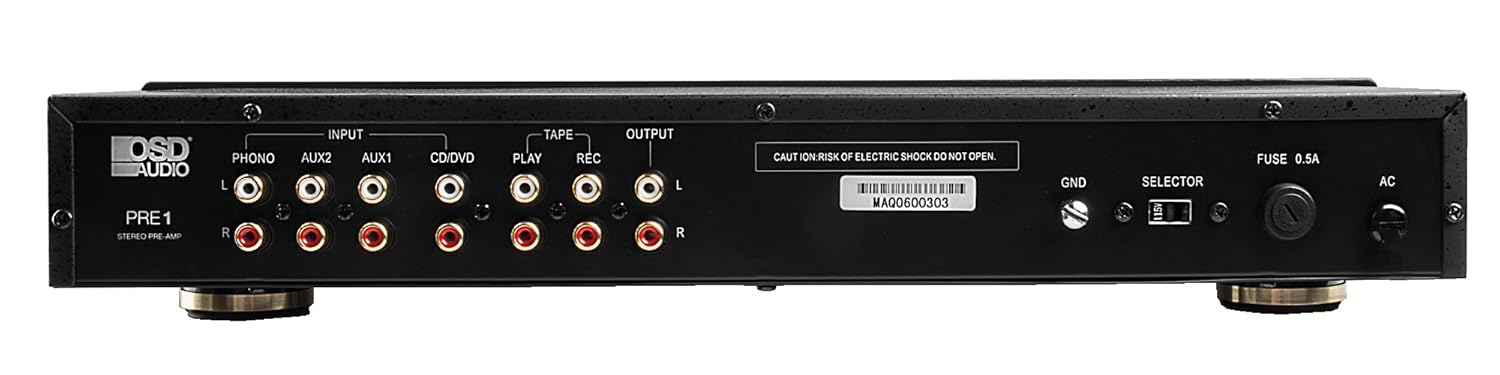
The rear panel of the PRE-1 Preamplifier, showing all input and output connections for various audio devices.
- Phono Input (L/R): RCA inputs for connecting a turntable. Includes a ground terminal.
- AUX1 Input (L/R): RCA inputs for general auxiliary devices.
- AUX2 Input (L/R): RCA inputs for a second auxiliary device.
- CD/DVD Input (L/R): RCA inputs for CD or DVD players.
- Tape Play (L/R): RCA inputs for the playback output of a tape deck or other recording device.
- Tape Rec (L/R): RCA outputs for connecting to the recording input of a tape deck or other recording device.
- Výstup (L/P): RCA outputs to connect to your main power ampživější.
- Zemnící svorka (GND): Connects to the ground wire of your turntable to reduce hum.
- Přepínač: For internal configuration (typically left in default position unless specified).
- pojistka: Replace only with the specified fuse type and rating.
- Vstup střídavého proudu: Connects to the supplied power cable.
5. Nastavení a připojení
Follow these steps to properly set up your OSD Audio PRE-1 Preampživější:
- Umístění: Place the PRE-1 on a stable, flat surface, ensuring adequate ventilation around the unit. Avoid placing it near heat sources or in direct sunlight.
- Vypnout: Ensure all audio components, including the PRE-1 and your main amplifier, are turned off before making any connections.
- Připojit zdroje:
- točna: Connect the RCA cables from your turntable to the Phono Input (L/R) on the PRE-1. Connect the turntable's ground wire to the GND terminal on the PRE-1.
- Přehrávač CD/DVD: Connect the RCA cables from your CD/DVD player to the CD/DVD Input (L/R).
- Other Devices (e.g., Streamer, Tuner): Connect RCA cables from these devices to the AUX1 Input (L/R) or AUX2 Input (L/R).
- Tape Deck: Connect the playback outputs of your tape deck to the Tape Play (L/R) inputs. Connect the recording inputs of your tape deck to the Tape Rec (L/R) výstupy.
- Připojte se k Ampživější: Připojte Output (L/R) RCA jacks on the PRE-1 to the input jacks of your main power ampživější.
- Připojení napájení: Připojte dodaný napájecí kabel k Vstup střídavého proudu on the rear panel of the PRE-1, then plug it into a suitable wall outlet.
- Počáteční zapnutí: Turn on your main power amplifier first, then turn on the PRE-1. When powering off, turn off the PRE-1 first, then your main ampživější.
6. Návod k obsluze
Once your PRE-1 is connected, follow these steps for basic operation:
- Vyberte vstup: Použijte Výběr vstupu rotary knob on the front panel to choose the desired audio source (Phono, AUX1, AUX2, CD/DVD).
- Upravit hlasitost: Začněte s Objem knob at its minimum setting. Begin playing your selected audio source and slowly increase the volume to a comfortable listening level.
- Ovládání tónů: Použijte Bas, Střednía Ztrojnásobit knobs to adjust the tonal characteristics of your audio. Turn clockwise to increase, counter-clockwise to decrease.
- Kontrola vyvážení: Upravte Váhy knob to fine-tune the left and right channel output for optimal stereo imaging.
- Hlasitost: Stiskněte tlačítko Hlasitost button to activate a contour that boosts bass and treble frequencies, which can be beneficial at lower listening volumes. Press again to deactivate.
- Nízký filtr: Stiskněte tlačítko Nízký filtr button to engage a filter that reduces very low frequencies. This can help eliminate rumble from turntables or other unwanted low-frequency noise. Press again to deactivate.
- Mono: Stiskněte tlačítko Mono button to combine the left and right stereo channels into a single monaural signal. This is useful for playing mono recordings. Press again for stereo.
- Ztlumit: Stiskněte tlačítko Ztlumit button to instantly silence the audio output. Press again to restore sound.
- Použití mikrofonu: Plug a microphone into the Mikrofonní vstup. Adjust the microphone's volume using the Úroveň mikrofonu knoflík.
- Tape Monitoring/Recording: If you have a tape deck connected, select the appropriate input for playback. To record, ensure your tape deck is set to record and the PRE-1 is passing the desired source through the Tape Rec outputs.
7. Údržba
Proper care and maintenance will ensure the longevity and optimal performance of your PRE-1 Preampživější.
- Čištění: Use a soft, dry cloth to clean the exterior of the unit. Do not use liquid cleaners, aerosols, or harsh chemicals, as they may damage the finish or internal components.
- Větrání: Periodically check that the ventilation openings are free from dust and obstructions.
- Spojení: Occasionally check all cable connections to ensure they are secure. Loose connections can lead to signal loss or interference.
- Skladování: If storing the unit for an extended period, disconnect it from the power outlet and store it in a cool, dry place, away from direct sunlight and extreme temperatures.
8. Řešení problémů
If you experience issues with your OSD Audio PRE-1, refer to the following common problems and solutions:
| Problém | Možná příčina | Řešení |
|---|---|---|
| Žádná síla | Power cable not connected; Power outlet not active; Blown fuse | Ensure power cable is securely connected. Test the outlet with another device. Check and replace the fuse if necessary (refer to specifications for fuse type). |
| Žádný zvukový výstup | Incorrect input selected; Volume too low; Mute engaged; Loose audio cables; Main amplifier off or incorrect input selected | Select the correct input source. Increase the volume. Disengage Mute. Check all RCA cable connections. Ensure your main amplifier is on and set to the correct input. |
| Zkreslený zvuk | Volume too high (clipping); Incorrect tone control settings; Faulty cables | Reduce the volume. Adjust Bass, Mid, and Treble controls to neutral or desired settings. Try replacing audio cables. |
| Hučení nebo bzučení | Ground loop; Loose ground wire (Phono); Interference from other electronics | Ensure turntable ground wire is connected to the PRE-1's GND terminal. Try moving the PRE-1 or other audio components away from power cables or other electronic devices. Use a ground loop isolator if necessary. |
| Mikrofon nefunguje | Mic not connected; Mic Level too low; Faulty microphone | Ensure microphone is securely plugged into the Mic Input. Increase the Mic Level. Test with another microphone if available. |
9. Specifikace
Below are the technical specifications for the OSD Audio PRE-1 Preampživější:
| Funkce | Specifikace |
|---|---|
| Model | PRE-1 |
| Značka | Zvuk OSD |
| Počet kanálů | 2 |
| Typ montáže | Povrchová montáž |
| UPC | 819603012446 |
| ASIN | B01MPYJLPX |
| Výrobce | Zvuk OSD |
10. Záruka a podpora
OSD Audio products are designed for reliability and performance. For specific warranty details and terms, please refer to the warranty card included with your product or visit the official OSD Audio website. If you require technical assistance or have questions not covered in this manual, please contact OSD Audio customer support.
OSD Audio Customer Support: Please visit the OSD Audio webweb s kontaktními informacemi a zdroji podpory.