
Zavedení
This manual provides detailed instructions for the installation, operation, and maintenance of your Venstar T1900 Residential Slimline Platinum Thermostat. Please read this manual thoroughly before attempting to install or operate the thermostat to ensure proper function and to avoid potential damage.
Důležité bezpečnostní informace
- Always turn off power to the heating/cooling system at the main circuit breaker or fuse box before installing or servicing the thermostat.
- This thermostat operates on 24 Volts AC. Do not connect to line voltage (120V nebo 240V).
- Pokud nejste obeznámeni s elektrickým zapojením, měl by instalaci provést kvalifikovaný technik.
- Do not short circuit the terminals on the gas valve or at the system control to test the thermostat. This will damage the thermostat and void the warranty.
- Ensure all wiring connections are secure and insulated to prevent short circuits.
Obsah balení
Ověřte, zda váš balíček obsahuje následující položky:
- Termostatická jednotka Venstar T1900
- Montážní materiál (šrouby a hmoždinky do zdi)
- Uživatelská příručka (tento dokument)
Konec produktuview
The Venstar T1900 is a 7-day programmable digital thermostat designed for residential use. It offers precise temperature control and energy-saving scheduling capabilities. This thermostat is compatible with heat/cool, heat pump, and dual-fuel systems, controlling up to three heat stages a dvě cool stages.
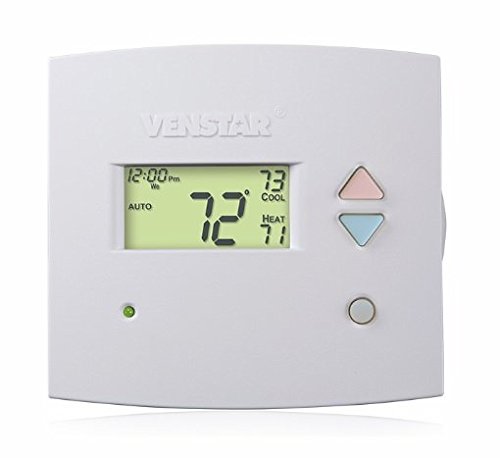
Obrázek 1: Přední view of the Venstar T1900 Thermostat. This image displays the thermostat's LCD screen and control buttons, indicating its slimline design.
Klíčové vlastnosti:
- 7denní programovatelnost: Allows for customized heating and cooling schedules for each day of the week.
- Kompatibilita systému: Works with heat/cool, dual-fuel, and heat pump systems.
- Multi-Stage ovládání: Manages up to three heat stages a dvě cool stages.
- Možnost dálkového ovládání: Controllable by phone using an optional add-on (sold separately).
- Automatic or Manual Operation: Provides flexibility for scheduled or on-demand temperature adjustments.
Průvodce instalací
Požadované nástroje:
- Šroubovák (Phillips a/nebo plochý)
- Drill with appropriate drill bit (if installing new wall anchors)
- Kleště pro odizolování
- Tužka
- Úroveň (volitelné)
1. Vypněte napájení
Locate the circuit breaker or fuse box that controls your heating and cooling system. Turn off the power completely before proceeding with any wiring.
2. Remove Old Thermostat (if applicable)
- Carefully remove the cover of your old thermostat.
- Pro ilustraci si vyfoťte stávající zapojení elektroinstalace.
- Label each wire with the terminal designation it was connected to (e.g., R, G, Y, W).
- Disconnect the wires and remove the old thermostat's mounting plate from the wall.
3. Namontujte novou základnu termostatu
- Separate the front cover of the T1900 thermostat from its base plate.
- Position the base plate on the wall where you want to install the thermostat. Ensure it is level.
- Označte montážní otvory tužkou.
- V případě potřeby vyvrtejte pilotní otvory a vložte do nich hmoždinky.
- Připevněte základní desku termostatu ke zdi pomocí dodaných šroubů.
4. Zapojení
Connect the wires from your HVAC system to the corresponding terminals on the T1900 thermostat base. Refer to the wiring diagram provided with your specific HVAC system for precise connections. Ensure wires are stripped approximately 3/8 inch and securely fastened under the terminal screws.
Běžné označení svorek:
- R/Rc/Rh: 24V Power (Heating/Cooling)
- C: Common (24V return)
- G: Větrák
- R/R1: Kompresor Stage 1 (chlazení)
- Y2: Kompresor Stage 2 (chlazení)
- T/T1: Teplo S.tage 1 (topení)
- W2: Teplo S.tage 2 (topení)
- O / B: Reversing Valve (Heat Pumps)
Note: The T1900 supports various system types. Consult the detailed wiring diagrams in the full installation manual for specific configurations (e.g., heat pump with auxiliary heat, conventional multi-stage systémy).
5. Připevnění termostatu k základně
Once wiring is complete and verified, carefully align the thermostat front cover with the mounted base plate and snap it into place.
6. Obnovte napájení
Return to your circuit breaker or fuse box and restore power to your heating and cooling system.
Počáteční nastavení
Upon initial power-up, the thermostat may prompt you to configure basic settings. Follow the on-screen instructions to set the current date, time, and system type (e.g., Conventional, Heat Pump).
System Type Configuration:
It is crucial to correctly configure the thermostat for your specific HVAC system. Incorrect settings can lead to improper operation or damage. Access the installer settings menu (refer to the full installation guide for specific button sequences) to select:
- Typ systému: Heat/Cool, Heat Pump, Dual Fuel
- Číslo tepla Stages
- Počet Cool Stages
- Reversing Valve Operation: O (Chlazení) nebo B (Vytápění)
Návod k obsluze
Pochopení displeje:
The LCD screen displays the current temperature, set temperature, system mode, fan mode, time, and programming status. Refer to the icons and indicators on the screen for current operational status.
Setting System Mode:
Stiskněte tlačítko MODE button to cycle through available system modes:
- TEPLO: The system will operate to maintain the heating setpoint.
- CHLADNÝ: The system will operate to maintain the cooling setpoint.
- AUTO: Termostat automaticky přepíná mezi vytápěním a chlazením podle potřeby, aby udržel nastavený teplotní rozsah.
- OFF: Systém vytápění a chlazení je vypnutý.
Setting Fan Mode:
Stiskněte tlačítko FAN tlačítko pro přepínání režimů ventilátoru:
- AUTO: Ventilátor běží pouze tehdy, když je aktivně zapnuto topení nebo chlazení.
- NA: Ventilátor běží nepřetržitě, bez ohledu na to, zda se jedná o vytápění nebo chlazení.
Nastavení teploty:
Použijte UP a DOLŮ arrow buttons to adjust the desired temperature setpoint. In programmable modes, this will temporarily override the schedule until the next scheduled change.
Programming Schedules (7-Day):
The T1900 allows for 7-day programming, enabling different schedules for each day of the week. This feature helps save energy by adjusting temperatures when you are away or asleep.
- Stiskněte tlačítko NAPROGRAMOVAT tlačítko pro vstup do programovacího režimu.
- Použijte DEN button to select the day or group of days you wish to program (e.g., Mon-Fri, Sat-Sun, or individual days).
- Použijte ČAS button to cycle through the four available periods: Wake, Leave, Return, Sleep.
- Použijte UP a DOLŮ arrow buttons to set the desired temperature for each period.
- Použijte DRŽET button to exit programming mode or save changes.
Refer to the detailed programming section in the full user guide for advanced options and specific button sequences.
Remote Control (Optional Add-on):
The Venstar T1900 thermostat can be controlled remotely via a phone using an optional add-on module (sold separately). This module connects to the thermostat and allows for remote access and control through a dedicated application. Installation and setup instructions for the remote control module are provided with the module itself.
Údržba
Cleaning the Thermostat:
To maintain the appearance and functionality of your thermostat, periodically wipe the exterior with a soft, damp hadříkem. Nepoužívejte abrazivní čisticí prostředky, rozpouštědla ani chemické spreje, protože by mohly poškodit plastové a elektronické součástky.
Výměna baterie:
The Venstar T1900 thermostat does not require batteries for operation as it is powered by the 24V AC system.
Odstraňování problémů
If you experience issues with your Venstar T1900 thermostat, consult the following common problems and solutions:
| Problém | Možná příčina | Řešení |
|---|---|---|
| Displej termostatu je prázdný | Termostat není napájen. | Zkontrolujte jistič vašeho systému HVAC. Ujistěte se, že jsou všechna kabeláž bezpečně připojena. |
| Heating/Cooling system does not respond | Incorrect system mode selected; wiring issue; system lockout. | Verify the system mode (HEAT/COOL/AUTO). Check wiring connections. Wait 5 minutes for system lockout to reset. |
| Odečet teploty se zdá být nepřesný | Umístění termostatu; zablokování senzoru. | Ensure the thermostat is not exposed to direct sunlight, drafts, or heat sources. Clean any dust from the thermostat vents. |
| Programming schedule is not working | Program not saved; temporary override active; incorrect time/day setting. | Ensure programs are saved. Check if a temporary override is active and cancel it. Verify current time and day settings. |
| Ventilátor běží nepřetržitě v automatickém režimu | Fan mode set to ON; wiring issue. | Press the FAN button to ensure it is set to AUTO. Check fan wiring. |
If these solutions do not resolve the issue, please contact customer support or a qualified HVAC technician.
Specifikace
| Funkce | Specifikace |
|---|---|
| Značka | Venstar |
| Název modelu | Venstar T1900 |
| Typ ovladače | Stiskněte tlačítko |
| Speciální funkce | Programovatelné |
| Barva | Bílý |
| Specifické použití pro produkt | Heat Pump, Heater |
| Typ řízení teploty | Programmable, Smart/Remote (with add-on) |
| svtage | 24 voltů AC |
| Typ zobrazení | LCD nebo LED |
| Kontrolní metoda | Remote (with add-on) |
| Podsvícení | Ano |
| Rozměry produktu | 5.3 x 2 x 2 palce |
| Hmotnost položky | 0.01 uncí |
| Jsou vyžadovány baterie? | Žádný |
Informace o záruce
Venstar products are manufactured to high-quality standards. This product is covered by a limited warranty against defects in materials and workmanship. The specific terms and duration of the warranty may vary. Please refer to the warranty card included with your product or visit the official Venstar webpodrobné informace o záruce a postupech registrace naleznete na webu.
Zákaznická podpora
For technical assistance, troubleshooting, or warranty inquiries, please contact Venstar customer support. You can typically find contact information, including phone numbers and email addresses, on the official Venstar webweb (www.venstar.com) nebo na obalu produktu.
When contacting support, please have your thermostat model number (T1900) and any relevant purchase information ready.