
1. Úvod
This manual provides essential information for the safe and efficient operation of your KitchenAid 5KMT223GER 2-Slot Automatic Toaster. Please read all instructions carefully before first use and retain for future reference.

Obrázek 1.1: Přední strana view of the KitchenAid 5KMT223GER 2-Slot Automatic Toaster.
2. Důležité bezpečnostní pokyny
Při používání elektrických spotřebičů je třeba vždy dodržovat základní bezpečnostní opatření, včetně následujících:
- Přečtěte si všechny pokyny.
- Nedotýkejte se horkých povrchů. Použijte rukojeti nebo knoflíky.
- Abyste se chránili před úrazem elektrickým proudem, neponořujte kabel, zástrčky ani toustovač do vody ani jiné kapaliny.
- Když je jakýkoli spotřebič používán dětmi nebo v jejich blízkosti, je nutný pečlivý dohled.
- Vytáhněte zástrčku ze zásuvky, když ji nepoužíváte a před čištěním. Před nasazením nebo sejmutím dílů nechte vychladnout.
- Nepoužívejte žádný spotřebič s poškozeným kabelem nebo zástrčkou, ani po poruše spotřebiče, jeho pádu či jiném poškození. Spotřebič vraťte do nejbližšího autorizovaného servisního střediska k prohlídce, opravě nebo seřízení.
- Použití příslušenství, které není doporučeno výrobcem spotřebiče, může způsobit zranění.
- Nepoužívejte venku.
- Nenechávejte kabel viset přes okraj stolu nebo pultu ani se dotýkat horkých povrchů.
- Neumisťujte na horký plynový nebo elektrický hořák nebo do jeho blízkosti nebo do vyhřáté trouby.
- Pro odpojení vypněte libovolný ovladač a poté vytáhněte zástrčku ze zásuvky.
- Nepoužívejte spotřebič k jinému než určenému použití.
- Do toustovače se nesmí vkládat příliš velké potraviny, obaly z kovové fólie nebo náčiní, protože by mohlo dojít k požáru nebo úrazu elektrickým proudem.
- Pokud jsou topinkovače zakryty nebo se dotýkají hořlavého materiálu, včetně záclon, závěsů, stěn a podobně, když jsou v provozu, může dojít k požáru.
- Nepokoušejte se vytlačit jídlo, když je toustovač zapojený.
- Nepracujte bez dozoru.
- Always remove the crumb tray for cleaning. Do not operate the toaster without the crumb tray in place.
3. Části a vlastnosti
Familiarize yourself with the components of your KitchenAid 2-Slot Automatic Toaster:
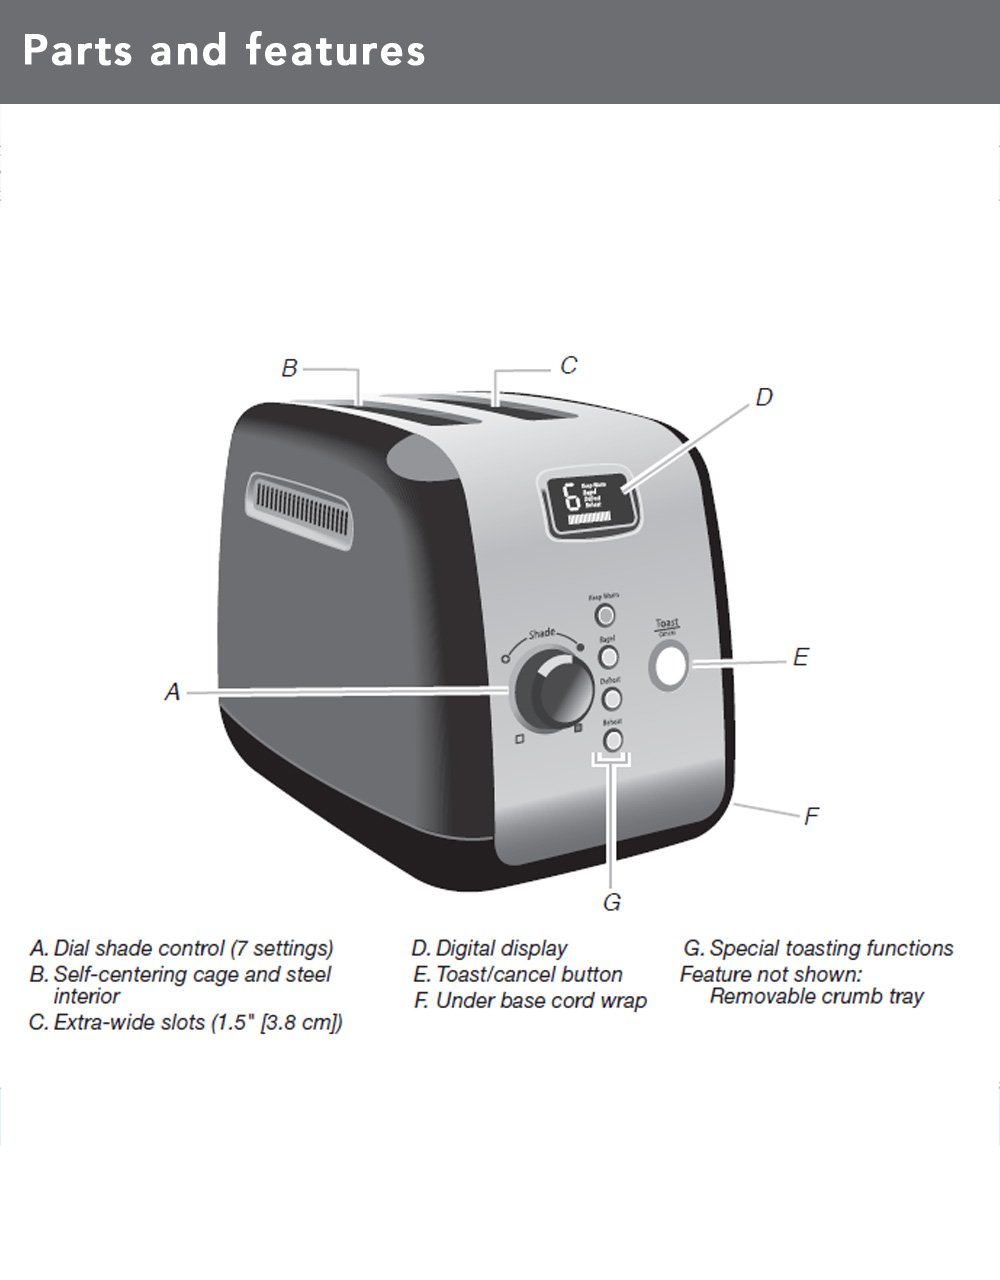
Image 3.1: Diagram illustrating the main parts and features of the toaster.
- Shade Control Dial (A): Adjusts the browning level with 7 settings.
- Self-Centering Bread Racks (B): Automatically centers bread for even toasting.
- Extra-Wide Slots (C): 3.8 cm (1.5 inches) wide slots accommodate various bread types.
- Digital Display (D): Shows selected shade setting and a countdown timer for toasting progress.
- Toast/Cancel Button (E): Initiates or cancels the toasting cycle. Features motorized lift.
- Under Base Cord Wrap (F): For convenient cord storage.
- Special Toasting Functions (G): Includes Keep Warm, Bagel, Defrost, and Reheat buttons.
- Vyjímatelný tác na drobky: Located at the back for easy cleaning (not shown in diagram).
4. Nastavení
Before using your toaster for the first time:
- Vybalte toustovač a odstraňte všechny obalové materiály.
- Otřete vnější povrch toustovače reklamouamp hadříkem. Před zapojením se ujistěte, že je zcela suchý.
- Place the toaster on a stable, flat, heat-resistant surface, away from flammable materials.
- Ensure the crumb tray is properly inserted at the back of the toaster.
- For the first use, operate the toaster without bread on the highest shade setting (7) to burn off any manufacturing residues. A slight odor or smoke may be present; this is normal. Allow the toaster to cool completely.
5. Návod k obsluze
Follow these steps to toast bread and use the special functions:

Image 5.1: Bread slices inserted into the toaster's extra-wide slots.
5.1 Základní opékání
- Plug the toaster into a grounded electrical outlet.
- Place bread slices into the toasting slots. The self-centering racks will automatically adjust.
- Otočte Ovladač stínění to select your desired browning level (1 for lightest, 7 for darkest). The digital display will show the selected shade.
- Stiskněte tlačítko Toast/Cancel Button. The motorized lift will lower the bread into the slots, and the toasting cycle will begin. The digital display will show a countdown.
- Once the cycle is complete, the toaster will automatically raise the toasted bread.
- Chcete-li cyklus opékání kdykoli zastavit, stiskněte tlačítko Toast/Cancel Button. The bread will be raised.
5.2 Speciální funkce
Your toaster includes dedicated buttons for specialized toasting needs:
- UCHOVÁVEJTE V TEPLE: Press this button after a toasting cycle to keep toasted food warm for up to one minute. The toaster will gently lower and raise the bread after the warming period.
- BAGEL: This function toasts the cut-side of a bagel while gently warming the outer surfaces. Insert bagels with the cut side facing inwards. Select your desired shade, then press the BAGEL tlačítko následované Toast/Cancel Button.
- ROZMRAZOVÁNÍ: Use this function to defrost and toast frozen food. Select your desired shade, then press the ROZMRAZOVÁNÍ tlačítko následované Toast/Cancel Button. The toaster will automatically adjust the toasting time.
- OHŘEV: This function quickly reheats previously toasted food without further browning. Press the OHŘEV tlačítko následované Toast/Cancel Button.
6. Čištění a údržba
Pravidelné čištění zajišťuje optimální výkon a prodlužuje životnost vašeho toustovače.
6.1 Zásobník na drobky

Image 6.1: The removable crumb tray for easy cleaning.
- Před čištěním vždy odpojte toustovač ze zásuvky a nechte jej zcela vychladnout.
- Pull out the removable crumb tray located at the back of the toaster.
- Discard crumbs. The crumb tray can be washed in the top rack of a dishwasher or by hand with warm, soapy water. Rinse thoroughly and dry completely before reinserting.
- Never operate the toaster without the crumb tray properly inserted.
6.2 Exteriér
- Otřete vnější povrch toustovače reklamouamp hadříkem a důkladně osušte.
- Nepoužívejte abrazivní čisticí prostředky ani drátěnky, protože by mohly poškrábat povrch.
- Nikdy neponořujte toustovač do vody nebo jiné tekutiny.
7. Řešení problémů
If you experience issues with your toaster, refer to the following table for common problems and solutions:
| Problém | Možná příčina | Řešení |
|---|---|---|
| Topinkovač se nezapne. | Není zapojeno do zásuvky; výpadek napájenítage; jistič se vypnul. | Ujistěte se, že je toustovač bezpečně zapojený do funkční zásuvky. Zkontrolujte jistič v domácnosti. |
| Bread does not lower or raise. | Toaster not powered; Toast/Cancel button not pressed; food jammed. | Ensure power is on. Press Toast/Cancel button. Unplug toaster and carefully remove any jammed food. |
| Nerovnoměrné opečení. | Nerovnoměrná tloušťka chleba; hromadění drobků. | Ensure bread slices are of similar thickness. Clean crumb tray regularly. |
| Zápach kouře nebo spáleniny. | Food jammed; crumb buildup; high shade setting. | Immediately press Cancel. Unplug and allow to cool. Remove jammed food or clean crumb tray. Reduce shade setting for next use. |
If the problem persists after attempting these solutions, please contact KitchenAid customer support.
8. Specifikace
| Funkce | Detail |
|---|---|
| Číslo modelu | 5KMT223GER |
| Wattage | 1100 wattů |
| svtage | 220 voltů |
| Slot Count | 2 |
| Nastavení stínu | 7 |
| Speciální funkce | Keep Warm, Bagel, Defrost, Reheat, Cancel |
| Materiál | Kov |
| Rozměry produktu (D x Š x V) | 25H x 34Š x 25.5V centimetrů |
| Hmotnost položky | 2200 gramů |
| Zahrnuté komponenty | Pop-up Toaster, Removable Crumb Tray |
9. Záruka a podpora
Your KitchenAid 5KMT223GER 2-Slot Automatic Toaster is covered by a 2letá omezená záruka od data nákupu. Tato záruka se vztahuje na vady materiálu a zpracování při běžném používání v domácnosti.
For warranty service, technical support, or to order replacement parts, please contact KitchenAid customer service. Keep your purchase receipt as proof of purchase for warranty claims.