
LUX P711-010
Lux Pro Home Thermostat P711 User Manual
Model: P711-010 | 7-Day Programmable: 1 Heat & 1 Cool Stage
1. Konec produktuview
The Lux Pro Home Thermostat Model P711-010 is a versatile 7-day programmable thermostat designed for 1 heat and 1 cool stage HVAC systems. It offers flexible temperature control options, including 7-day, 5/2-day programming, or non-programmable settings. Key features include an easy-view backlight, keypad lock for security, and customizable display options for Fahrenheit or Celsius.
This thermostat is dual-powered, operating on 2 AA alkaline batteries (included) or a 24-volt system, ensuring reliable performance. It is designed for easy installation and intuitive operation, making it a convenient solution for managing your home's heating and cooling.

Obrázek 1: Přední strana view of the Lux Pro P711 Thermostat, showing the display, fan and system mode switches, and control buttons.

Figure 2: Labeled diagram of the P711 control panel, indicating the LCD Display Screen, Fan Mode Switch, System Mode Switch, SET, NEXT, HOLD buttons, and UP and DOWN buttons.
2. Bezpečnostní informace
Before installation or operation, please read all instructions carefully. Failure to follow these instructions could result in property damage or personal injury.
- Před instalací nebo servisem termostatu vždy vypněte napájení topného/chladicího systému hlavní pojistkou nebo jističem.
- Ujistěte se, že všechna elektroinstalace jsou bezpečná a splňují místní elektrotechnické předpisy.
- Do not short (jumper) across the electrical terminals on the thermostat base.
- Tento termostat je určen pro nízké objemytage (24V) systems. Do not use with line voltagsystémy (120 V/240 V).
- Uchovávejte baterie mimo dosah dětí. Použité baterie řádně zlikvidujte.
3. Instalace
3.1. Kompatibilita
The P711 thermostat is compatible with a variety of 24V heating and cooling systems. Refer to the compatibility chart below to ensure your system is supported.

Figure 3: System Compatibility Chart for the P711 Thermostat, detailing compatible and non-compatible HVAC systems.
3.2. Požadované nástroje a materiály
- Šroubovák s křížovou hlavou
- Drill with 3/16” (4.8mm) drill bit (if new holes are needed)
- Odizolovače drátů (v případě potřeby)
- Tužka
- Úroveň (volitelné)
3.3. Kroky instalace
- Vypnout napájení: Locate the circuit breaker or fuse box that controls your heating and cooling system and turn off the power. Verify the power is off by attempting to turn on your system.
- Odstraňte starý termostat: Carefully remove the cover of your old thermostat. Take a picture of the wiring connections before disconnecting any wires. Label each wire with the terminal designation (e.g., R, G, Y, W, C) using the provided wire labels.
- Demontáž montážní desky: Unscrew and remove the old thermostat's mounting plate from the wall.
- Montáž nové základny termostatu: Separate the front cover of the P711 thermostat from its base. Position the new thermostat base on the wall, feeding the wires through the opening. Mark the mounting holes with a pencil. If drilling new holes, use a 3/16” drill bit and insert the wall anchors. Secure the thermostat base to the wall using the provided screws.
- Zapojení termostatu: Connect the labeled wires to the corresponding terminals on the P711 thermostat base. Refer to the wiring diagrams below for common configurations. Ensure connections are tight.

Figure 4: Wiring diagram for 3/4 wire conventional, non-heat pump, 1-stage cool only systems. Shows connections for C, G, RH, RC, W, Y, O/B terminals.
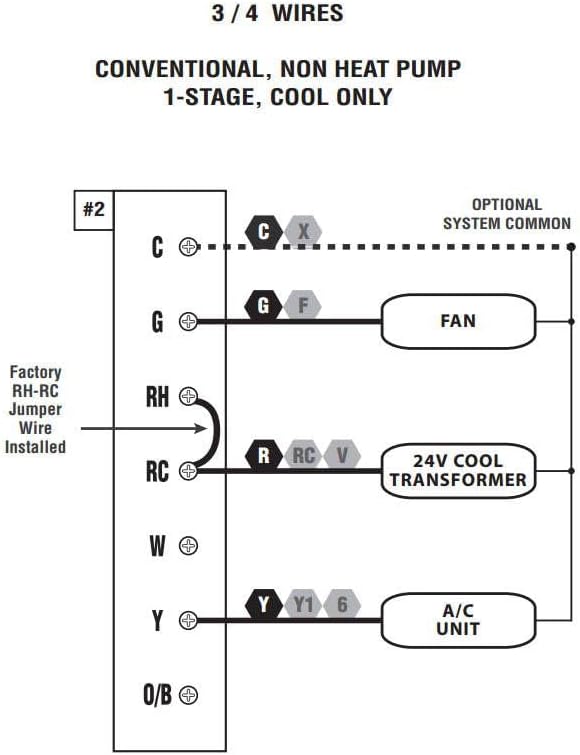
Figure 5: Wiring diagram for 4/5 wire conventional, non-heat pump, 1-stage tepla a 1-stage cool systems. Shows connections for C, G, RH, RC, W, Y, O/B terminals.

Figure 6: Wiring diagram for 5/6 wire conventional, non-heat pump, 1-heat / 1-cool systems with two transformers. Shows connections for C, G, RH, RC, W, Y, O/B terminals, and the removal of the factory RH-RC jumper wire.
- Vložte baterie: If using battery power, insert the 2 AA alkaline batteries into the battery compartment.
- Attach Thermostat Cover: Carefully align the thermostat cover with the base and snap it into place.
- Obnovit napájení: Return to the circuit breaker or fuse box and restore power to your heating and cooling system.
4. Počáteční nastavení a konfigurace
4.1. Nastavení času a dne
Upon initial power-up or after a battery change, the display will show a flashing time and day. Use the SOUBOR button to navigate through the time and day settings, and the UP a DOLŮ buttons to adjust the values. Press DALŠÍ pro potvrzení každého nastavení.
4.2. Programovací režimy
The P711 offers three programming options: 7-day, 5/2-day, or non-programmable. You can select your preferred mode during the initial setup or by accessing the system settings. Refer to the detailed programming instructions in the full manual for specific steps on setting schedules for each day or period.
4.3. Display Options (Fahrenheit/Celsius)
You can switch between Fahrenheit (°F) and Celsius (°C) display modes. This setting is typically found within the advanced setup menu. Consult the full manual for instructions on accessing and changing this option.
4.4. Zámek klávesnice
The keypad lock feature prevents unauthorized access or accidental changes to your thermostat settings. To activate or deactivate the keypad lock, follow the instructions provided in the comprehensive manual.
5. Provoz
5.1. Nastavení teploty
V normálním provozním režimu použijte UP or DOLŮ buttons to adjust the desired temperature setpoint. The new setpoint will be displayed, and the thermostat will adjust the system to reach it.
5.2. Nastavení ventilátoru
The fan mode switch allows you to select between two settings:
- AUTO: The fan runs only when the heating or cooling system is actively operating. This is the most energy-efficient setting.
- NA: Ventilátor běží nepřetržitě, bez ohledu na to, zda je aktivní systém topení nebo chlazení.
5.3. Systémový režim
The system mode switch allows you to select the operating mode for your HVAC system:
- TEPLO: Termostat bude řídit váš topný systém tak, aby udržoval nastavenou teplotu.
- OFF: Systémy vytápění i chlazení jsou vypnuty.
- CHLADNÝ: Termostat bude řídit váš chladicí systém tak, aby udržoval nastavenou teplotu.
5.4. Funkce Hold
The DRŽET button allows you to temporarily or permanently override the programmed schedule. When activated, the thermostat will maintain the current temperature setpoint until the HOLD function is canceled or a new schedule period begins (for temporary hold).
5.5. Temporary Override
Adjusting the temperature using the UP or DOLŮ buttons during a programmed period will initiate a temporary override. The thermostat will maintain this new temperature until the next scheduled program period begins.
6. Údržba
6.1. Výměna baterie
The thermostat uses 2 AA alkaline batteries. When the battery indicator appears on the display, replace the batteries promptly to ensure continuous operation. Open the battery compartment, remove old batteries, and insert new ones, observing polarity (+/-). The thermostat has battery-free memory, so programming should not be lost during battery replacement.
6.2. Čištění
Očistěte vnější povrch termostatu měkkým hadříkemamp hadříkem. Nepoužívejte abrazivní čisticí prostředky ani rozpouštědla, protože by mohly poškodit povrchovou úpravu nebo vnitřní součásti.
7. Řešení problémů
If you experience issues with your Lux Pro P711 thermostat, refer to the common troubleshooting steps below. For more complex problems, contact customer support.
| Problém | Možná příčina | Řešení |
|---|---|---|
| Displej je prázdný nebo tmavý | Low or dead batteries; No 24V power (if wired); Loose connections. | Replace batteries. Check circuit breaker for HVAC system. Verify wiring connections are secure. |
| System (Heat/Cool) does not turn on | System switch in OFF position; Incorrect wiring; Blown fuse in HVAC system; Temperature setpoint not calling for heat/cool. | Ensure system switch is set to HEAT or COOL. Recheck wiring against diagrams. Check HVAC system fuse. Adjust setpoint to be above (for heat) or below (for cool) current room temperature. |
| Ventilátor nefunguje | Fan switch in AUTO; Incorrect wiring. | Set fan switch to ON to test continuous operation. Verify fan wiring (G terminal). |
| Nepřesný údaj o teplotě | Thermostat exposed to direct sunlight or drafts; Needs calibration. | Relocate thermostat if possible. Access user temperature calibration setting (refer to full manual). |
| Problémy s programováním | Incorrect programming steps; Keypad locked. | Review programming instructions carefully. Unlock keypad if activated. |
8. Specifikace
| Funkce | Specifikace |
|---|---|
| Značka | LUX |
| Název modelu | P711-010 |
| Typ ovladače | Stiskněte tlačítko |
| Speciální funkce | Nízký objemtage |
| Barva | Bílý |
| Typ řízení teploty | Manuální, Programovatelné |
| Technologie připojení | N/A (Note: Product specifications list Wi-Fi, but this model is typically non-Wi-Fi. Refer to specific product packaging for confirmation.) |
| Zahrnuté komponenty | P711-010 Programmable 7 Day Thermostat, 2 AA LR6 batteries, 2 ST screws, 2 wall anchors, wire labels, instruction manual |
| Zdroj napájení | Battery Powered (2 AA included), 24 Volts (system power) |
| Hmotnost položky | 1.6 unce |
| svtage | 24 voltů |
| Materiál | Plast |
| Tvar | Obdélníkový |
| Typ zobrazení | LCD s podsvícením |
| Typ ovládání | Ovládání tlačítkem |
| Typ montáže | Držák na zeď |
| Styl | Programmable: 1 heat & 1 cool Stage |
| Podsvícení | Ano |
| Osvědčení | UL (Underwriters Laboratories) Low Voltage Certification |
| Rozměry produktu | 1.25 x 3.38 x 5.38 palce |
| UPC | 021079147113 |
9. Záruka a podpora
9.1. Informace o záruce
The Lux Pro P711 Thermostat typically comes with a 5-year limited warranty from the date of purchase. This warranty covers defects in materials and workmanship under normal use and service. Please retain your proof of purchase for warranty claims.
9.2. Zákaznická podpora
For technical assistance, troubleshooting not covered in this manual, or warranty inquiries, please contact LUX customer support. Refer to the contact information provided on the product packaging or the official LUX webweb (www.luxproducts.com) for the most up-to-date support options.
Ask a question about this manual
Ask about setup, troubleshooting, compatibility, parts, safety, or missing instructions. Manuals+ will review the question and use this page’s manual context to help answer it.