
1. Úvod
The ULTRICS Digital Multimeter is a compact and versatile tool designed for both commercial and home use. It functions as a voltmeter, ammeter, and ohmmeter, capable of testing continuity, AC/DC voltage, diode, transistor HFE, and car batteries. This manual provides essential information for the safe and effective operation, maintenance, and troubleshooting of your multimeter.

Image 1.1: The ULTRICS Digital Multimeter, including the main unit, test leads, and a 9V battery.
2. Bezpečnostní informace
Vždy dodržujte následující bezpečnostní opatření, abyste předešli zranění osob nebo poškození multimetru:
- Nepřekračujte maximální vstupní hodnoty pro žádný rozsah.
- Ensure the test leads are properly connected and the rotary switch is set to the correct range before making measurements.
- Avoid touching the metal tips of the test leads when connected to a circuit.
- Nepoužívejte multimetr, pokud se jeví poškozený nebo pokud jsou měřicí vodiče roztřepené.
- Před měřením odporu, kontinuity nebo diod vždy odpojte napájení obvodu.
- Vyměňte baterii, když se zobrazí indikátor slabé baterie, abyste zajistili přesné měření.
3. Konec produktuview
Familiarize yourself with the components and features of your ULTRICS Digital Multimeter:
- LCD podsvícený displej: Provides clear digital readings, visible in low light conditions.
- Otočný přepínač: Používá se k výběru požadované měřicí funkce (např. objemtage, Current, Resistance).
- Zdířky pro testovací vodiče: Input terminals for connecting the test leads (COM, VΩmA, 10ADC).
- Tlačítko pro pozastavení dat: Freezes the current reading on the display for easy note-taking.
- Tlačítko podsvícení: Aktivuje podsvícení displeje.
- Vestavěný stojan: Allows the multimeter to stand upright for convenient viewIng.
- Removable Rubber Casing: Provides protection against splashes and minor impacts.
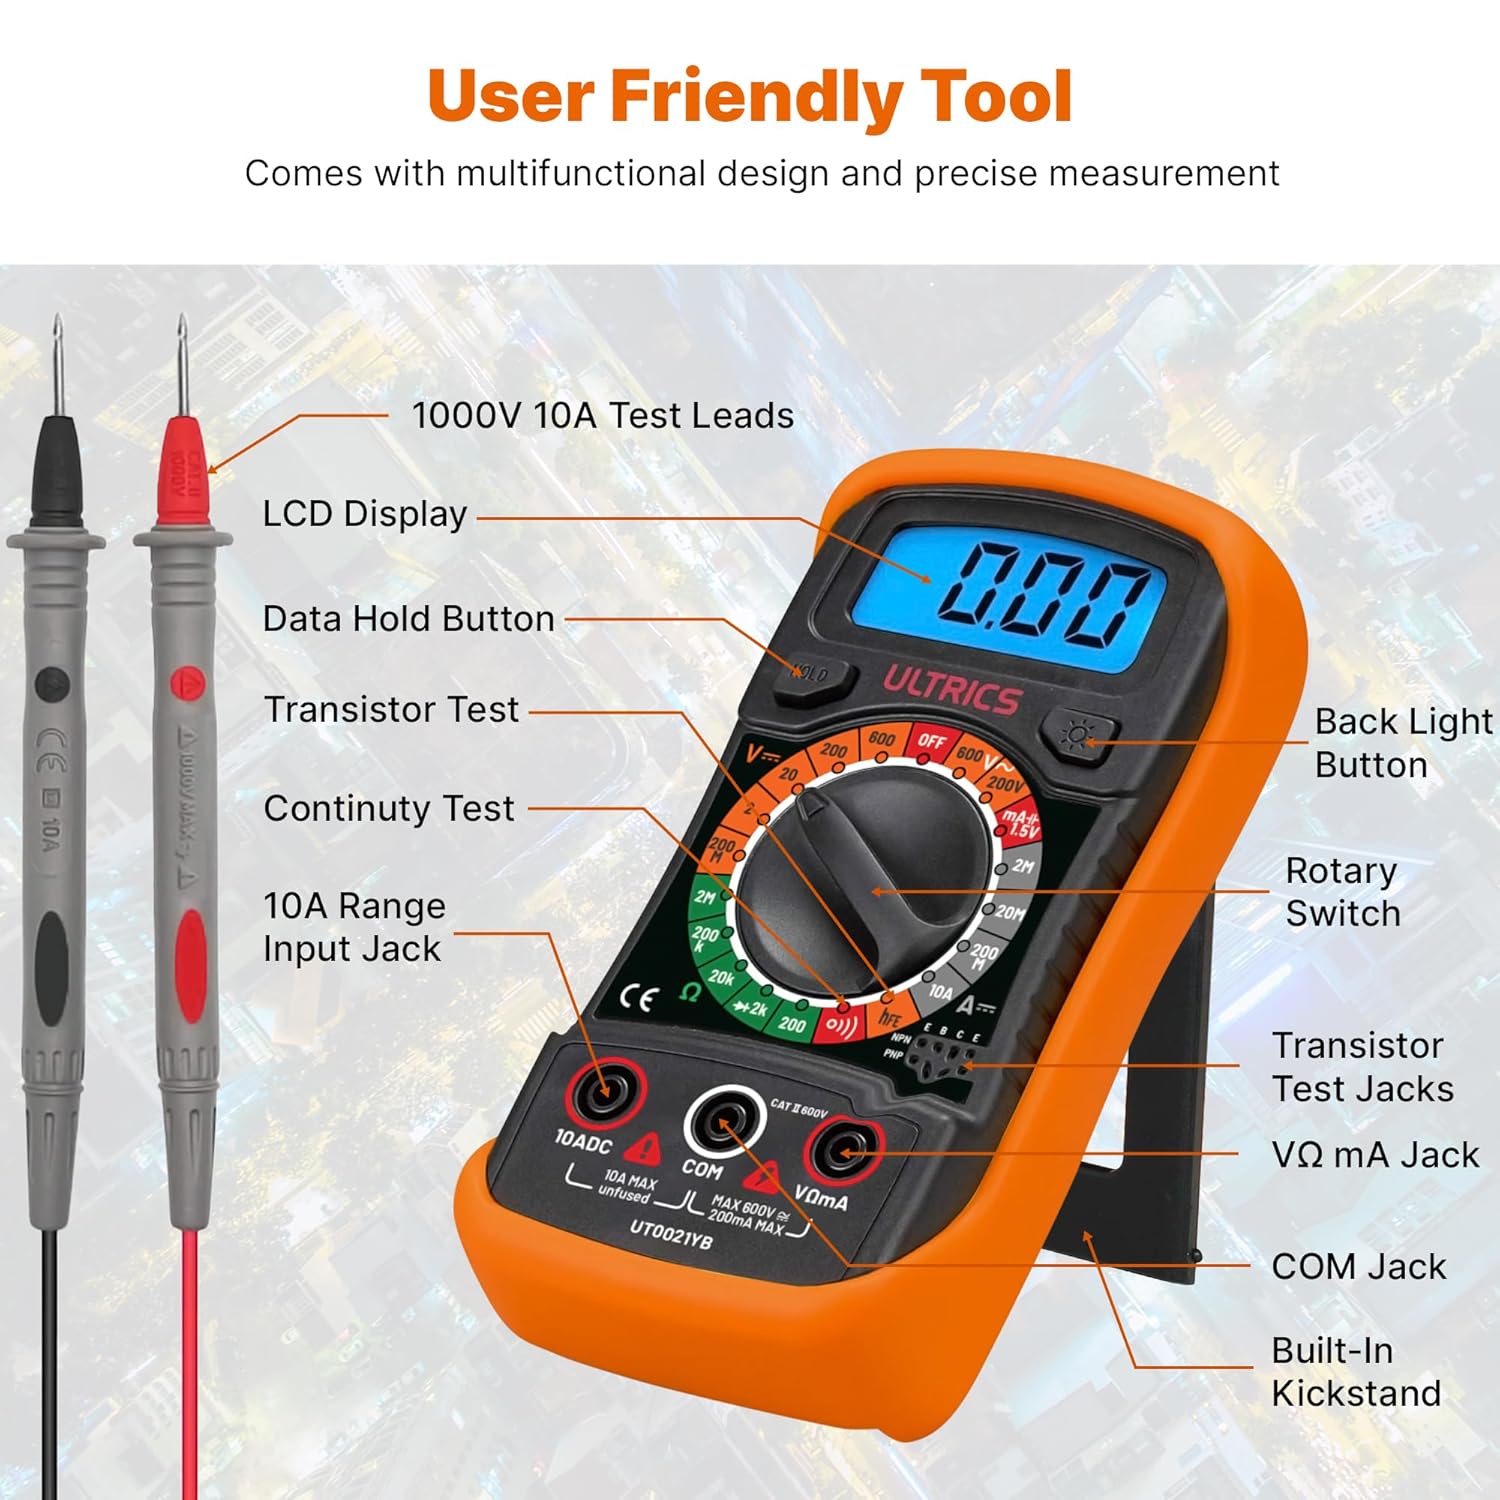
Image 3.1: Detailed diagram showing the various parts of the multimeter, including the LCD display, rotary switch, test lead jacks, and buttons.

Obrázek 3.2: Detailní záběr view highlighting the backlit LCD screen and the retractable kickstand for improved usability.
4. Nastavení
Before first use, or when the low battery indicator appears, install or replace the 9V battery.
- Instalace baterie: Locate the battery compartment on the back of the multimeter. Use a screwdriver to open the cover. Insert a 9V battery, observing the correct polarity. Close the cover securely.
- Připojení měřicích vodičů: Insert the black test lead into the 'COM' (Common) jack. Insert the red test lead into the 'VΩmA' jack for voltage, resistance, and small current measurements. For high current (up to 10A), insert the red lead into the '10ADC' jack.
5. Návod k obsluze
This multimeter offers a range of measurement capabilities. Always ensure the correct function is selected and leads are connected appropriately.

Image 5.1: Visual representation of the multimeter's multi-functional capabilities, including AC/DC Voltage, Current, Resistance, Continuity, Diode, Capacity, and Transistor testing.
- Měření AC/DC Voltage:
Nastavte otočný přepínač do polohy „V~“ (AC Volumetage) nebo 'V-' (DC Voltage) range. Connect the test leads in parallel to the circuit or component being measured. Read the value on the LCD. - Měření stejnosměrného proudu:
Set the rotary switch to the 'A-' (DC Current) range. Ensure the red lead is in the appropriate current jack (VΩmA for mA, 10ADC for 10A). Connect the multimeter in series with the circuit. Read the value on the LCD. - Měření odporu (Ω):
Set the rotary switch to the 'Ω' (Resistance) range. Ensure the circuit is de-energized. Connect the test leads across the component. Read the value on the LCD. - Test kontinuity:
Set the rotary switch to the continuity symbol (speaker icon). Connect the test leads across the circuit or component. An audible beep indicates continuity (low resistance). - Test diod:
Set the rotary switch to the diode symbol. Connect the red lead to the anode and the black lead to the cathode of the diode. The display will show the forward voltagpokles e. Pro kontrolu přepólování vodičů zaměňte. - Test tranzistoru HFE:
Set the rotary switch to the 'hFE' range. Insert the transistor's emitter, base, and collector leads into the corresponding sockets on the multimeter. The display will show the transistor's HFE value. - Test baterie:
Set the rotary switch to the '1.5V' or '9V' battery test range. Connect the test leads to the battery terminals (red to positive, black to negative). The display will show the battery voltage.

Image 5.2: Demonstrates the 'Hold' button function, which allows users to freeze the displayed reading for convenient note-taking or collaboration.

Obrázek 5.3: Příkladamples of the multimeter being used for various tests, including AC/DC Voltage, DC Current, Battery, and Continuity measurements.

Image 5.4: Illustrates the versatile usability of the multimeter across different scenarios such as car battery testing, appliance repair, laboratory work, and general DIY projects.
6. Údržba
Správná údržba zajistí dlouhou životnost a přesnost vašeho multimetru.
- Čištění: Otřete multimetr reklamouamp tkanina. Nepoužívejte abrazivní čisticí prostředky nebo rozpouštědla.
- Výměna baterie: Replace the 9V battery promptly when the low battery indicator appears. Remove the battery if the multimeter will not be used for an extended period.
- Skladování: Multimetr skladujte na chladném a suchém místě, mimo dosah přímého slunečního záření a extrémních teplot.
7. Řešení problémů
Pokud narazíte na problémy s multimetrem, podívejte se na následující běžné problémy a jejich řešení:
| Problém | Možná příčina | Řešení |
|---|---|---|
| Žádný displej nebo tlumený displej | Vybitá nebo vybitá baterie | Vyměňte 9V baterii. |
| Nesprávné údaje | Incorrect function selected, poor lead connection, or battery low. | Verify rotary switch setting, ensure leads are firmly connected, replace battery if needed. |
| Žádný pípnutí pro signalizaci kontinuity | Přerušený obvod nebo vysoký odpor. | Zkontrolujte obvod, zda v něm nejsou přerušené nebo zda se v něm nenacházejí body s vysokým odporem. |
| Overload indication ('OL') | Naměřená hodnota překračuje zvolený rozsah. | Select a higher range or ensure the input is within the multimeter's limits. |
8. Specifikace
Detailed technical specifications for the ULTRICS Digital Multimeter:
| Funkce | Specifikace |
|---|---|
| Číslo modelu | UT0021YB |
| Rozměry | 14.6 x 10 x 5 cm |
| Hmotnost položky | 240 g |
| Zdroj napájení | Battery Powered (9V battery included) |
| Max. Objemtage | 1000 voltů |
| Materiál | Plast |
| Speciální funkce | DC svtage Range, AC Voltage, Diode Check, Battery Check, Transistor HFE Check, Overload Protection on all ranges, Low Battery Voltage Indication, Data Hold Function, Removable Thick rubber casing, Fold-out stand |
| Certifikace | CE, UKCA |
9. Záruka a podpora
The ULTRICS Digital Multimeter comes with a 12-month warranty from the date of purchase. This warranty covers manufacturing defects and ensures reliable performance under normal use. For technical support, warranty claims, or any inquiries, please contact ULTRICS customer service through the retailer's platform or the official ULTRICS webwebu. Uschovejte si prosím doklad o koupi pro ověření záruky.