1. Úvod
Děkuji za nákupasing the Mastech MS8230B Digital Multimeter. This device is a compact, battery-operated, handheld digital multimeter designed for measuring DC and AC voltage, DC current, resistance, diode, and transistor (hFE) tests. It features a large LCD display for easy reading and is built to international safety standards.
Please read this instruction manual thoroughly before using the multimeter to ensure safe and proper operation. Keep this manual for future reference.
2. Bezpečnostní informace
This multimeter is designed according to IEC 1010-1 international safety standards for electronic measuring instruments. It complies with CAT III 600V and CAT II 1000V overvoltage categories. Always adhere to the following safety precautions:
- Never exceed the maximum input limits for any function.
- Do not use the meter if the case is damaged or open.
- Ujistěte se, že měřicí vodiče jsou v dobrém stavu a nemají poškozenou izolaci.
- Vždy vypněte napájení obvodu a vybijte všechny vysokonapěťové baterie.tage capacitors before measuring resistance, diodes, or hFE.
- Při práci s voltagnad 60 V DC nebo 30 V AC RMS, protože tyto prvky představují nebezpečí úrazu elektrickým proudem.
- Před změnou funkcí nebo rozsahů odpojte měřicí kabely od obvodu.
- Pro zajištění přesných údajů ihned vyměňte baterii, jakmile se zobrazí indikátor slabé baterie.
- Nepoužívejte měřič v prostředí s výbušnými plyny, parami nebo prachem.
3. Obsah balení
Verify that all items listed below are present and undamaged:
- Mastech MS8230B Digital Multimeter
- Test Leads (one pair)
- 9V baterie (předinstalovaná nebo dodávaná samostatně)
- Uživatelská příručka
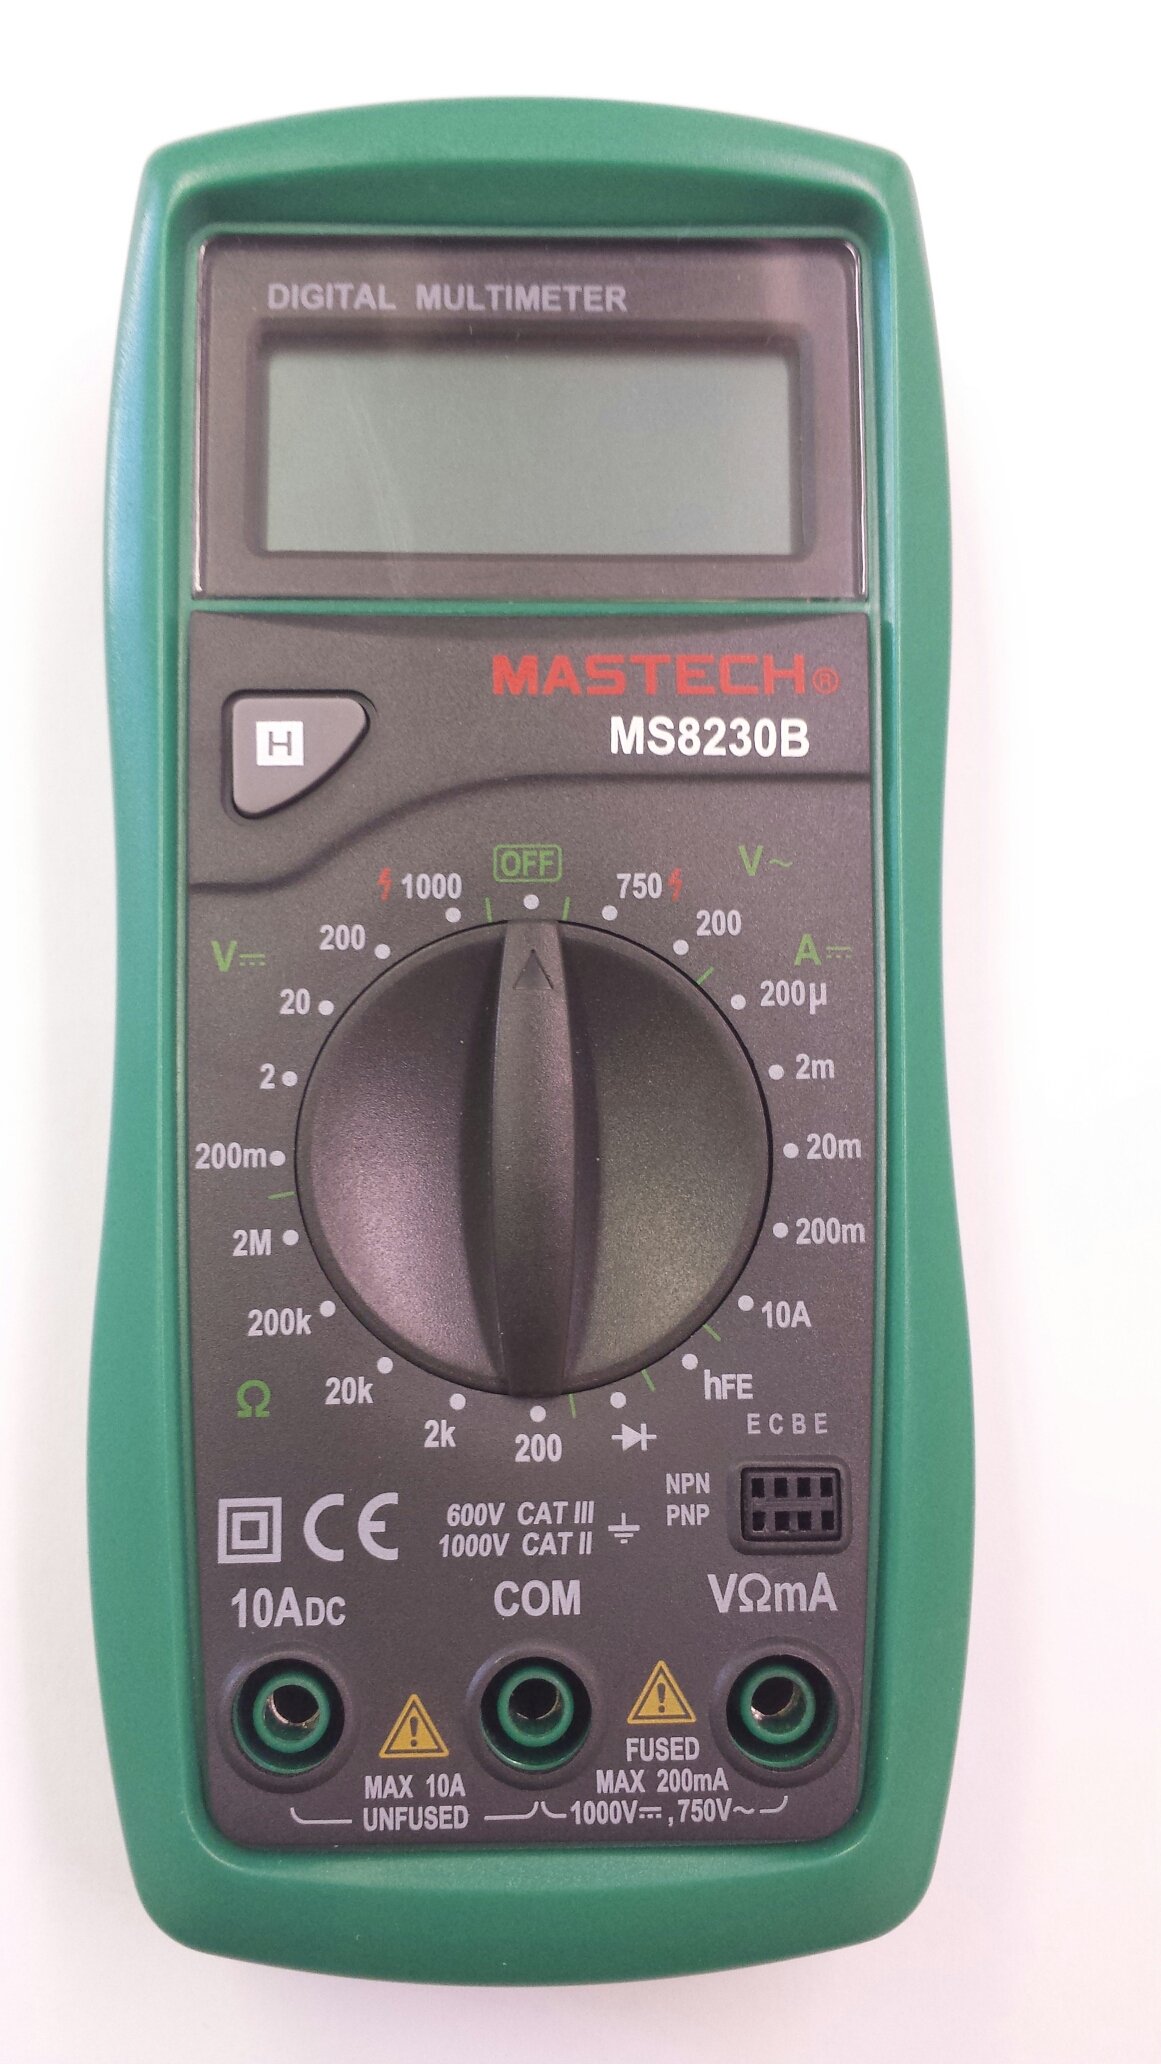
Image 1: Contents of the Mastech MS8230B package, including the multimeter, test leads, batteries, and user manual.
4. Nastavení
4.1 Instalace baterie
The MS8230B multimeter requires one 9V battery for operation. If the battery is not pre-installed or needs replacement:
- Ujistěte se, že je multimetr VYPNUTÝ a odpojte všechny měřicí kabely.
- Vyhledejte kryt přihrádky na baterie na zadní straně jednotky.
- Loosen the screw(s) on the battery cover and remove the cover.
- Connect the 9V battery to the battery connector, observing correct polarity.
- Vložte baterii do přihrádky a nasaďte kryt, který zajistíte šroubem (šrouby).
4.2 Připojení měřicích kabelů
Always connect the test leads correctly for the desired measurement:
- Zapojte červený měřicí vodič do zdířky „VΩmA“ pro měření hlasitosti.tage, resistance, and low current measurements.
- Insert the red test lead into the "10ADC" jack for high DC current measurements (up to 10A).
- Always insert the black test lead into the "COM" (common) jack.
5. Návod k obsluze
Before taking any measurement, ensure the test leads are correctly connected and the function switch is set to the appropriate range.
5.1 DC svtage měření (DCV)
- Připojte červený měřicí vodič do zdířky „VΩmA“ a černý měřicí vodič do zdířky „COM“.
- Set the rotary switch to the desired DCV range (e.g., 200mV, 2V, 20V, 200V, 1000V). If the voltagPokud je e neznámé, začněte s nejvyšším rozsahem a podle potřeby jej snižujte.
- Připojte měřicí vodiče k měřené součástce nebo obvodu.
- Přečtěte si svtage value on the LCD display. Observe the polarity indication.
5.2 AC svtage měření (ACV)
- Připojte červený měřicí vodič do zdířky „VΩmA“ a černý měřicí vodič do zdířky „COM“.
- Set the rotary switch to the desired ACV range (e.g., 200V, 750V). Start with the highest range if the voltage je neznámé.
- Připojte měřicí vodiče k měřené součástce nebo obvodu.
- Přečtěte si svtage hodnota na LCD displeji.
5.3 DC Current Measurement (DCA)
Pozor: Never attempt to measure current on a circuit with voltage present by connecting the meter in parallel. Always connect the meter in series with the load.
- Determine the expected current. For currents up to 200mA, connect the red lead to "VΩmA". For currents up to 10A, connect the red lead to "10ADC". The black lead always goes to "COM".
- Set the rotary switch to the appropriate DCA range (e.g., 200µA, 2mA, 20mA, 200mA, 10A).
- Turn off the power to the circuit. Open the circuit where the current is to be measured.
- Zapojte multimetr sériově s obvodem.
- Zapněte obvod a odečtěte hodnotu proudu na LCD displeji.
5.4 Měření odporu
Pozor: Ensure the circuit under test is completely de-energized and all capacitors are discharged before measuring resistance.
- Připojte červený měřicí vodič do zdířky „VΩmA“ a černý měřicí vodič do zdířky „COM“.
- Set the rotary switch to the desired Resistance (Ω) range (e.g., 200Ω, 2kΩ, 20kΩ, 200kΩ, 2MΩ).
- Připojte měřicí vodiče k měřené součástce.
- Odečtěte hodnotu odporu na LCD displeji.
5.5 Test diod
Pozor: Ensure the circuit under test is completely de-energized and all capacitors are discharged before performing a diode test.
- Připojte červený měřicí vodič do zdířky „VΩmA“ a černý měřicí vodič do zdířky „COM“.
- Nastavte otočný přepínač na symbol diody (→|).
- Connect the red test lead to the anode and the black test lead to the cathode of the diode. The display will show the forward voltagpokles napětí (obvykle 0.5 V až 0.8 V u křemíkových diod).
- Reverse the test leads. The display should show "OL" (Open Loop) for a good diode. A reading in both directions or "0" indicates a shorted diode.
5.6 Test tranzistoru hFE
Pozor: Ensure the transistor is not connected to a live circuit.
- Set the rotary switch to the "hFE" position.
- Určete, zda je tranzistor NPN nebo PNP.
- Insert the transistor's emitter, base, and collector leads into the corresponding holes in the hFE socket on the multimeter.
- Odečtěte hodnotu hFE (zesílení stejnosměrného proudu) na LCD displeji.
5.7 Funkce Data Hold
Press the "H" button to hold the current reading on the display. Press it again to release the hold function and resume live readings.
6. Údržba
6.1 Čištění
Otřete pouzdro reklamouamp cloth and mild detergent. Do not use abrasives or solvents. Keep the jacks free of dust and debris.
6.2 Výměna baterie
When the battery symbol appears on the LCD, the 9V battery needs to be replaced. Refer to section 4.1 for battery installation instructions.
6.3 Výměna pojistky
The multimeter is protected by a fuse. If the current measurement function stops working, the fuse may need replacement. This should only be performed by qualified personnel. The fuse specifications are typically printed near the fuse holder or in the specifications section.
7. Řešení problémů
Pokud multimetr nefunguje správně, zkontrolujte následující:
- Žádné zobrazení nebo slabé zobrazení: Zkontrolujte baterii. V případě potřeby ji vyměňte.
- Nesprávné hodnoty: Ensure the test leads are properly connected, the function switch is on the correct range, and the battery is not low.
- Zobrazuje se „OL“ (přetížení): Naměřená hodnota překračuje zvolený rozsah. Přepněte na vyšší rozsah.
- Měření proudu nefunguje: Zkontrolujte pojistku.
Pokud problémy přetrvávají, kontaktujte zákaznickou podporu.
8. Specifikace
The Mastech MS8230B Digital Multimeter offers the following technical specifications:

Image 2: Detailed specifications for the Mastech MS8230B Multimeter, including display, range, and accuracy.
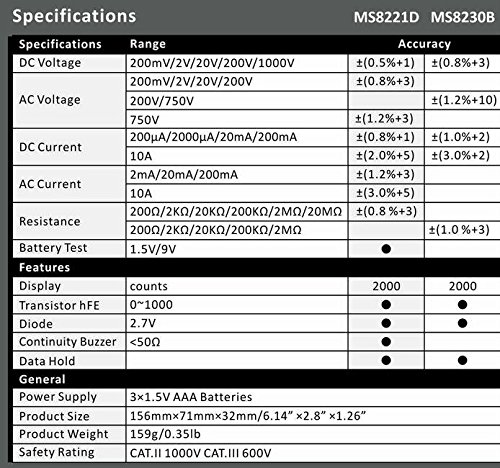
Image 3: Comparison table of specifications for Mastech MS8230B and MS8221D multimeters.
| Specifikace | Hodnota |
|---|---|
| Zobrazit | 1999 counts, 15mm digit height |
| DC svtage (DCV) | 200mV, 2V, 20V, 200V, 1000V (Accuracy: 0.5% to 0.8%) |
| AC svtage (ACV) | 200V, 750V (Accuracy: 1.2%) |
| DC proud (DCA) | 200µA, 2mA, 20mA, 200mA, 10A (Accuracy: 1.0% to 2.0%) |
| Odpor (Ω) | 200Ω, 2kΩ, 20kΩ, 200kΩ, 2MΩ (Accuracy: 0.8% to 1.0%) |
| Test diod | Vpřed svtage pokles |
| Test hFE tranzistoru | 1 až 1000 |
| Data Hold | Ano |
| Indikace slabé baterie | Ano |
| Ochrana proti přetížení | Ano |
| Zdroj napájení | 1x 9V baterie |
| Rozměry (D x Š x V) | 15.2 x 7.6 x 2.5 cm (přibližně 6 x 3 x 1 palce) |
| Hmotnost | Cca. 158.76 g (5.6 unce) |
| Hodnocení bezpečnosti | IEC 1010-1 CAT III 600V, CAT II 1000V |
| Provozní teplota | 0 °C až 40 °C (32 °F až 104 °F) |
| Skladovací teplota | -10 °C až 50 °C (14 °F až 122 °F) |
9. Záruka a podpora
Mastech products are designed for reliability and performance. For specific warranty details, please refer to the warranty card included with your product or contact your local Mastech distributor.
For technical support or service inquiries, please contact Mastech customer service through their official webwebu nebo kontaktních informací uvedených v dokumentaci k nákupu.