
1. Konec produktuview
The HP ProDisplay P17A is a 17-inch LED-backlit LCD monitor designed for general computing tasks. It features a 5:4 aspect ratio with a maximum resolution of 1280 x 1024 pixels, providing clear and consistent visuals. This monitor is equipped with both VGA and HDMI connectivity options, offering versatility for various system configurations. Its compact design and energy-efficient LED backlighting make it suitable for a range of environments.

Obrázek 1: Přední strana view of the HP ProDisplay P17A monitor, showcasinjeho displej a stojan.
2. Pokyny k nastavení
2.1 Vybalení monitoru
Opatrně vyjměte všechny součásti z obalu. Ujistěte se, že jsou přítomny následující položky:
- HP ProDisplay P17A Monitor
- Monitor Stand (base and neck)
- Napájecí kabel
- VGA Cable (may vary by region/package)
- Kabel HDMI (může se lišit v závislosti na regionu/balení)
2.2 Sestavení stojanu
- Položte monitor displejem dolů na měkký, čistý povrch, abyste zabránili poškrábání.
- Attach the stand neck to the back of the monitor, aligning the tabs and pushing until it clicks into place.
- Attach the stand base to the bottom of the stand neck, securing it with the captive screw if present.
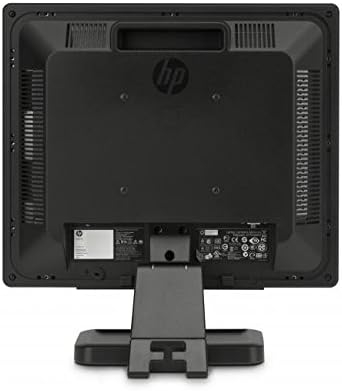
Obrázek 2: Zadní view of the monitor, illustrating the stand attachment point and various connectivity ports.
2.3 Propojovací kabely
- Připojení napájení: Připojte napájecí kabel k napájení monitoru a poté k uzemněné elektrické zásuvce.
- Připojení videa:
- For VGA: Connect one end of the VGA cable to the VGA port on the monitor and the other end to the VGA port on your computer. Tighten the screws on the VGA connector.
- Pro HDMI: Připojte jeden konec kabelu HDMI k portu HDMI na monitoru a druhý konec k portu HDMI na počítači.
- Ujistěte se, že jsou všechna připojení bezpečná.
3. Návod k obsluze
3.1 Zapnutí/vypnutí
Stisknutím tlačítka napájení na předním krytu monitoru jej zapnete nebo vypnete. Kontrolka napájení se rozsvítí, když je monitor zapnutý.
3.2 Adjusting Display Settings (OSD Menu)
The On-Screen Display (OSD) menu allows you to adjust various monitor settings. Use the buttons on the front bezel to navigate and select options.
- Tlačítko nabídky: Otevře nabídku OSD.
- Navigační tlačítka (+ / - or Up/Down): Move through menu options and adjust values.
- Tlačítko Vybrat/OK: Potvrzuje výběr nebo vstupuje do podnabídky.
- Tlačítko Konec: Ukončí aktuální nabídku nebo OSD.
Mezi běžná nastavitelná nastavení patří:
- Jas/kontrast: Upravuje celkový jas a rozdíl mezi světlými a tmavými oblastmi.
- Ovládání barev: Allows adjustment of color temperature, RGB levels, or preset color modes.
- Výběr vstupu: Manually switches between VGA and HDMI input sources.
- Ovládání obrazu: Adjusts sharpness, aspect ratio, and auto-adjustment for analog signals.
- Řízení: Power-saving options, OSD timeout, language selection.
4. Údržba
4.1 Čištění monitoru
- Před čištěním vždy vypněte monitor a odpojte napájecí kabel.
- Lehce používejte měkký hadřík, který nepouští vlákna dampvodou nebo neabrazivním čističem obrazovek.
- Nestříkejte čisticí prostředek přímo na obrazovku ani monitor.asing.
- Avoid using benzene, thinner, ammonia-based cleaners, or abrasive materials, as these can damage the surface.
4.2 Obecná péče
- Neumisťujte monitor na přímé sluneční světlo nebo do blízkosti zdrojů tepla.
- Zajistěte dostatečné větrání v okolí monitoru.
- Nezakrývejte ventilační otvory.
- Chraňte obrazovku před ostrými předměty nebo nadměrným tlakem.
5. Řešení problémů
Before contacting support, try the following basic troubleshooting steps:
5.1 Žádný obraz na obrazovce
- Ensure the monitor's power cable is securely connected to both the monitor and a working electrical outlet.
- Verify the power indicator light on the monitor is on. If not, press the power button.
- Check that the video cable (VGA or HDMI) is securely connected to both the monitor and the computer.
- Ensure the correct input source is selected on the monitor (use the OSD menu to switch inputs).
- Restartujte počítač.
5.2 Špatná kvalita obrazu
- Rozmazaný nebo neostrý obraz: Ujistěte se, že rozlišení displeje v počítači je nastaveno na nativní rozlišení monitoru (1280 x 1024).
- Nesprávné barvy: Adjust color settings through the OSD menu or your computer's display settings.
- Image Off-Center/Incorrect Size (VGA only): Use the "Auto Adjust" function in the OSD menu.
- Blikající: Check the refresh rate setting on your computer; ensure it is set to 60 Hz.
5.3 Monitor Not Responding to Buttons
- Odpojte napájecí kabel monitoru, počkejte 10 sekund, poté jej znovu zapojte a zkuste to znovu.
- Ujistěte se, že nejsou žádná tlačítka zaseknutá.
6. Technické specifikace
| Funkce | Specifikace |
|---|---|
| Značka | HEWLETT PACKARD |
| Název modelu | HP P17A |
| Číslo modelu | F4M97AAABA |
| Velikost obrazovky | 17 palce |
| Typ zobrazení | LED podsvícený LCD |
| Nativní rozlišení | 1280 x 1024 (SXGA) |
| Poměr stran | 5:4 |
| Kontrastní poměr | 1000:1 |
| Obnovovací frekvence | 60 Hz |
| Doba odezvy | 5 milisekund |
| Viewúhel | 170 stupňů |
| Konektivita | 1x VGA, 1x HDMI |
| Spotřeba energie | 25 W (maximálně) |
| Rozměry položky (D x Š x V) | 8.12"H x 14.85"Š x 15.24"V |
| Hmotnost položky | 8.2 libry |
| Typ montáže | Nástěnný držák (kompatibilní s VESA) |
| Další funkce | Anti Glare Screen |

Figure 3: Dimensions of the HP ProDisplay P17A monitor.
7. Záruka a podpora
7.1 Informace o záruce
This product is often sold as a refurbished item. Refurbished products typically come with a limited warranty provided by the refurbisher or seller. Please refer to your purchase documentation for specific warranty terms and conditions, including duration and coverage details.
7.2 Technická podpora
For technical assistance, troubleshooting beyond this manual, or warranty claims, please contact the vendor or HP customer support. Have your monitor's model number (F4M97AAABA) and serial number ready when contacting support.
You can find additional support resources, drivers, and documentation on the official HP support webmísto.