
1. Úvod
This manual provides instructions for the installation, operation, and maintenance of your Orbit 27954 Pocket Star 4-Station Plus Indoor Sprinkler Controller. This controller is designed to manage residential 24-volt sprinkler systems, offering dual programming capabilities and a rain delay feature.
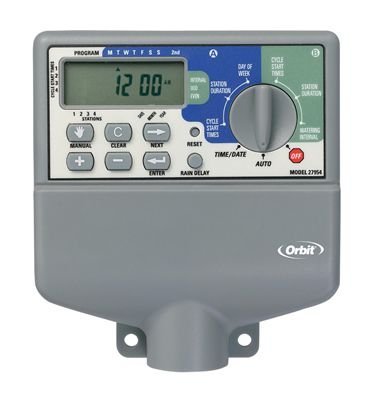
Image 1.1: The Orbit 27954 Pocket Star 4-Station Plus Indoor Sprinkler Controller. This image displays the front panel of the controller, featuring its digital display and control buttons.
2. Bezpečnostní informace
Please read all instructions carefully before installation and operation. Failure to follow these instructions may result in property damage or personal injury.
- This controller is designed for indoor use only. Do not install outdoors or in areas exposed to water.
- Před zahájením jakékoli kabeláže nebo údržby se ujistěte, že je odpojeno napájení.
- All electrical wiring should comply with local codes and regulations. If you are unsure, consult a qualified electrician.
- Nepokoušejte se jednotku opravovat sami. Veškerý servis svěřte kvalifikovanému personálu.
3. Nastavení
3.1 Vybalení
Carefully remove the controller from its packaging. Verify that all components are present. Retain packaging for future use or disposal.
3.2 Montáž regulátoru
- Choose a suitable indoor location near a standard 120V AC outlet and away from direct sunlight or extreme temperatures.
- Use the provided mounting template (if applicable) or mark the desired screw locations on the wall.
- Install mounting screws into the wall, leaving the screw heads slightly extended.
- Hang the controller onto the screws using the keyhole slots on the back of the unit.
- Secure the controller by tightening the screws.
3.3 Zapojení
Důležité: Před zapojením odpojte napájení.
- Připojení napájení: Plug the controller's power cord into a standard 120V AC outlet.
- Zapojení ventilu: Connect one wire from each sprinkler valve to a numbered terminal (1, 2, 3, 4) on the controller. Connect the common wire from all valves to the terminal labeled 'C' (Common).
- Sensor Wiring (Optional): If using a rain sensor, connect its wires to the designated sensor terminals. Refer to your sensor's manual for specific wiring instructions.
3.4 Počáteční zapnutí
Once all wiring is complete and secure, connect the power cord to the electrical outlet. The controller display should illuminate, indicating it is powered on.
4. Návod k obsluze
4.1 Vysvětlení displeje a tlačítek
The controller features a digital display and several buttons for navigation and programming. Familiarize yourself with the 'Program', 'Set', 'Arrow' (up/down), and 'Rain Delay' buttons.
4.2 Nastavení aktuálního času a data
- Press the 'Set' button repeatedly until 'Set Time' appears on the display.
- Use the 'Arrow' buttons to adjust the hour, then press 'Set' to move to minutes.
- Repeat for minutes, AM/PM, year, month, and day.
4.3 Programování zavlažovacích plánů
The controller supports dual programs (A and B) for flexible scheduling.
- Vyberte program: Press the 'Program' button to select Program A or B.
- Nastavit časy zahájení: Press 'Set' until 'Start Time' appears. Use 'Arrow' buttons to set the desired start time for the first cycle. The controller supports multiple start times per program.
- Nastavte doby běhu: Press 'Set' until 'Run Time' appears. Use 'Arrow' buttons to set the duration (in minutes) for each station (1-4).
- Nastavení dnů zavlažování: Press 'Set' until 'Watering Days' appears. Use 'Arrow' buttons to select specific days of the week, odd/even days, or interval watering.
4.4 Ruční provoz
Ruční zavlažování jedné nebo všech stanic:
- Press the 'Manual' button (if available, or follow specific manual run instructions in the display menu).
- Select the desired station or 'All Stations'.
- Set the run time using the 'Arrow' buttons.
- The selected station(s) will begin watering immediately.
4.5 Funkce zpoždění deště
The rain delay feature allows you to pause watering for a set period without losing your programmed schedule.
- Press the 'Rain Delay' button.
- Use the 'Arrow' buttons to select the delay duration (e.g., 24, 48, or 72 hours).
- The controller will pause watering for the selected period and resume the schedule automatically afterward.
5. Údržba
5.1 Čištění
Otřete vnější povrch ovladače měkkým hadříkemamp hadříkem. Nepoužívejte abrazivní čisticí prostředky ani rozpouštědla, protože by mohly poškodit displej neboasing.
5.2 Seasonal Considerations
As an indoor controller, the unit is not directly exposed to outdoor elements. However, ensure the indoor environment remains within recommended operating temperatures to prolong its lifespan.
6. Řešení problémů
| Problém | Možná příčina | Řešení |
|---|---|---|
| Displej ovladače je prázdný. | Žádná síla. | Check power outlet, ensure power cord is securely plugged in. Verify circuit breaker. |
| Zavlažovací postřikovače se nezapínají. | Incorrect programming, wiring issue, or rain sensor activated. | Verify watering schedule. Check valve wiring connections. Ensure rain sensor is not active or bypassed. |
| Only some sprinklers turn on. | Faulty valve, wiring issue to specific station. | Check wiring for the non-working station. Test the valve manually. |
| Zalévání probíhá v nesprávnou dobu. | Incorrect time/date setting or program schedule. | Verify current time and date. Review and adjust program start times and watering days. |
7. Specifikace
- Model: Orbit 27954 Pocket Star 4-Station Plus Indoor Controller
- Značka: Obíhat
- Číslo dílu: 27954
- Počet stanic: 4
- svtage: 24 voltů (AC)
- Vstup lidského rozhraní: Tlačítka
- Potřebné baterie: Žádný
- Instalace: Krytý
- Vlastnosti: Dual program, Rain delay
- Rozměry balení: 21.84 x 13.46 x 6.6 cm
- Hmotnost: 226.8 g
8. Záruka a podpora
For warranty information or technical support, please refer to the official Orbit webnebo kontaktujte jejich zákaznický servis. Uschovejte si účtenku jako doklad o koupi.