1. Úvod
This manual provides detailed instructions for the installation, operation, and maintenance of your AZZA Solano 1000R CSAZ-1000R Full Tower Computer Case. Please read this manual thoroughly before beginning installation to ensure proper setup and to maximize the performance and longevity of your system components.
2. Vlastnosti produktu
- Optimized Thermal Management: Features multiple fans for superior cooling, including a 230mm top fan, a 230mm side fan, two 140mm front fans, and a 120mm rear fan.
- Bottom-Mounted Power Supply: Designed for improved thermal separation and stability, allowing installation facing up or down.
- Advanced Cable Management: Pre-drilled motherboard tray and ample space behind for organized cable routing, enhancing airflow and aesthetics.
- Tool-Less Design: Thumb screws for easy installation of optical drives and hard disk drives.
- Pohodlné přední I/O: USB and audio ports, along with an eSATA port, located on the top panel for easy access.
- Prostorný interiér: Full tower design accommodates large components, including extended graphics cards and tall CPU coolers.
- Estetický design: Black exterior with a vibrant red painted interior and red LED fans.
3. Obsah balení
Prosím, ověřte, zda jsou v balení přítomny všechny položky:
- AZZA Solano 1000R CSAZ-1000R Full Tower Case
- Krabice s příslušenstvím (obsahuje šrouby, distanční sloupky, stahovací pásky atd.)
- Uživatelská příručka (tento dokument)
4. Komponenta přesview
4.1 Externí Views
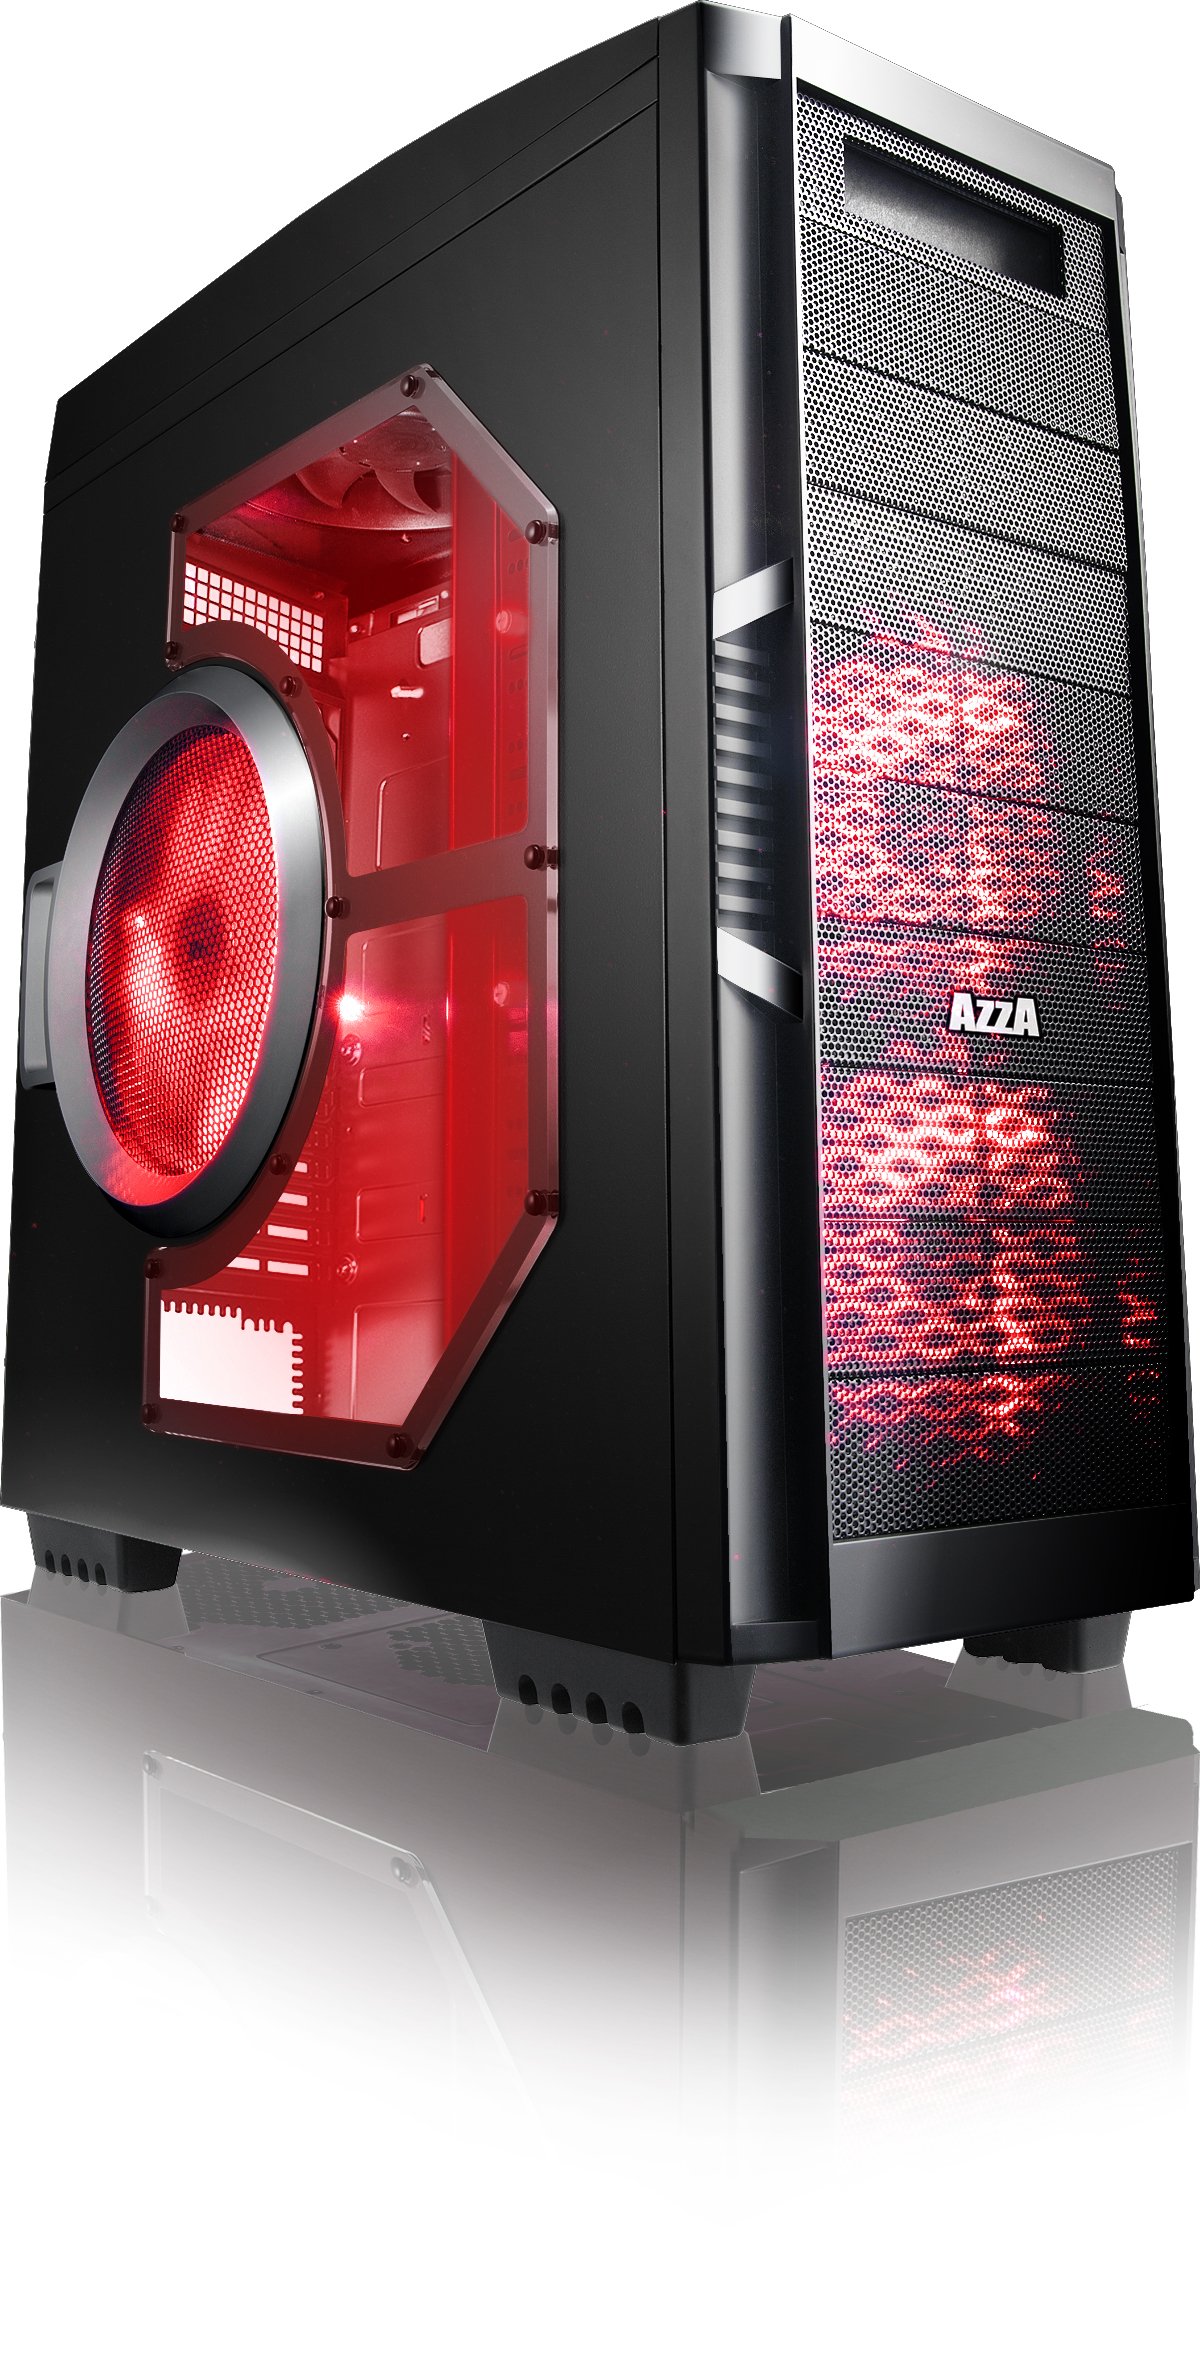
Obrázek 4.1: Přední strana view of the AZZA Solano 1000R case, showcasing the red LED fans on the front and side panel.

Obrázek 4.2: Přední strana view of the AZZA Solano 1000R case, highlighting the two 140mm red LED intake fans behind the mesh panel.

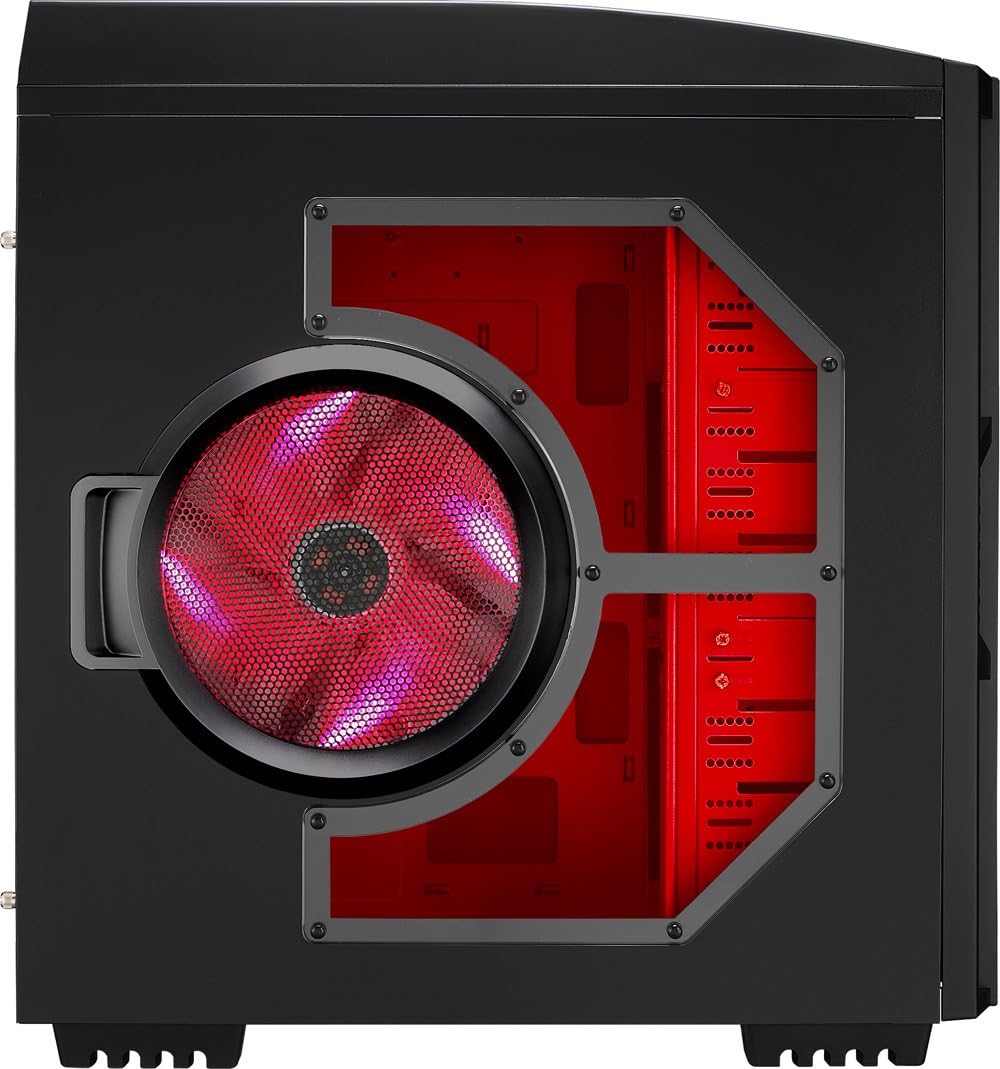
Obrázek 4.3: Strana view of the AZZA Solano 1000R case, showing the large 230mm red LED side panel fan and the transparent window.

Figure 4.4: Top-front angled view of the AZZA Solano 1000R case, showing the top ventilation grille, front I/O panel with USB and audio ports, and power button.
Obrázek 4.5: Zadní strana view of the AZZA Solano 1000R case, displaying the red interior, rear exhaust fan, and expansion slots.
4.2 Interní Views

Obrázek 4.6: Interiér view of the AZZA Solano 1000R case with the left side panel removed, revealing the red painted motherboard tray, drive bays, and cable routing cutouts.

Obrázek 4.7: Úhlový interiér view of the AZZA Solano 1000R case, focusing on the multiple 5.25" and 3.5" drive bays.

Obrázek 4.8: Úhlový interiér view of the AZZA Solano 1000R case, showing the rear 120mm exhaust fan, expansion slots, and the extensive drive bay structure.

Obrázek 4.9: Interiér view of the AZZA Solano 1000R case with the right side panel removed, showing the space behind the motherboard tray for cable management.
5. Instalační příručka
Před zahájením instalace se ujistěte, že je vaše pracovní místo čisté a bez statické elektřiny. Doporučuje se nosit antistatický náramek.
5.1 Příprava případu
- Umístěte pouzdro na rovný a stabilní povrch.
- Odstraňte boční panely odšroubováním šroubů s křídlovou hlavou na zadní straně skříně a posunutím panelů dozadu.
5.2 Instalace základní desky
- Nainstalujte kryt I/O dodaný se základní deskou do otvoru v zadní části skříně.
- Align the motherboard with the pre-installed standoffs. If necessary, install additional standoffs according to your motherboard's form factor.
- Carefully place the motherboard onto the standoffs, ensuring the I/O ports align with the shield.
- Zajistěte základní desku příslušnými šrouby z krabice s příslušenstvím.
5.3 Instalace napájecího zdroje
- Position the power supply unit (PSU) in the bottom-rear compartment of the case. You can orient it with the fan facing up or down, depending on your cooling preference and PSU design.
- Secure the PSU to the case using the screws provided with your power supply.
5.4 Instalace úložného disku (HDD/SSD)
- For 3.5" HDDs, slide the drive into an available drive bay until it clicks into place. Use the provided thumb screws for additional security if desired.
- For 2.5" SSDs, an adapter bracket (not included) may be required to fit into the 3.5" bays. Secure the SSD to the adapter, then install the adapter into a 3.5" bay.
- Connect the SATA data and power cables to your installed drives.
5.5 Optical Drive Installation
- Remove the desired 5.25" front bay cover from the case.
- Slide the optical drive into the bay from the front until it aligns with the screw holes.
- Secure the optical drive using the provided thumb screws.
- Connect the SATA data and power cables to the optical drive.
5.6 Instalace rozšiřující karty
- Odstraňte potřebné kryty rozšiřujících slotů na zadní straně skříně.
- Insert your graphics card or other expansion card into the appropriate PCIe/PCI slot on your motherboard.
- Secure the card with the provided screw or tool-less latch mechanism.
5.7 Správa kabelů
Utilize the cutouts and space behind the motherboard tray to route and organize your cables. This improves airflow and gives your build a cleaner appearance. Use cable ties from the accessory box to bundle cables.
5.8 Připojení I/O na předním panelu
Connect the front panel cables (USB, Audio, Power Switch, Reset Switch, Power LED, HDD LED) to the corresponding headers on your motherboard. Refer to your motherboard manual for exact header locations.
6. Provoz
6.1 Zapnutí/vypnutí
Press the power button located on the top panel to turn your system on or off. A power LED will illuminate when the system is active.
6.2 Ovládání ventilátoru
The case features a fan speed control switch (L/M/H) at the rear, primarily for the top, side, and rear fans. Adjust this switch to balance cooling performance and noise levels according to your preference.
7. Údržba
7.1 Čištění
Pravidelné čištění pomáhá udržovat optimální proudění vzduchu a životnost součástí.
- Vnější: Vnější povrchy otřete měkkým, damp tkanina. Vyhněte se abrazivním čisticím prostředkům.
- Prachové filtry: The case includes mesh filters at the bottom. Periodically remove and clean these filters to prevent dust buildup.
- Interiér: Use compressed air to remove dust from inside the case, especially from fans and heatsinks. Ensure the system is powered off and unplugged before cleaning the interior.
8. Řešení problémů
- Systém se nezapíná: Ujistěte se, že všechny napájecí kabely (24pinový ATX, 8pinový CPU, napájení GPU) jsou bezpečně připojeny. Ověřte, zda je přepínač zdroje v poloze „ON“. Zkontrolujte připojení přepínače napájení na předním panelu k základní desce.
- Ventilátory se netočí: Check fan power connections to the motherboard or fan controller. Ensure the fan speed switch is not set to 'Off' or 'Low' if fans are not spinning at all.
- Side Panel Not Closing: If a large CPU cooler or tall components prevent the side panel from closing, especially due to the side fan, consider relocating the side fan to the exterior of the panel if possible, or ensure your cooler fits within the case's clearance specifications.
- Cable Management Difficulty: If the rear panel bulges due to thick cables, try rerouting cables more efficiently or using flatter cables where possible.
9. Specifikace
| Funkce | Detail |
|---|---|
| Číslo modelu | CSAZ-1000R |
| Typ pouzdra | Plná věž |
| Barva | Černá/červená |
| Rozměry produktu (D x Š x V) | 19.7 x 8.1 x 21.5 palce (500 x 206 x 546 mm) |
| Hmotnost položky | 24 libry (10.89 kg) |
| Způsob chlazení | Vzduch |
| Typ montáže napájecího zdroje | Spodní montáž |
| Celkový počet portů USB | 2 (USB 2.0) + 1 (eSATA) |
| Hard Disk Form Factor Support | 3.5 palce |
| Zahrnuté ventilátory | 2x 230mm (Top, Side), 2x 140mm (Front), 1x 120mm (Rear) |
10. Záruka a podpora
For warranty information and technical support, please refer to the official AZZA webnebo se obraťte na místního prodejce. Uschovejte si doklad o koupi pro případ reklamace.